Modifying Installation Scripts Using Script Editor
As we've seen, we can use SMS Installer's graphical menus and attribute settings to configure our installation scripts to suit our specific needs. Under different circumstances, however, these tools may not give us all of the control needed to fully customize our SMS Installer-generated script file. Likewise, specific situations may arise in which it is more efficient or just faster and easier to use a scripting method to make changes.
It really doesn't matter how we go about creating our scripted installation. Remember, we can generate our initial script using either the Repackage Installation Wizard or the Watch Application Wizard. These two methods are probably preferred, as they give us a good basic script that we can customize using the Script Editor utility. Or we can open the Script Editor window to modify an existing script or even begin scripting from scratch. In this section, we'll explore Script Editor variables and actions and then look at how to modify installation scripts using Script Editor.
Script Editor Variables and Actions
The Script Editor provided by SMS Installer is a powerful scripting utility. It provides a vast array of variables and actions (SMS Installer commands) that let you optimize the script files used by the installation process. Script variables contain information about the installation being performed. We can use these variables to hold the information gathered from users about where to place files. Script variables can also be used to hold information about which files users want to install. Additionally, a number of predefined variables contain information about the target computer system on which you are installing software.
Before we look at how to make modifications to a script using Script Editor, let's review some common scripting variables and actions. The following tables are not intended as a comprehensive list of all the available variables and actions, but rather as a short list of those more commonly used.
![]()
MORE INFO
Refer to the Systems Management Server Administrator's Guide for a comprehensive list of scripting variables and actions.
Table 13-1 lists several predefined variables and the values they are designed to return.
Table 13-1. Predefined variables
| Variable | Returns |
|---|---|
| WIN | The path of the Windows directory—for example, C:\Windows. |
| SYS32 | The system directory for Win32 files under Windows NT—for example, C:\Winnt\System32. |
| TEMP | The path of the temporary directory on the reference computer. This directory is often used by an application to store DLLs before referencing them. |
| CMDLINE | The command-line options that are passed to the SMS Installer-generated file. |
| PASSWORD | The installation password assigned to a password-protected installation. |
As we write our script, we can have SMS assign values to existing variables or generate additional variables to perform functions or hold values. During the installation, we can create the variables SMS uses to perform various functions. For example, we can define the values for the four variables listed in Table 13-2 as part of the installation script or have SMS prompt for the values during execution of the installation script. These variables are frequently used by SMS—note especially the DOBACKUP variable, which is used to support the SMS Installer rollback feature.
Table 13-2. Functional variables
| Variable | Function |
|---|---|
| BACKUPDIR | Defines where the backup files should be located. |
| DOBACKUP | Enables the performance of a backup of all files replaced during an installation. |
| HELPFILE | Identifies the help file to be read and displayed during installation when the user clicks Help. |
| RESTART | Causes the system to be restarted when the script terminates. This variable is generally set automatically. |
Defining Variables
As mentioned, you can also define your own variables in the script. You can use the Set Variable action or the Prompt For Text action from Script Editor. To create variables, follow these steps:
- In the Installation Expert window, choose Script Editor from the View menu to display the Script Editor window, shown in Figure 13-32.
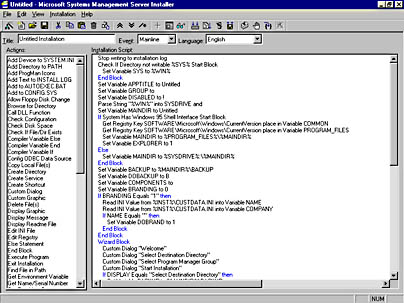
Figure 13-32. The Script Editor window.
![]()
NOTE
If you previously closed SMS Installer from the Script Editor window, when you next open SMS Installer, Script Editor will appear with the Installation Script pane blank. If you open SMS Installer in the Installation Expert window, it loads a default script, which is displayed in the Installation Script screen when you switch to Script Editor.
- In the Actions list, double-click on the Set Variable action to display the Set Variable dialog box, shown in Figure 13-33.
- Enter the name of the variable you want to create. Variable names must always begin with a letter, must be no longer than 14 characters, and must contain no special characters except underscores.
- In the New Value text box, enter the value you want to set the variable to.
- Select an operation that you want performed on the new value from the Operation drop-down list, if required. Operations include incrementing or decrementing a numeric value by 1, removing trailing backslashes, converting a value to all uppercase or lowercase, converting the path and filename to a short or long filename, or simply performing no action—the default.

Figure 13-33. The Set Variable dialog box.
![]()
MORE INFO
Refer to the SMS Installer 2.0 help for examples of how to use the different operations.
- Three check boxes appear at the bottom of the Set Variable dialog box: Append To Existing Value, Remove Filename, and Read Variable From Values File. If the variable you entered is a counter and you choose to increment or decrement its value, select the Append To Existing Value check box. You can also use this option to append a string value to the current string value. If you want to remove the filename from a value that has a full path, select the Remove Filename check box. If you want SMS Installer to read the variable's value from a file, select the Read Variable From Values File select box. Selecting this option will cause the entered value to be ignored, so select this option only if you are running your script from the command line.
- Click OK to close the Set Variable dialog box.
To create a variable named APPDIR, for example, in which you set the location of the application's working directory, enter APPDIR as the variable name and an appropriate path such as C:\WorkDir as the value. When you need to invoke this value in your script, reference the variable's value by enclosing the variable name in percent signs. To create a BACKUP directory for rollback that is a subdirectory of the path you entered for APPDIR, your script line would look like this:
Set Variable BACKUP to %APPDIR%\BACKUP
Set Variable is just one of the SMS Installer Script Editor actions. In the next section, we'll look at the more common Script Editor actions.
Common Script Editor Actions
The Script Editor window, shown in Figure 13-32, contains a list of SMS Installer Script Editor actions that the installation script can perform. In this section, we'll look at some of the more common actions and their functions. Table 13-3 lists these actions.
Table 13-3. SMS Installer Script Editor actions
| Action | Description |
|---|---|
| Add to AUTOEXEC.BAT | Adds or replaces commands and environment variables in the Autoexec.bat file other than the PATH command. |
| Add to CONFIG.SYS | Adds device driver and other statements to the Config.sys file. |
| Call DLL Function | Calls specific Win16 and Win32 DLLs. |
| Check Disk Space | Performs a check of disk space to verify that there is enough space to complete the installation. |
| Check If File/Dir Exists | Checks whether a specified file or directory exists on the target computer. |
| Create Directory | Creates a new directory on the target computer. |
| Create Service | Creates a service on a target Windows NT computer. |
| Delete Files | Deletes specified files and directories from the target computer. |
| Edit Registry | Creates or deletes new keys and values in the registry on Windows 95, Windows 98, Windows NT, and Windows 2000 computers. |
| Else Statement | Inserts a logical ELSE statement into the script. |
| Execute Program | Calls an executable to run outside the actual scripted installation. |
| Exit Installation | Terminates and exits the installation. |
| If/While Statement | Inserts IF/WHILE logic into the script. |
| Install Files | Finds the source files used during installation and compresses them into the installer executable file. These files are uncompressed on the target computer when the script is run. |
| Prompt For Text | Generates a dialog box to prompt the user for text input such as a filename or directory path. |
| Remark | Adds comments to the script. |
| Rename File/Directory | Finds and renames a file or directory on the target computer. |
| Set Variable | Creates or modifies a script variable. |
As you can see, variables and actions can be set in your script. You can find more details about these options in the Systems Management Server Administrator's Guide and in the SMS Installer help file accessible through the SMS Installer interface. Don't expect to become proficient at scripting in a couple of hours or even a couple of days. We're talking about a development language here, and that takes time to learn and appreciate. But with a little perseverance you will become proficient at using many of these options.
Modifying the Script
Now let's take a look at how to make some simple modifications to our script using Script Editor. To do so, follow these steps:
- In the Installation Expert window, choose Script Editor from the View menu to display the Script Editor window, shown in Figure 13-32.
- Choose Open from the File menu to display the Open dialog box, shown in Figure 13-34, and then select a script (.IPF) file to open for editing. For this example, we will use the Office 97 script we created earlier. Click Open to open the script for editing.
- Next we will edit the variable that specifies the installation directory the program will use. In this example, we are installing to the Microsoft Office 97 directory. We will change this to Office97.
- Choose Edit Script Item from the Installation menu or double-click on the Set Variable statement containing "Maindir" to display the Set Variable dialog box, shown in Figure 13-36. In the New Value text box, enter Office97, and then click OK. The variable setting is modified in the Installation Script pane of the Script Editor window.
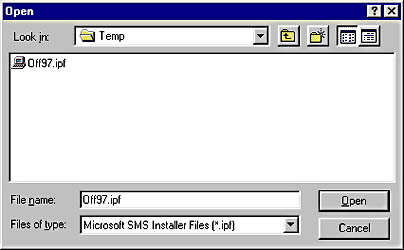
Figure 13-34. The Open dialog box.
Choose Find from the Edit menu to display the Find Text In Installation Script dialog box, shown in Figure 13-35. Enter Maindir in the Find What text box, and then click Find Next. The first instance of a script line containing "Maindir" is selected. This is the variable setting for the directory location of the Office installation we want to modify. Click Close to close the dialog box.
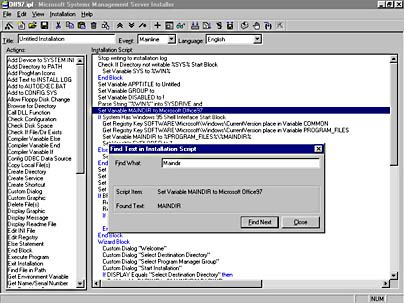
Figure 13-35. The Find Text In Installation Script dialog box.
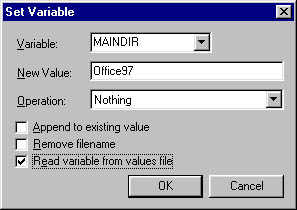
Figure 13-36. The Set Variable dialog box.
Any additional script modifications would be accomplished in much the same manner. After we have completed our editing of the script, we are ready to test and compile the installation script file. This will give us the SMS Installer-generated executable file.
![]()
REAL WORLD Sample ScriptOccasionally, you may encounter a situation in which you do not want to install an application or run the installation script if certain elements are not in place on the target computer. For example, you might want to verify that there is enough disk space available before proceeding or that a particular program file exists. This example uses a file to indicate whether a computer should execute the installation script. This is a simple text file that you create and copy to all the computers that should not execute the script. If the file is found on the computer, the script will be terminated. If the file is not found, the script will continue.
The sample SMS Installer script routine shown in Figure 13-37 demonstrates how to test for the existence of a file and can be incorporated into larger scripts. It provides a basic structure that can be easily modified to meet other needs.

Figure 13-37. Sample SMS Installer script designed to find a file and perform an action.
This script is designed to look for a specific file identified in the script as Findfile.txt using the Search For File action. In the Actions list, double-click on Search For File to display the Search For File Settings dialog box, shown in Figure 13-38.
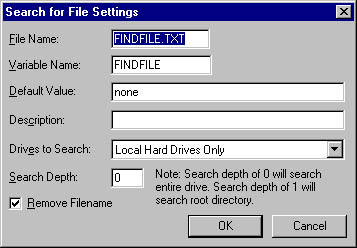
Figure 13-38. The Search For File Settings dialog box.
In the Search For File Settings dialog box, specify the file and path to search for and whether to search all local drives, all network drives, or both. The path that is searched is determined by the Search Depth value. A value of 0 indicates that the entire drive will be searched. A value of 1 indicates that the root drive will be searched. Values of 2, 3, and higher indicate that the first directory level, second directory level, and so on will be searched. In this example, we will search all local drives.
Select the Remove Filename check box. If the file is found, the file and its path will be stored in the variable FINDFILE. This option will remove the file entry and keep just the path, which can be useful if you are trying to capture a specific path or need to rename a file, as we do in this script.
The script begins by using Set Variable to define a variable named FINDFILE. This variable is set to a default value of None to indicate that no file has been found. The Search For File action looks for the file on all local drives on the target computer. If the file is found, the file and its full path are placed in FINDFILE, and the value of FINDFILE is no longer None. Simple IF/THEN logic tests to determine whether FINDFILE is still None. If it is not, the file has been found, and we will rename it Findfile.old. If the file has not been found, we simply continue on with the rest of the script. The script also includes display messages for debugging purposes to alert us when the file has been found. These messages can be removed after the existence of the file has been tested.
This basic script routine can be easily modified to perform any number of actions or tasks—for example, deleting the file, moving the file to a new location, or creating a new file with the same name as an existing file if that file is not found.
EAN: 2147483647
Pages: 167