Two Methods of Building a Title
| [ LiB ] |
Two Methods of Building a Title
When Boris FX is installed on your computer, you have two methods of working with a title. You can create the title in Avid Xpress Pro and simply use Boris FX to apply an effect or filter to the title or you can create the title right in Boris FX.
Using Avid's Title Tool
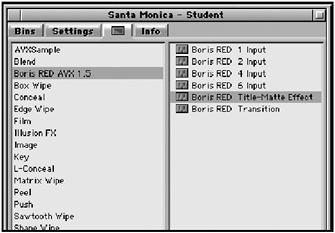
If you create a title using Avid's Title tool, first edit the title into your sequence. From the Effect Palette, apply the Boris Red Title-Matte effect to the title (see Figure B.1). This effect is needed to open the title in Boris FX.
Figure Figure B.1. From the Effect Palette, you'll see several types of Boris FX effects. The Boris Red Title-Matte can be applied to a title.
NOTE
![]() CAUTION
CAUTION
Adding the Boris Red Title-Matte effect to a title is a destructive process that replaces the matte key of the Avid title. To return the title to an Avid title, use the Undo command, not the Remove Effect command.
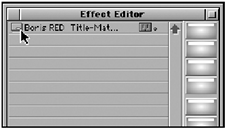
After the effect is applied, open the title in the Effect Editor. You'll notice that there are no adjustments available in the Effect Editor. That's okay because all the adjustments will be made using Boris FX. In the upper-left corner of the Effect Editor, click on the More Options button (see Figure B.2).
Figure Figure B.2. Click on the More Options button to open Boris FX.
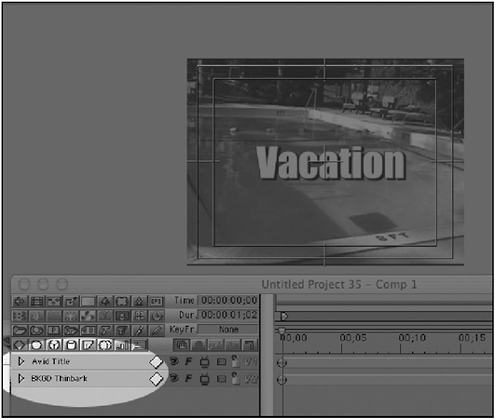
Once you click this button, the Boris FX interface will open. The tracks inside of Boris FX's Timeline will contain the title you created and any other tracks from the Avid Xpress Pro's Timeline (see Figure B.3).
Figure Figure B.3. In the Boris Timeline, the graphic you created is on its own track.
All of the options, including all of Boris FXs great filters, are available to you to use on the title track. You can also apply keyframes, rotate the image, add a shadow, and so on. Basically anything you can do in Boris FX can now be applied to your title. Once you are done working with the title, simply click on the Apply button at the bottom of the Timeline in Boris FX. You'll return to the Avid Xpress Pro interface (see Figure B.4). To preview the finished results, you'll need to render the effect.
Figure Figure B.4. If you're happy with what you create in Boris FX, simply click on the Apply button to return to Avid Xpress Pro.

Using Boris FX to Create Your Title
If you want to take your titles to the next level, simply create your titles in Boris FX instead of Avid Xpress Pro. Boris FX titles have several advantages over the titles you create in Avid Xpress Pro. Two huge advantages are that Boris FX allows you to create 3D titles and vector-based titles. Vector-based titles can be transformed to any size without any problems. The titles you create in Avid Xpress Pro are pixel-based. If you decide to increase their size, you'll start to see the graphic pixelate as it increases (see Figure B.5).
Figure Figure B.5. This title has been increased to twice its original size. Notice the edges are starting to deteriorate.

To create a title using Boris FX, follow these steps:
-
You'll need to add a Boris FX effect to the clip in the Timeline you want to build the title over. This effect is used simply to transfer your Timeline from Avid Xpress Pro to Boris FX.
-
Open the Boris FX effect in the Effect Editor and click on the More Options button to transfer over to Boris FX.
-
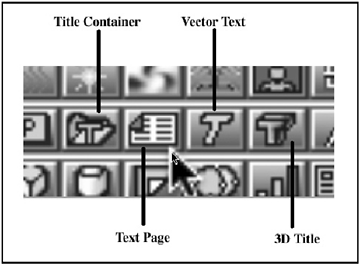
After your Timeline is displayed in the Boris FX interface, you have four types of titles you can create. The four options are Add Title Container, Add Text Page, Add Vector Text, and Add Extruded 3D Text (see Figure B.7).
NOTE
 TIP
TIP If you don't want the title to be displayed on-screen with the same duration of the clip in the Timeline, use some Add Edits before you apply the effect to the clip. This will cut down your rendering time in Avid Xpress Pro (see Figure B.6).
-
If you click on any of these icons, with the exception of the Title Container, the Text window will open and a new track will appear in the Timeline.
Figure Figure B.6. By using Add Edits, this clip is sub-divided before the effect is applied.
Figure Figure B.7. These four icons are used to add text in Boris FX.
-
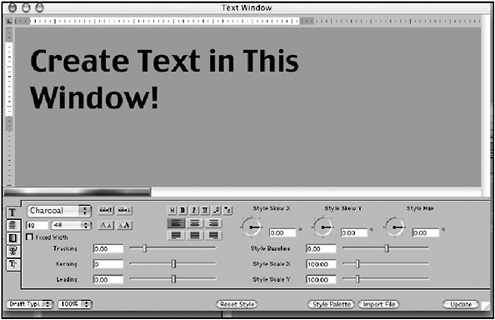
In the Text window, you can create your text, add a shadow, change a font, and add an outline. You can even add a slight slant or skew to your text. Basically, all of Boris FX title capabilities are available to you (see Figure B.8).
Figure Figure B.8. This is the Text window in Boris FX.
-
After you create, animate, and edit the title, click on the Apply button at the bottom of the Timeline in Boris FX to return to Avid Xpress Pro's editing interface.
Using the Title Container
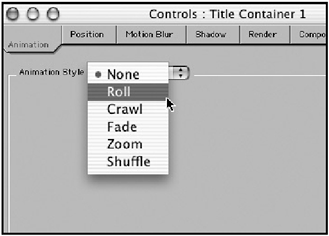
The Title Container in Boris FX allows you to animate your text. Your options are Roll, Crawl, Fade, Zoom, and Shuffle. These are preset animations. Boris FX calls this type of text a container due to the fact that your text tracks will be contained inside of the Title Container. When you add a Title Container, a new track will be added and you have to decide which type of effect you want to add. Your choices appear in the Controls window (see Figure B.9).
Figure Figure B.9. From this pull-down menu, you can decide how the Title Container will animate.
To create the final effect, you need to add a text track inside the container. Highlight the Title Container track and choose Add Text Page, Add Vector Text, or Add Extruded 3D Text. You're adding another track inside the container, which will be part of the container effect (see Figure B.10).
Figure Figure B.10. You can add text tracks inside of the Title Container.

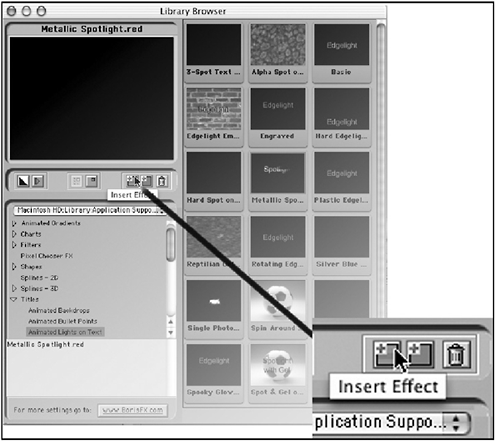
Using Boris FX Library Browser
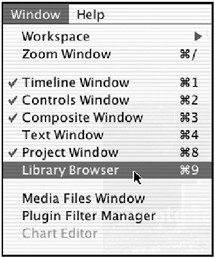
One of the greatest features of Boris FX is its Library Browser. The Library Browser contains a number of preset effects and keyframes that you can apply to a track in the Timeline. In the Title Category, you find all kinds of options. To use any of the Title effects in Boris Effects Library Browser, open the Browser through the Window menu (see Figure B.11).
Figure Figure B.11. The Library Browser is opened through the Window menu.
Once the Browser is open, you can select the category of effect you're looking for and click on the Insert Effect button to add to your title track (see Figure B.12).
Figure Figure B.12. This is the Library Browser and the button that adds the effect to your track in the Timeline.
NOTE
TIP
I occasionally use the Library Browser simply to learn how an effect is built. Apply the effect and examine how the keyframes and settings are applied in the Timeline.
Bottom line: Take the time to learn Boris FX. Your titles will certainly improve!
| [ LiB ] |