Media-Management Tips
| [ LiB ] |
Media-Management Tips
One of the most important areas of Avid Xpress Pro system is media management. It's imperative that you understand how to move, add, and delete media. After you have these general concepts down, you can benefit from the following tips.
Tip 16: Work with Site Settings
Using Site settings is definitely a management issue. Site settings are different than User and Project settings. Only the computer administrator should adjust the Site settings. If you're the only person who is working on your version of Avid Xpress Pro, that person is you.
Site settings allow you to determine a global setting for all new users and projects. For example, maybe you want all new sequences to start at a certain timecode number. You can change the starting timecode in the General settings and save the setting as a Site setting. Then, whenever a new project begins or a user logs in, the new starting timecode is applied to any sequences. These settings override any User or Project settings.
To make a setting a Site setting, follow these steps:
-
In the Project window, click on the Settings tab.
-
From the File menu, choose Open Setting File.
-
You'll need to navigate to the folder that contains Avid Xpress Pro and find the Settings folder. Open the Site settings within that folder.
-
The Site Settings window will open (see Figure 16.28).
Figure 16.28. You can drag and drop settings into this window.
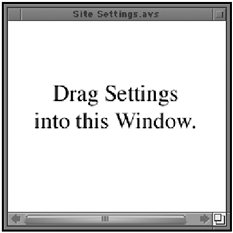
Any settings you drag and drop from the Project window into this window become Site settings. Some good examples for Site settings are deck configurations and general settings.
Tip 17: Calculate the Total Duration of Clips Offline
Here's a simple tip that can answer that annoying question: How long will it take to capture all those logged clips? You can open the duration column in the bin and add all the duration times or you can simply use this tip. Select all the clips you want to calculate. If all the clips are offline, simply press Command+A (Macintosh) or Ctrl+A (Windows) to select all the items in the bin. After the clips are highlighted, choose Get Bin Info from the File menu. This command will open the Console window and display how many clips have been identified and show the total duration for all the clips to be captured (see Figure 16.29).
Figure 16.29. The Console window displays the total duration of all the clips highlighted.

NOTE
 TIP
TIP
The Console window is a great tool to use if you need to identify your system ID number or your dongle number, which is the number on the key that needs to be inserted into one of the USB hubs to run Avid Xpress Pro legally. Simply choose Console from the Tools menu. Your system ID number, the dongle ID number, and your Avid Xpress Pro options will all be displayed in the Console window at the top. You'll need this information if you ever call Avid for help.
Tip 18: Quickly Identify a Clip's Source Tape
When you're working with clips offline, Avid Xpress Pro provides a shortcut for identifying a clip's tape name . Of course, you can open the Headings menu and choose Tape as one of your bin columns , but there is a quicker method when you're already in the Capture mode. Simply drag and drop your clip into logging portion of the Capture tool (see Figure 16.30).
Figure 16.30. Drag a clip into this portion of the Capture tool.
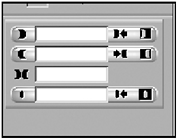
A dialog box will open indicating which tape is needed to capture the clip (see Figure 16.31). The IN and OUT points of the clip are also displayed. By the way, your clip doesn't have to be offline for this feature to work.
Figure 16.31. This dialog box will indicate which tape the clip came from.

Tip 19: Delete Unwanted Tracks From Clips
Okay, here's the scenario. If it hasn't happened to you yet, it will. Let's say you tried to capture an extremely long voiceover and, as you captured the audio-only clip, you left the video track selection on in the Capture tool. The results are an extremely long audio clip with video attached to it. Audio media files take up very little hard drive space; however, video media files can gobble up a substantial amount of hard drive space. Instead of re-capturing the entire clip, wouldn't it be nice to strip off just the video track of the clip? Well, you can.
To remove a single track from a clip, follow these steps:
-
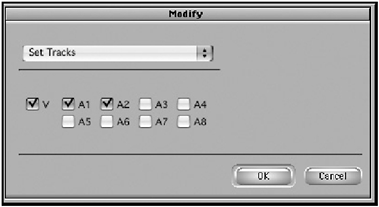
If the clip has yet to be captured, simply select the clip and choose Modify from the Clip menu. Choose Set Tracks from the pop-up menu and deselect the extraneous track (see Figure 16.32).
Figure 16.32. The Modify option works if the clip hasn't been captured.
-
If the clip has already been captured, you need to use a different method. Load the clip into the source monitor.
-
Mark an IN at the beginning of the clip and an OUT at the end.
-
Turn off any tracks you want to remove.
-
Holding down the Option (Macintosh) or Alt (Windows) key, drag the clip back into a bin. This will turn the clip into a sub-clip containing the tracks you want.
-
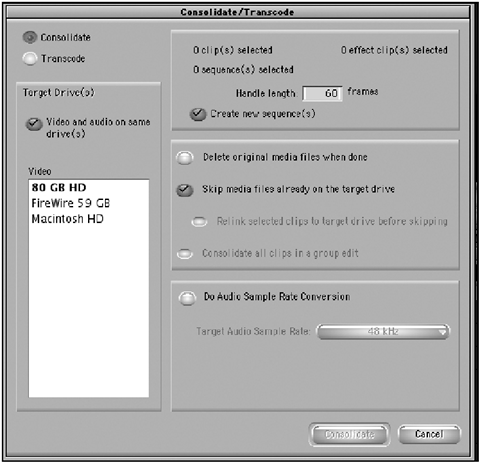
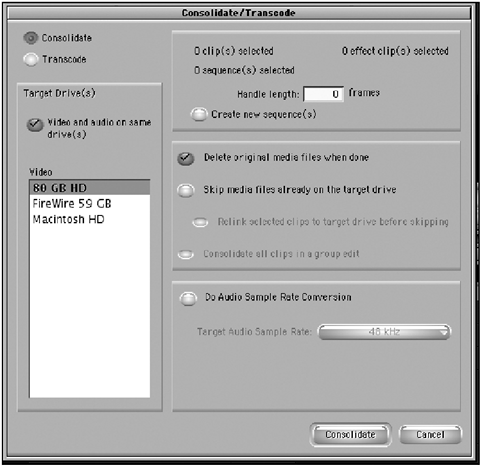
Select the sub-clip and choose Consolidate/Transcode from the Bin menu. A dialog box will open (see Figure 16.33).
Figure 16.33. The Consolidate/ Transcode dialog box lets you adjust the settings when consolidating a clip.
-
In the dialog box, make sure Consolidate is selected. Type a 0 value for the handle length because you can't add a handle to this clip. Select Delete Original Media Files When Done and deselect Skip Media Files Already on the Target Drive. Also deselect the Create New Sequence option. The Consolidate/Transcode dialog box should look like Figure 16.34.
Figure 16.34. Once all the adjustments are made, the Consolidate/Transcode dialog box should look like this.
-
Click OK. A new consolidated clip and sub-clip will appear in your bin. Congratulations; you removed a track from a clip and didn't have to re-capture the media. If you want, delete the original clip because you'll be using the new clip to edit with.
Tip 20: Re-Create a Deleted Master Clip
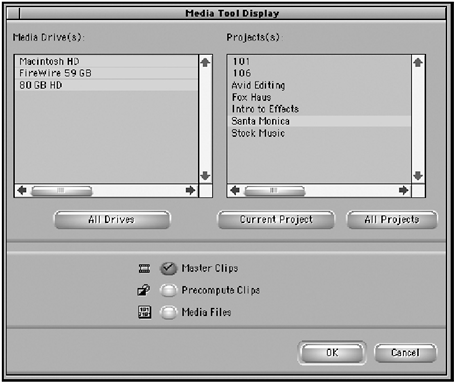
If you ever delete a clip from a bin by mistake, don't worry; you can retrieve it. This tip works only when you have deleted the master clip but its media files still exist. To re-create a master clip, open the Media tool and choose to view the master clips only for the project you're working on (see Figure 16.35). Click OK.
Figure 16.35. In the Media tool, choose to view only the master clips for the project you're working on.
Once the Media tool opens, only master clips are displayed. If you forget the file's name, change the Media tool's view to Frame view to better identify the clip. Once you find the clip, simply drag and drop it into a bin. Avid Xpress Pro will re-create the clip in the bin. Again, if the clip's media files have been deleted, this tip wouldn't work.
| [ LiB ] |