Preparing Your Sequence
| [ LiB ] |
Preparing Your Sequence
Before you output your sequence, there are a couple of things you should do in order to make sure your sequence is output to tape correctly. If you're simply outputting to tape as a rough draft, some of these options are unnecessary. If you're outputting to tape for broadcast or mass duplication, some of these options are mandatory. Before you consider outputting your sequence, ask yourself the following questions:
-
Are all the effects that need to be rendered actually rendered? If not, perform an expert render on the sequence.
-
Are all the audio tracks mixed correctly? If not, use the Audio Mix tool and the Audio tool to mix and monitor levels.
-
Does the finished sequence have any mixed audio sample rates? If it does, you need to change the sample rate.
-
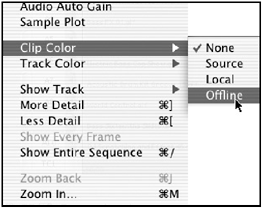
Is any media offline? If so, perform a batch capture or find each clip individually and recapture it. You can tell if your sequence is missing media by choosing Clip Color : Offline from the Timeline's Fast Menu (see Figure 15.1). This will turn any offline media red.
Figure 15.1. This is the quick way to tell if any media in your sequence is offline. All offline media will appear in red.
-
Is your deck hooked up to Avid Xpress Pro or to Avid Mojo correctly?
-
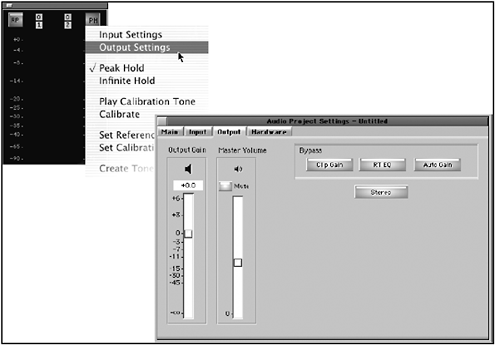
Are you going to output your sequence in mono or stereo? To select a method, open the Audio tool and click on the PH (Peak Hold) button. Choose Output Settings (see Figure 15.2). From this window, you can switch from stereo to mono.
Figure 15.2. The Output Settings allow you to change how the audio is output from Avid Xpress Pro.
-
Are all the scenes that need to be color corrected actually corrected? If not, use the Color Correction tool to make all the necessary adjustments.
Adding Filler at the Start
When you started a new sequence in the Timeline, the first edit you performed started at the very beginning. In other words, there is nothing in place before the first edit.
If you're simply laying off your sequence to tape, you can cue up a tape in your VTR or camera and then cue up the Position Indicator in the Timeline. You then press Play and Record on your VTR. After the tape is rolling, press any of the Play keys in Avid Xpress Pro. This is called manual recording or sometimes crash recording . Avid recommends that you use the Preview Digital Cut option in the Digital Cut tool. When you click on the button, the sequence plays as you record. This button is displayed later in this chapter.
Although this is a very rudimentary method for outputting your sequence, it certainly works. One problem with using this method is that the first frame of your sequence is displayed for a brief time before you actually press the Play button.
To avoid this condition, Avid Xpress Pro allows you to add filler (or black) to the beginning of your sequence. How much filler you add is up to you. Click on the Settings tab inside your Project window. Scroll down to your Timeline settings and double-click it to open the settings. At the top of these settings, click on the Edit tab. Inside the Edit tab, you can adjust how much filler is applied to the beginning of your sequence (see Figure 15.3).
Figure 15.3. Your Timeline settings allow you to adjust the amount of filler that's added at the beginning of your sequence.

If you're simply manually recording, just leave this setting at one second. You'll be able to leave your Position Indicator parked on the one second of black and let your deck record as much black or filler as you feel is necessary.
To actually add the filler at the beginning of your sequence, follow these steps:
-
Load the sequence into the Timeline.
-
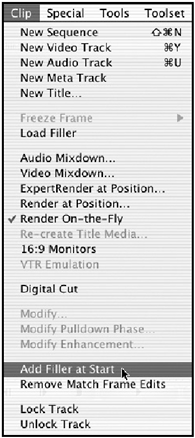
Choose Add Filler at Start from the Clip menu (see Figure 15.4).
Figure 15.4. Choose Add Filler at Start from the Clip menu to add black to the beginning of your sequence.
-
The amount of filler you designated in the Timeline settings is added to your sequence.
NOTE
 TIP
TIP
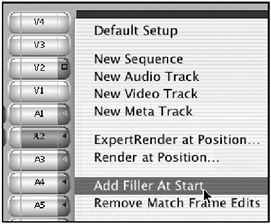
The shortcut method for adding filler is to right-click (Windows) or Ctrl+Shift-click (Macintosh OS) in the Timeline. A menu with the Add Filler at Start option will open (see Figure 15.5). If you left the Timeline setting at one second, simply choose this option a second time if you need two seconds. Choose it a third time for three seconds, and so on.
You can access the Add Filler at Start command directly from the Timeline.
You can also choose Load Filler from the Clip menu and perform a splice-in edit with all the tracks in the Timeline selected. This allows you to add exactly the amount of filler or black you need.
NOTE
![]() NOTE
NOTE
You might be wondering where the Add Filler at End command is. There isn't one. If you're not going to use the Digital Cut method and want to place black or filler at the end of your sequence, I suggest you add a title, which is simply a full page of black, at the end of the sequence.
Adding Color Bars and Tone
If your sequence is going to be broadcast or sent to a mass duplication facility for dubs, you need to add color bars and tone to the beginning of your sequence. Color bars allow the broadcast station or duplication facility to ensure that the correct colors are broadcast. The tone you apply at the beginning of your sequence also aids the broadcast facility in setting the proper audio levels. Many broadcasters will not air your finished product if it does not contain both color bars and tone.
Color bars can be created in numerous waysfrom a camera, a VTR, a signal generator, or from an imported file. When you installed Avid Xpress Pro software on your computer, a series of test pattern images were also installed. These test patterns are a great way to add color bars to your sequence. Although there are a variety of test patterns, this chapter uses the standard SMTPE (Society of Motion Picture and Television Engineers ) bars you've probably have seen before. The color bar pattern the SMTPE created is an industry standard and ensures correct picture quality.
To use the color bars file that came with your Avid Xpress Pro software, follow these steps:
-
Highlight the bin you want to import the file into.
-
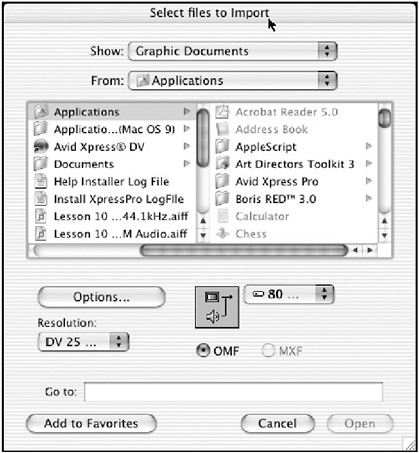
Choose Import from the File menu. This will open the Select Files to Import window (see Figure 15.6).
Figure 15.6. This window is where you'll choose the file to be imported.
-
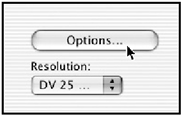
Before you import any test patterns, you need to make sure your Import settings are set correctly. Click on the Options button at the bottom of the Select Files to Import window (see Figure 15.7).
Figure 15.7. This button allows you to change your import settings.
-
Make sure your color levels are set to 601. This is the standard color level for video/television (see Figure 15.8). Because you have the Import settings open, use this opportunity to set the duration of the imported file. The length of the color bars is usually determined by the broadcast facility.
Figure 15.8. When importing any test pattern, always use the 601 color levels.

-
Click OK and navigate through the following files. For Windows, go to Program Files/Avid/Avid Xpress Pro/Supporting Files/Test Patterns/NTSC. For Macintosh, go to Applications/Avid Xpress Pro/Supporting Files/Test Patterns.
-
Click on the SMPTE color bars.
-
Click the Open button to import the file.
-
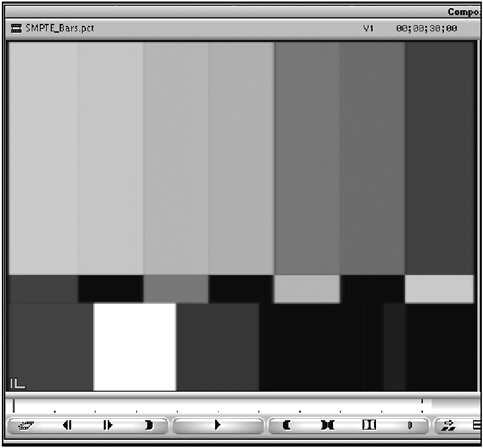
A new master clip will appear in your bin. Load the clip into the source monitor (see Figure 15.9).
Figure 15.9. This is what SMPTE color bars look like (picture them in color, of course). The engineers at the facility that's broadcasting your project will use these color bars to ensure correct color use.
Now that you've created the file, simply add it to your sequence using a splice-in edit. It's really up to the broadcast facility but if you are unsure, I recommend using at least 30 seconds of color bars and tone and then black before the start of your sequence.
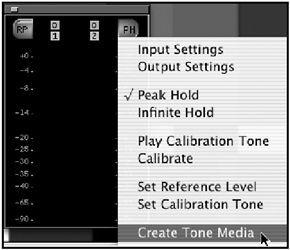
Now that you have the color bars added to your sequence, it's time to create audio tone. Audio tone is created using the Audio tool. Choose the Audio tool from the Tools menu. Click on the PH button (Peak Hold) and choose Create Tone Media (see Figure 15.10).
Figure 15.10. You can create tone media from the Audio tool.
A dialog box will open allowing you to make adjustments to the tone media you're about to create. The default settings are generally close. Keep the media level in dB to 14. Remember, audio levels in a digital realm peak at 14, not 0.
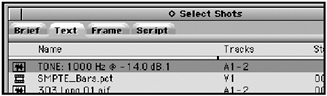
Type in the length of media you want to create and then select how many tracks you want to create. Decide which bin the new clip will be stored in and in which drive the media files for the tone media will be saved. Once you click OK, a new master clip (audio only) will appear in your bin (see Figure 15.11).
Figure 15.11. When you create tone media, a new master clip is created in your targeted bin.
Load the tone media into the source monitor and add it to your sequence underneath the color bars. The duration should be the same as the color bars. Now that you have added color bars and tone to your sequence, you're one step closer to outputting to tape. Color bars are not needed if your sequence is always going to be maintained as a computer file, which you would do if you output your sequence to the web or to a DVD.
| [ LiB ] |