Hack49.Clone Systems Quickly and Easily
Hack 49. Clone Systems Quickly and Easily
Once you've customized and fine-tuned a sample machine, you can quickly and easily deploy other systems based on its configuration by simply cloning it. Now that Linux is in widespread use, many businesses that don't want to roll their own Linux systems simply deploy out-of-the-box systems based on supported distributions from sources such as SUSE, Mandriva, Turbo Linux, and Red Hat. Businesses that need a wider array of system or application software than these distributions provide often spend significant effort adding this software to their server and desktop systems, fine-tuning system configuration files, setting up networking, disabling unnecessary services, and setting up their corporate distributed authentication mechanisms. All of this takes a fair amount of time to get "just right"it also takes time to replicate on multiple systems and can be a pain to recreate if this becomes necessary. You do have backups, don't you? To speed up deploying multiple essentially identical systems, the classic Unix approach that I used to take in the "bad old days" was to purchase large numbers of disks that were the same size, use the Unix dd utility to clone system disks containing my tricked out systems to new disks, and then deploy the cloned disks in each new system of the specified type. This still works, but the downside of this approach is that the dd utility copies every block on a disk, regardless of whether it's actually in use or not. This process can take hours, even for relatively small disks, and seems interminable when cloning today's larger (200-GB and up) drives. Thanks to the thousands of clever people in the open source community, faster and more modern solutions to this classic problem are now readily available for Linux. The best known are Ghost for Linux (a.k.a. g4l, http://sourceforge.net/projects/g4l/), which takes its name from the commercial Ghost software package from Symantec (formerly Norton) for Windows systems, and partimage, the popular GNU Partition Image application (http://www.partimage.org). Both of these are open source software packages that are designed to create compressed images of partitions on your systems and make it easy for you to restore these partition images on different drives. The Ghost for Linux software is largely targeted for use on bootable system disks and provides built-in support for transferring the compressed filesystem or disk images that it creates to central servers using FTP. It is therefore extremely useful when you need to boot and back up a system that won't boot on its own. This hack focuses on partimage because it is easier to build, deploy, and use as an application on a system that is currently running. Of course, you have to have enough local disk space to store the compressed filesystem images, but that's easy enough to dig up nowadays. Like Ghost for Linux, you can't use partimage to create an image of a filesystem that is currently mounted, because a mounted filesystem may change while the image is being created, which would be "a bad thing."
partimage easily creates optimal, compressed images of almost any type of filesystem that you'd find on a Linux system (and even many that you would not). It supports ext2fs/ext3fs, FAT16/32, HFS, HPFS, JFS, NTFS, ReiserFS, UFS, and XFS partitions, though its support for both HFS (the older Mac OS filesystem) and NTFS (the Windows filesystem de jour) is still experimental. 5.5.1. Building partimagepartimage is easy enough to build, but it has a fair number of dependencies. To build partimage, you must build or already have installed the following libraries:
Once you've built and installed any missing libraries, you can configure and compile partimage using the standard commands for building most modern open source software: # ./configure && make install The fun begins once the build and installation is complete. The final product of the make command is two applications: partimage, which is the application that you run on a system to create an image of an existing partition; and partimaged, which is a daemon that you can run on a system in order to be able to save partition images to it over the network, much like the built-in FTP support provided by Ghost for Linux.
5.5.2. Cloning Partitions Using partimageUsing partimage to create a copy of an existing unmounted partition is easy. Because partimage needs raw access to partitions, you must execute the partimage command as root or via sudo. As shown in Figure 5-1, the initial partimage screen enables you to select the partition of which you want to create an image, the full pathname to which you want to save the partition image, and the operation that you want to perform (in this case, saving a partition into a file). To move to the next screen, press F5 or use the Tab key to select the Next button and press Enter. Figure 5-1. Selecting a partition to image and specifying the output file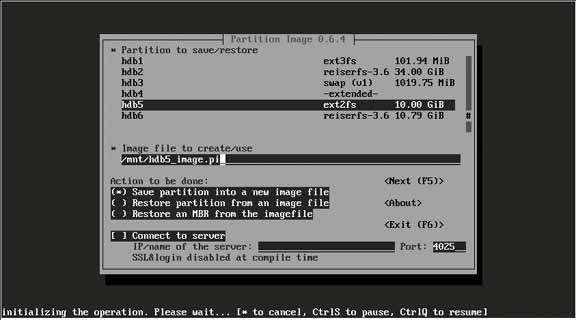 The second partimage backup screen, shown in Figure 5-2, enables you to specify the compression mechanism that you want to use in the image file. Here you can specify that you want to check the consistency of the partition that you are imaging before creating the partition image file, which is always a good idea since you don't want to clone an inconsistent filesystem. You can also optionally specify that you want to add a descriptive comment to the file, which is often a good idea if you are going to be saving and working with a large number of partition image files. You can also specify what partimage should do after the image file has been created: wait for input, quit automatically, halt the machine, and so on. (The latter is probably only useful if you've booted from a rescue disk containing partimage in order to image one of the system partitions on your primary hard drive.) Press F5 to proceed to the next screen.
If you specified that you wanted to check the consistency of the filesystem before imaging it, partimage checks the filesystem and displays a summary screen that you can close after reviewing it by pressing Enter. partimage then proceeds to create an image file of the specified partition, as shown in Figure 5-3, displaying a summary screen when the image has been successfully created. If you specified Wait (i.e., wait for inputthe default) as the action to perform after creating the image file, you will have to press Enter to close the summary screen and exit partimage. Figure 5-2. Specifying compression methods and other options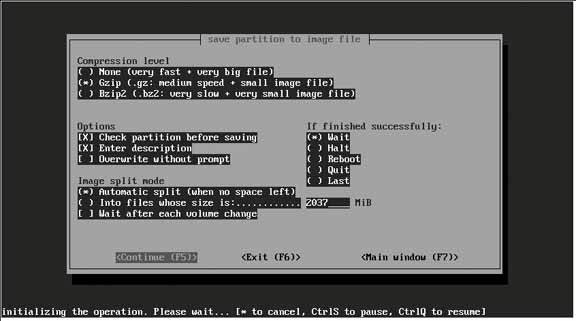 Figure 5-3. Creating the partition image file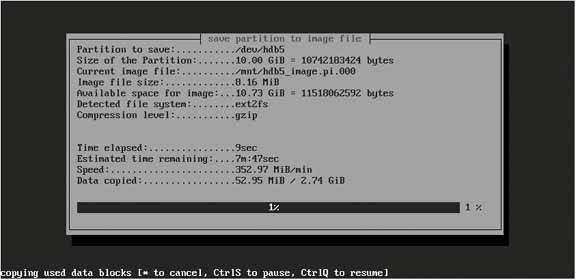 5.5.3. Restoring Partitions Using partimageUsing partimage to restore a partition image to an existing partition is even simpler than creating the image in the first place. The initial partimage restore screen, shown in Figure 5-4, is the same as that shown in Figure 5-1. It enables you to identify the partition to which you want to restore the partition image, the name of the image file that you want to restore from, and the action that you want to perform (in this case, restoring a partition from a file). To move to the next screen, press F5 or use the Tab key to select the Next button and press Enter. Figure 5-4. Selecting a partition to restore to and the partition image file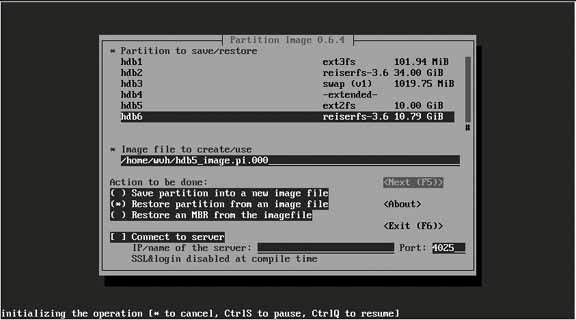 The second partimage restore screen, shown in Figure 5-5, enables you to run a consistency check by performing a dry run of restoring from the image file and also enables you to zero out unused blocks on the target filesystem when it is created. As with the image-creation process, you can also specify what partimage should do after the image file has been restored: wait for input, quit automatically, halt or reboot the machine, and so on. Press F5 to proceed to the next screen. partimage then proceeds to restore the partition image file to the specified partition, as shown in Figure 5-6, displaying a summary screen by default when the image has been successfully restored. If you specified Wait (i.e., wait for inputthe default) as the action to perform after creating the image file, you will have to press Enter to close the summary screen and exit partimage. Figure 5-5. Specifying restore options and completion behavior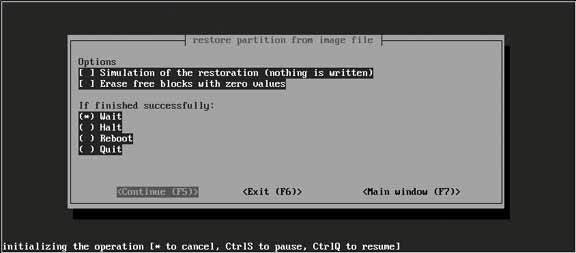 Figure 5-6. Restoring the partition image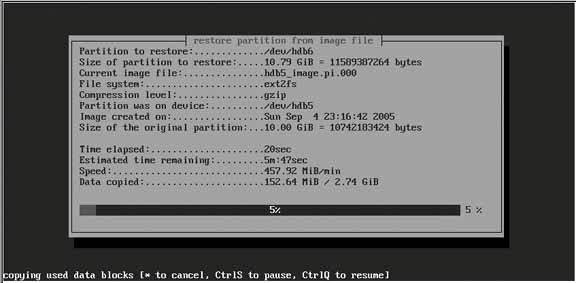 5.5.4. SummaryCreating partition image files of customized, optimized, and fine-tuned desktop and server partitions provides a quick and easy way of cloning those systems to new hardware. You can always clone partitions containing applications, such as /opt,/var,/usr, and /usr/local. (Your actual partition scheme is, of course, up to you.) If your new systems have the same devices as the system on which the image file was created, you can even easily copy preconfigured system partitions such as /boot and / itself. Either way, applications such as partimage can save you lots of time in configuring additional hardware by enabling you to reuse your existing customizations as many times as you want to. 5.5.5. See Also
|

EAN: 2147483647
Pages: 162