Posting Templates via HTML Forms
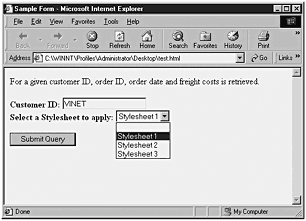
| As a final exercise for this chapter, we are going to show how to post a template file using an HTML form. In a Web environment, this would probably be the most common way of executing template files. Let's face it; users are comfortable and familiar with HTML forms. They see them just about every time they access the Internet and on their company intranet if there is one. Forms are easy to generate and provide a high level of interaction. This template file has one parameter passed to the query. It would be a simple exercise to add multiple parameters. This template file would be saved as an HTML file and placed in a directory other than the virtual root tree. The SQLISAPI.DLL file is not expecting an HTML file and will not function correctly if placed in its directory tree. Let's look at the HTML form itself, as shown in Listing 4.24. Listing 4.24 Posting a Template via an HTML Form<head> <TITLE>Sample Form </TITLE> </head> <body> For a given customer ID, order ID, order date and freight costs is retrieved. <form action="http://griffinjnt4s/nwind" method="POST"> <B>Customer ID</B> <input type=text name=CustomerID value='VINET'> <input type=hidden name=contenttype value=text/xml> <input type=hidden name=template value=' <ROOT xmlns:sql="urn:schemas-microsoft-com:xml-sql" > <sql:header> <sql:param name="CustomerID">VINET</sql:param> </sql:header> <sql:query> SELECT OrderID, OrderDate, Freight FROM Orders WHERE CustomerID=@CustomerID FOR XML AUTO </sql:query> </ROOT> '> <p><input type="submit"> </form> </body> Here, the HTML text box supplies the value that is passed to the query.The query then returns the order ID, date ordered, and freight cost. It is also possible to give the user a choice of what XSLT stylesheet to apply to the data. Add the following lines in Listing 4.25 to Listing 4.24. Listing 4.25 Additional HTML Code for the Drop-Down Box<br> Select a Stylesheet to apply: <select name='stylesheets' size='1'> <option value=''></option> <option value='ss1.xsl'>Stylesheet 1</option> <option value='ss2.xsl'>Stylesheet 2</option> <option value='ss3.xsl'>Stylesheet 3</option> </select> This adds a drop-down list of stylesheets for the user to choose from (see Figure 4.6). Figure 4.6. Adding an XSLT stylesheet selection drop-down box. Also add an additional input field and parameter field like this: <input type="text" name="stylesheet" value="ss1.xsl'> sql:param name="stylesheet">ss1</sql:param> Finally, modify the <root> statement to this: <root xmlns:sql="urn:schemas-microsoft-com:xml-sql" sql:xsl="@stylesheet"> That finishes this chapter. One thing you should have noticed in this chapter is that the documents we generated are what are known as attribute-centric documents. All data is assigned to attributes of the elements of the document. The opposite of this is element-centric documents. All data is returned as a series of nested elements, which is probably the way you expected the data to be returned in the first place. SQL Server 2000 does provide ways to generate element-centric documents, and we will learn about them when we cover the FOR XML clause in detail in Chapter 8. |