10.4. Emulating the Mac
| < Day Day Up > |
10.3. Emulators on Mac OS XEmulation has been a hot area of the past few years. It's emerged as a way to defeat obsolescence by letting you run software for obsolete computers. Have a favorite Atari 800 game but your old Atari won't boot? You can download the emulator, point it at the disk image containing that old game, and start playing. Repeat as necessary for Apple II, Commodore 64, Atari VCS, and more.
Given the speeds of today's Macs, it's not surprising that you can easily emulate a 1 MHz computer from the old days. But what's fantastic is how you can emulate near-current PC hardware on your Mac. Microsoft's Virtual PC is capable of running even the resource-hungry Windows XP quite comfortably on current Macintoshes, and the open source QEMU comes close, although it's not quite as fast as Virtual PC. Both are capable of running Linux comfortably. 10.3.1. Virtual PCMicrosoft's Virtual PC, formerly Connectix Virtual PC, has been letting Mac users run Windows and DOS on their Macs for years. You can also run dozens of other operating systems some are easier to install than others including Linux, Darwin, and Net/Free/OpenBSD. Virtual PC 7 is available without an operating system (it's basically a bare-metal virtual machine) for approximately $129. If you're planning to run Windows on it, you could splurge on one of the editions of Virtual PC that is bundled with a Windows operating system (Windows 2000, Windows XP Home, or Windows XP Professional). Once you've got Virtual PC up and running, you can install an operating system. You can install from an ISO image, CD-ROM, or DVD. For example, here's how to install Ubuntu Linux from an ISO image:
After you've captured the drive, select PC 10.3.1.1. Linux doesn't find the network adapterIf Linux doesn't detect your network hardware, you can try to force its hand. Virtual PC emulates a DECChip Ethernet adapter that Linux is happy to support with the de2104x driver. For example, here's how you can get Ubuntu to recognize the network hardware and proceed as though nothing's gone wrong. First, wait for the Ubuntu installer to complain about its failure to detect the network interface, then:
With other Linux distributions, such as Mandrake, you can safely wait until after installation is complete to configure the network hardware. For example, under Mandrake 10.0 Community Edition, you can add de2104x (on a line by itself) to /etc/modprobe.preload (/etc/modules under 2.4 and earlier kernels) and reboot the virtual machine. You may also find that the tulip driver works just fine. 10.3.1.2. Linux can't configure TCP/IPAfter you install Linux, one of the first things you'll need to do is fetch updates from the network. Under Debian, Ubuntu, and other apt-based distributions, your operating system will make decisions during installation about which package repositories to use. If the network isn't working at this point, you may have to manually configure things later. So, the first thing you should do after that first reboot is to check the network. As soon as you reboot, switch to an alternate console (Option-F2 if you are at a text console, Control-Option-F2 if you are in X11) and log in.
Try to FTP or SSH to a known good host (don't use ping, since ICMP may be discarded by some NAT routers, and Virtual PC's default configuration puts an additional NAT layer between the virtual machine and the network). If you can't reach any hosts, you can manually configure networking in the virtual machine. You'll need to set the network as shown in Table 10-1.
For example, under Debian, you can edit /etc/network/interfaces and change: iface eth0 inet dhcp to: iface eth0 inet static address 192.168.131.175 netmask 255.255.255.0 gateway 192.168.131.254 and then set /etc/resolv.conf to read: nameserver 192.168.131.254 nameserver 192.168.131.252 Now restart networking with /etc/init.d/networking restart. Make sure you can reach something with FTP or SSH, and return to the post-install setup with Option-F1 (for the main text console) or Option-F7 (for X11-based setups). With many other Linux distributions, you can wait until installation is complete to configure the network. For example, under Mandrake 10.0 Community Edition, replace the contents of /etc/sysconfig/network-scripts/ifcfg-eth0 with: DEVICE=eth0 IPADDR=192.168.131.175 NETMASK=255.255.255.0 GATEWAY=192.168.131.254 ONBOOT=yes And configure /etc/resolv.conf as shown for Debian earlier in this section. Then restart networking with /etc/init.d/network restart.
For more information, see Microsoft's knowledge base entry on troubleshooting Virtual PC's network at http://support.microsoft.com/kb/825372. 10.3.1.3. Launching X11 displays garbage on the screenVirtual PC's emulated S3 Trio64 graphics adapter doesn't play well with X11 in 24/32-bit color. Reconfigure X11 to use 16-bit or lower color. In a Debian-based system, you can use the command dpkg-reconfigure xserver-xfree86. You can also edit /etc/X11/XF86Config-4 on most Linux distributions and set the color depth to 16 (look for Depth and DefaultDepth settings in that file). Figure 10-7 shows how to configure this during the installation of Mandrake 10. Figure 10-7. Setting color depth in Mandrake 10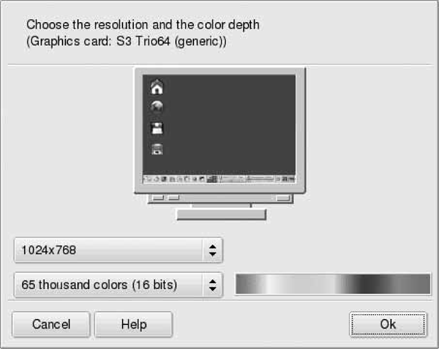 10.3.2. QEMUQEMU (http://fabrice.bellard.free.fr/qemu) is a state-of-the-art open source emulator. Like Bochs (http://bochs.sourceforge.net), QEMU can emulate an x86 CPU. However, QEMU is significantly faster than Bochs, and can also emulate a number of other CPUs, including SPARC and PowerPC. Most important, QEMU is fast enough for day-to-day use, although for top performance, you'll find that Virtual PC wins (see the sidebar "Virtual PC Versus QEMU," later in this chapter). To get started with QEMU, you can either grab a binary package from http://www.freeoszoo.org/download.php, or download the source from QEMU's web page (noted earlier) and compile it yourself. If you're chasing the latest release, you may need to compile it yourself. You'll also need to compile a Mac OS X native build of SDL; see http://www.libsdl.org/index.php. Once you've got QEMU installed, you should have at least qemu-img and qemu in someplace such as /usr/local/bin or /opt/local/bin. You may also have qemu-system-ppc and qemu-system-sparc (the Power PC and SPARC system emulators). Now you're ready to either run one of the pre-packaged virtual machines from http://www.freeoszoo.org/download.php, or install one by hand. 10.3.2.1. Installing an operating systemTo create a virtual machine with QEMU:
In a matter of seconds, you'll see the installation splash screen as shown in Figure 10-8.
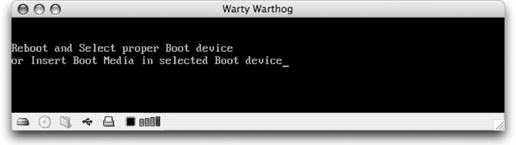
Figure 10-8. Ubuntu is ready to install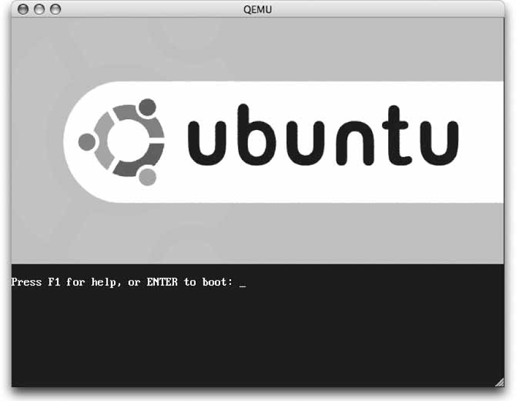 If you switch back to the Terminal window from which you launched QEMU, you'll see the console up and running. Type help and press Return to see a list of the commands that are available: QEMU 0.6.1 monitor - type 'help' for more information (qemu) help help|? [cmd] -- show the help commit -- commit changes to the disk images (if -snapshot is used) info subcommand -- show various information about the system state q|quit -- quit the emulator eject [-f] device -- eject a removable media (use -f to force it) change device filename -- change a removable media screendump filename -- save screen into PPM image 'filename' log item1[,...] -- activate logging of the specified items to '/tmp/qemu. log' savevm filename -- save the whole virtual machine state to 'filename' loadvm filename -- restore the whole virtual machine state from 'filename' stop -- stop emulation c|cont -- resume emulation gdbserver [port] -- start gdbserver session (default port=1234) x /fmt addr -- virtual memory dump starting at 'addr' xp /fmt addr -- physical memory dump starting at 'addr' p|print /fmt expr -- print expression value (use $reg for CPU register access) i /fmt addr -- I/O port read sendkey keys -- send keys to the VM (e.g. 'sendkey ctrl-alt-f1') system_reset -- reset the system (qemu) You'll need to use this console to switch CD-ROMs during installation. Use eject to eject the ISO, and change to insert a new one: (qemu) eject cdrom (qemu) change cdrom warty-install-i386.iso You can now install your operating system as you would on an actual PC (follow the prompts, partition your virtual disk, select packages, and then go drink a long slow cup of coffee). 10.3.2.2. Suspending and resumingThe user interface may not be as fancy as Virtual PC's, but you can suspend (pause and save state to disk) and resume your virtual machines under QEMU. However, if you mix any of this up, such as forgetting to stop before you issue the savevm command, you could get the contents of the saved memory and your hard disk image out of sync. To save state, stop the virtual machine, save the memory, and quit: (qemu) stop (qemu) savevm savedstate.sav (qemu) quit To resume where you left off, start QEMU as you normally would, but use the -loadvm option to specify the saved state: $ qemu -m128 -cdrom warty-install-i386.iso -hda ubuntu.img -boot c \ -monitor stdio -localtime -loadvm savedstate.sav 10.3.2.3. NetworkingQEMU sets up a NAT network for your virtual machine, so if the operating system cooperates, you won't need to do anything special to get networking working correctly. QEMU emulates a PCI NE2000 adapter, so you should be able to use a generic NE2000 driver for that card.
|
 New. Youll be prompted to select a setup method.
 Capture Disc.
| < Day Day Up > |
EAN: 2147483647
Pages: 176