7.5 SSH GUIs
| OpenSSH is a free version of the SSH suite of network connectivity tools that provides encrypted replacements for telnet , ftp , rlogin , rcp , and more. As noted earlier in the book, OpenSSH is bundled with Mac OS X. Although the SSH tools are fully functional from the command line, several GUIs are available for SSH. One such frontend, familiar to Unix/Linux users, is Brian Masney's GTK+/glib-based gftp (http://www.gftp.org/). gftp can be installed on Mac OS X using Fink. Another option is Fugu (http://rsug.itd.umich.edu/software/fugu/), which is a graphical interface to the OpenSSH program bundled with Mac OS X. Fugu is developed and provided as freeware by the University of Michigan's Research Systems Unix Group . As noted on its web site (which should always be consulted for the most up-to-date version and information), Fugu has many useful features including, but not limited to, the following:
When Fugu is launched, you will be greeted with a dialog window that includes a file browser showing your local Home directory, and blank fields that you must fill in to make an sftp connection to a remote site, as illustrated in Figure 7-3. Figure 7-3. Fugu's sftp connection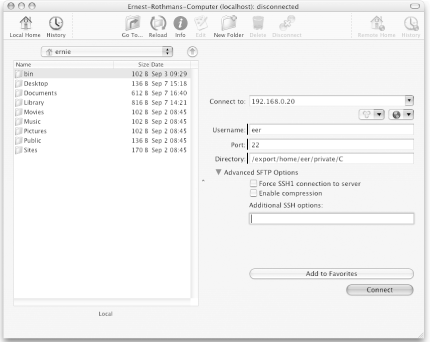 To use Fugu, enter the IP address or domain name , remote username, port, and directory that you want to access. Under Advanced SFTP Options, you can enable features such as compression or enter additional SSH options. Once you've added this information, add the host to a list of Favorites so you can quickly connect to that site in the future, instead of entering all of its information each time. Once you've entered this information as shown in Figure 7-3, click the Connect button. If you're connecting to this host for the first time, you'll be prompted to enter a password and add it to your Keychain. Click the Authenticate button and, if all goes well, the right column of Fugu's window displays the remote directory in its file browser. You can now drag and drop to upload or download files. However, at the time of this writing, you could not use Fugu to drag and download directories with sftp . To download folders in Fugu, you must use scp . As noted earlier, Fugu can be used to remotely delete files simply by selecting the filename and then clicking on the Delete icon. At the time of this writing, Fugu could not delete recursively. In other words, if you want to delete a directory and all of the files contained within it, you'll have to delete the files manually. Only then can you delete the empty directory. You can also change certain attributes of a file, regardless of whether a file is local or remote, by selecting the file in Fugu's file browser and clicking the Get Info icon. In the resulting pop-up window, you'll be able to change, among other things, the file's permissions. Two other freeware SSH frontends worth mentioning are:
SSHTunnelManager is designed to create SSH tunnels. Figure 7-4 illustrates how to use SSHTunnelManager to set up an SSH tunnel for the purpose of making a secure connection to a VNC server. Figure 7-4. Setting up an SSH tunnel to a VNC server with SSHTunnelManager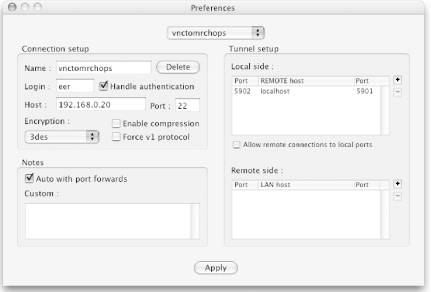 SSH Agent can be used to (among other things) start an SSH-agent, generate identities, add identities to agents , and establish a secure tunnel. Figure 7-5 illustrates how to use the SSH Agent to set up an SSH tunnel in order to make a secure connection to a VNC server. Figure 7-5. Setting up an SSH tunnel to a VNC server with SSH Agent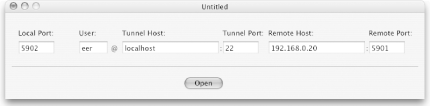 7.5.1 LaTeXTeX was developed by computer scientist Donald Knuth as a special programming language used to typeset mathematical and scientific publications . LaTeX, developed by Leslie Lamport and subsequently further developed by Frank Mittelbach among others, is essentially a rather large set of macros built on top of TeX. The TeX Users Group (TUG) web site (http://www.tug.org/) contains an enormous amount of information on TeX- related projects and resources. One distribution of TeX for Unix systems, teTeX (http://www.tug.org/teTeX/), is provided by Thomas Esser. teTeX is commonly found on Unix- and Linux-based systems, especially those used by mathematicians, scientists, and engineers .
teTeX can be installed on a Mac OS X system with Fink. You could also use the installation provided by Gerben Wierda's i-Installer to install TeX Live-teTeX, a superset of teTeX. In this section, we'll discuss how to install TeX Live-teTeX with i-Installer and then briefly describe two graphical frontends to LaTeX: TeXShop and iTeXMac. TeXShop and iTeXMac are actually more than frontends; they provide unified LaTeX environments, complete with editors and other tools. We'll round out this section with two more applications, Equation Service and LaTeX Equation Editor, which allow you to easily use your LaTeX installation to add mathematical typesetting capabilities to applications such as Mail and Keynote. 7.5.2 Installing TeX Live-teTeXTo install TeX Live-teTeX (http://www.rna.nl/tex-org.html), first download the i-Installer application from ftp://ftp.nluug.nl/pub/comp/macosx/ volumes /ii2/II2.dmg and install it in /Applications/Utilities . Once you've done this you will need to use it to install TeX. You may want to also install CM Super for TeX, Ghostscript 8, Freetype 2, wmf and iconv support, and ImageMagick. These last five packages are optional. Double-click the i-Installer in the Finder, and then select i-Package Figure 7-6. Known packages listed in the i-Directory window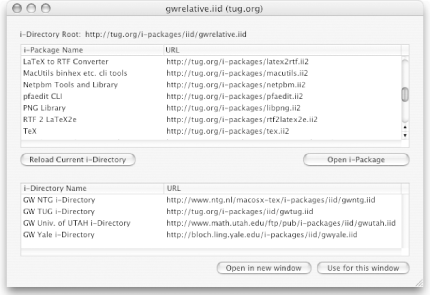 Double-click the TeX choice to open another pop-up window. In this new window, click Install & Remove, followed by Install. This downloads and installs the teTeX Foundation package in /usr/local/teTeX with symbolic link /Library/teTeX pointing to /usr/local/teTeX . When installation of TeX nears completion, you'll be prompted to configure items such as language selection, paper size, and formats. Local system modifications, for example, addition of new LaTeX packages (i.e., *.sty files) can be made to /usr/local/teTeX/share/texmf.local . Modifications can also be made on a per- user basis by modifying ~/Library/texmf . If you subsequently upgrade your LaTeX installation with i-Installer, these local modifications are not affected. The teTeX search order for files is:
Once the installation and configuration of TeX Live-teTeX is complete, you will be able to run latex from the command line. However, even the most hardcore command-line fanatics may find the available Aqua-based interfaces enticing. Finally, Gerben Wierda's TeX Live-teTeX can coexist with a teTeX that you've installed using Fink. Fink, which installs software in /sw , actually provides an option ( install system-tetex ) to place symbolic links in /sw instead of installing a second version of teTeX. This method allows you to maintain only one version of teTeX and ensures that Fink is aware of it when checking dependencies. 7.5.3 TeXShopTo install TeXShop, go to its web site (http://darkwing.uoregon.edu/~koch/texshop/texshop.html) and download the TeXShop.dmg file. Mount the disk image by double-clicking on it, and then drag the TeXShop application to your /Applications folder. TeXShop includes a specialized editor with syntax highlighting, LaTeX macros accessible from a toolbar menu, and a previewer. The LaTeX macros can be used to insert LaTeX code into your document. By default, TeXShop uses pdftex and pdflatex (part of standard teTeX distribution) to produce output in PDF instead of the more traditionally used DVI format. Figure 7-7 shows TeXShop's built-in editor, while Figure 7-8 shows TeXShop's previewer. Figure 7-7. TeXShop editor with its LaTeX Macros menu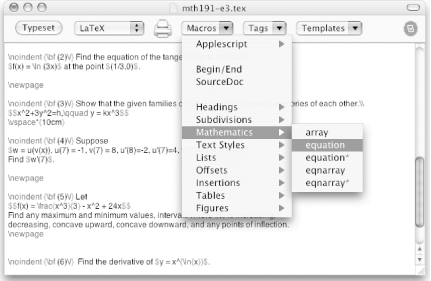 Figure 7-8. TeXShop's built-in previewer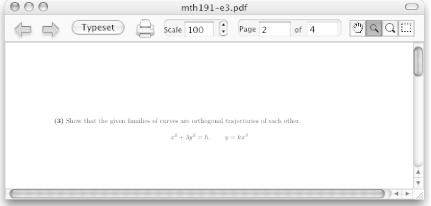 Among its many useful features, TeXShop supports AppleScript, and is highly configurable. In particular, you can configure the Latex Panel, Auto Completion, the Keyboard Menu Shortcuts, and the Macro menu. These user-level configurations are written to four plist files, stored in ~/Library/TeXShop : completion.plist , autocompletion.plist , KeyEquivalents.plist , and Macros.plist . Figure 7-9 shows TeXShop'sMacro Editor, which can be opened from the Macros toolbar. SelectWindow Figure 7-9. TeXShop's Macro Editor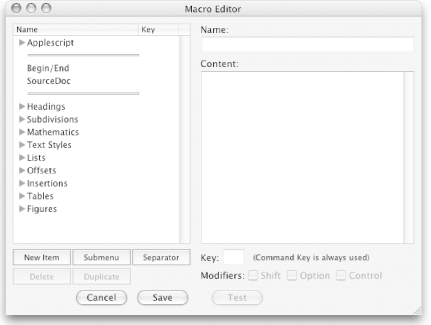 TeXShop (together with TeX Live-teTeX) provides a highly customizable, complete, and unified LaTeX environment that is nicely integrated for Mac OS X. 7.5.4 iTeXMacThe iTeXMac application, a feature-rich alternative to TeXShop, can be downloaded from http://itexmac. sourceforge .net/Download.html. Installation involves dragging and dropping the iTeXMac application file to the /Applications folder. You may also want to download LaTeX.help and TeX Catalogue Online.help , since both provide extensive help on LaTeX from within Mac OS X's Help Viewer. If you opt to download the two .help files, you must drop them in /Library/Documentation/Help before you can view them in Apple's Help Viewer ( /Library/System/CoreServices ). iTeXMac provides a customizable, integrated LaTeX environment, including a specialized editor with syntax highlighting and extensive LaTeX macros accessible from the toolbar menu. These macros can be used to insert LaTeX code into your document from a menu selection. While TeXShop also has this ability, iTeXMac comes with a larger selection of macros. Figure 7-10 shows iTeXMac's built-in editor and LaTeX macro menu. Figure 7-10. iTeXMac's editor and LaTeX Macro menu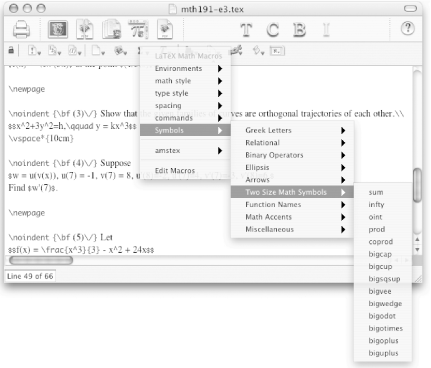 Additional features of iTeXMac include:
Although iTeXMac is designed to use Gerben Wierda's TeX Live-teTeX distribution, you can use it with teTeX installed by Fink, provided that you enable Fink teTeX in iTeXMac's Preferences iTeXMac and TeXShop share many of the same features. The differences between these two applications are essentially that iTeXMac has more features and those features are more extensively implemented. For example, the LaTeX macro menu in iTeXMac includes many more macros. On the other hand, it seems that (at least at the time of this writing, with iTeXMac at Version 1.3.1 and TeXShop at Version 1.30) TeXShop has a performance advantage when compiling large LaTeX files, as well as in viewing the resulting PDF files. Fortunately, these two very useful and well-designed applications can coexist. Since neither occupies a large amount of disk space, you may want to keep them both on hand in your /Applications folder and perhaps even in your Dock. An open source X11-based WYSIWYM (What You See Is What You Mean) document processor, LyX (http://www.lyx.org/), uses teTeX as a rendering engine and runs on most Unix/Linux systems, Windows OS/2, and Mac OS X. There are essentially two versions of LyX: one built on xforms , and another on Qt . Thanks to Qt/Mac (http://www.trolltech.com/download/qt/mac.html), an Aqua-native port of LyX, named LyX/Mac (http://www.18james.com/lyx_on_aqua.html), is available as a self-installing binary. To run LyX/Mac, however, you must first install teTeX using i-Installer or Fink. 7.5.5 LaTeX Services A useful feature of Mac OS X is its ability to allow services via menu selection. For example, in the Mail application, you can select text in an email, then select Mail Equation Service (http://www.esm.psu.edu/mac-tex/EquationService/) provides inline typesetting of LaTeX code. To install this service, download and install the Equation Service application in /Applications . When you run it the first time, configuration files are placed in ~/Library/Application Support . Equation Service is known to work with Mail.app, Keynote, TextEdit, Microsoft PowerPoint, OmniGraffle, and Stone Design's Create. There two ways to use Equation Service: by highlighting LaTeX code in an application and selecting one of several choices from the Services menu or by creating and previewing equations in the Equation Service application's main window. To use Equation Services to typeset LaTeX within an application (for example, Mail), highlight LaTeX string in a compose (i.e., New Message) Mail window, and select Mail Figure 7-11. A Mail message with an equation rendered by Equation Service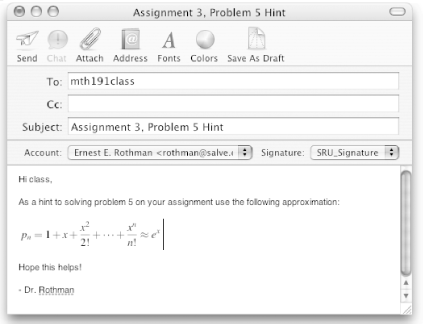 LaTeX strings can also be typeset in the main window of Equation Service, as Figure 7-12 illustrates. Figure 7-12. Typesetting an equation in Equation Service's main window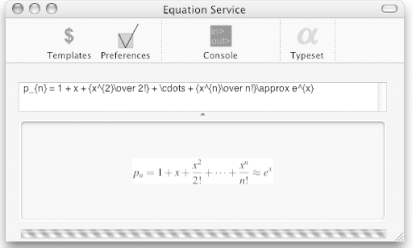 Once you've typeset an equation in the main window of Equation Service, you can drag and drop the resulting PDF image into a number of applications, such as Microsoft Office X or Apple's Keynote. There are several preferences you can set in Equation Service's preferences including font size, text color, and background color of the typeset equations. LaTeX Equation Editor (http:// evolve .lse.ac.uk/software/EquationEditor/) is similar to LaTeX Equation Service, but it operates in one mode only: you must create and preview equations in the application's main window. This application does not provide a Services menu selection to typeset LaTeX strings within other applications. Nevertheless, LaTeX Equation Editor is useful and easy to use, since it is a simple matter to drag and drop the small PDF image it produces into Mail and Keynote documents. Figure 7-13 shows LaTeX Equation Editor's typesetting of a simple LaTeX string. Figure 7-13. Typesetting an equation with LaTeX Equation Editor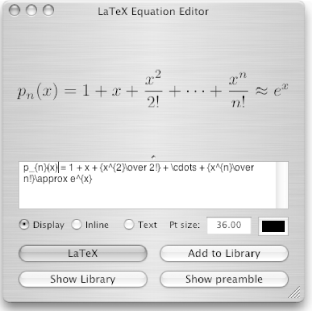 |

 Known Packages i-Directory. A window listing many packages will open , as shown in Figure 7-6.
 EAN: 2147483647
Pages: 212