Creating a Class Library
| The simplest way to write a class library to be called from an application is to make a second project within the solution that already contains the application. A library like this is designed to be used by a single application. It's quite simple to write other applications that can also use it. Writing a class library should always start with design. In order to keep the code simple and concentrate on the connections between the calling application and the class library, the design in this sample library is simple. The library does arithmetic. There is a class called Arithmetic , with methods such as Add() , Subtract() , Multiply() , and Divide() . These methods each take two double parameters and return double results. Future versions of this library might add more classes to it, such as a class that represents complex numbers , or matrices, or fractions represented as a numerator and a denominator instead of as a floating-point number. A class library with only one class in it can serve as a useful illustration, even if it's not really a very useful library. The user interface for the sample class library in this chapter could be a Windows application or a console application. Just for simplicity, this chapter builds a console application to demonstrate how to use a class library. To create the sample application, follow these steps:
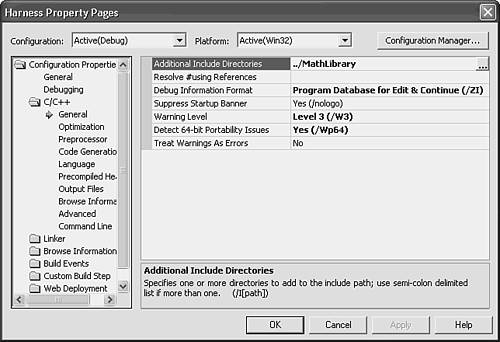
At this point you have two projects in a solution, and the MathLibrary project has a header file, Arithmetic.h and an implementation file, Arithmetic.cpp. Listing 5.1 shows the simple definition of this class, and Listing 5.2 shows the implementation. The constructor and destructor were generated by the wizard. Listing 5.1 Arithmetic.hClass Definition #pragma once class Arithmetic { public: Arithmetic(void); ~Arithmetic(void); double Add(double num1, double num2); double Subtract(double num1, double num2); double Multiply(double num1, double num2); double Divide(double num1, double num2); }; Listing 5.2 Arithmetic.cppClass Implementation #include "StdAfx.h" #include ".\arithmetic.h" Arithmetic::Arithmetic(void) { } Arithmetic::~Arithmetic(void) { } double Arithmetic::Add(double num1, double num2) { return num1 + num2; } double Arithmetic:: Subtract(double num1, double num2) { return num1 - num2; } double Arithmetic::Multiply(double num1, double num2) { return num1 * num2; } double Arithmetic::Divide(double num1, double num2) { return num1 / num2; } The code for the test harness calls these member functions. To write code that calls these functions, you need to ensure that the compiler knows where to find the definition of the class and the linker knows where to find the compiled code for the implementation. The harness file must include the header file for the Arithmetic class. You might simply add this line: #include "arithmetic.h" This won't work: arithmetic.h and harness.cpp are in different folders. Each is in a project folder beneath the solution folder. You could provide the full path to the header file: #include "../MathLibrary/arithmetic.h" This will work, but it's not very maintainableif you ever rearrange the folders, you might have to change hundreds of include statements throughout a large project. It's better to arrange with Visual Studio to look in the MathLibrary folder whenever it's looking for header files that you've included. Here's how:
All that remains is to write some test code that exercises a few of the Arithmetic member functions. That looks like this: #include "stdafx.h" #include "arithmetic.h" #include <iostream> using namespace std; int _tmain(int argc, _TCHAR* argv[]) { Arithmetic a; cout << "1.2 + 3.2 = " << a.Add(1.2, 3.2) << endl; cout << "2.1 * 3 = "<< a.Multiply(2.1, 3) << endl; cin.get(); return 0; } Build the entire solution (choose Build, Build Solution) and you're almost ready to test. When a solution holds more than one project, one is the startup project, the one that runs when you press F5. The name of that project is bold in Solution Explorer. By default, the project you create first ( MathLibrary in this case) is the startup project. Right-click the Harness project in Solution Explorer and choose Set As Startup Project. Now run the test harness by pressing F5. You should see something like this: 1.2 + 3.2 = 4.4 2.1 * 3 = 6.3 There you have ita simple class library in one project, and a simple test harness in another. In reality, your class library can be as complex as you like. You can define as many classes as you like. If your overall architecture has several layers, don't try to put more than one layer into each .LIB file. You'll have more flexibility if each layer can be reused independently. And think twice about splitting a layer across two .LIB files. If they can really be used independently, perhaps they represent two layers . And if they can't be used independently, why set other developers up for trouble by implying that they can be? It's better to keep logical units, such as a layer or module, intact. Because your library was statically linked (from a .LIB file) into your application, when you distribute the application, you only need to distribute the .EXE file. All the code from the library that your application uses has been copied into the .EXE file. This can make .EXE files large, which is one of the appeals of DLL programming, but it makes distribution simplethere is only one file to distribute. You can test this by copying Harness.exe to any other folder on your hard drive, and then double-clicking it to run it. It will run perfectly . |
EAN: 2147483647
Pages: 141