Using a DataGrid, DataView, and DataFilter
| In addition to basic building blocks like labels and text boxes, a simple user interface can also use controls that hold several pieces of information at once. The DataGrid is the most widely-used of these classes; it presents information in a grid format that is easy and intuitive for most users. Two related classes, the DataView and the DataFilter, can be used to add remarkable power to your application, without making your user interface complicated. The bottom half of the sample application form holds a DataGrid. It's not there just to show how docking works, but also to demonstrate some of the purposes to which you can put this very powerful control. A full treatment of how to get data into a datagrid is in Chapter 11, "Writing a Data Layer in Managed C++," but this chapter includes a very neat shortcut using XML.
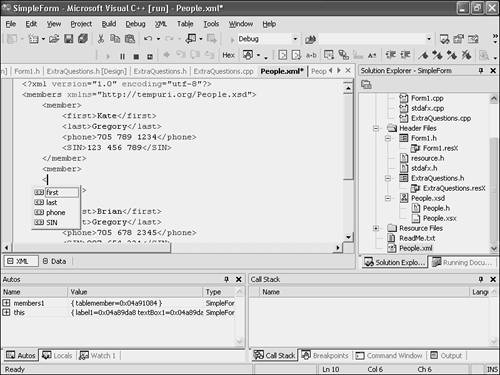
Creating XML, Schemas, and Typed DatasetsThe DataGrid control displays data in a grid format. In order to do that, it needs some data. In this chapter, you'll use a shortcut to load some static data into the grid so that you can explore the properties of the DataGrid control and get used to working with it. To get some data for the DataGrid to work with, start by creating a file of XML. You can create an empty one like this: Right-click the project in Solution Explorer and choose Add, Add New Item. On the Add New Item dialog box, choose XML File and name it People. Click Open. Visual Studio will create an almost-empty file and open it with the editor. You can then type some sample XML. Listing 4.2 shows some XML that will be used in this section to populate the DataGrid. If you type this in yourself, or open the sample application, you'll notice the syntax coloring provided by Visual Studio when you edit XML. Syntax coloring simplifies working with complicated files. Listing 4.2 People.xmlSample Data in XML<?xml version=" 1.0" encoding=" utf-8" ?> <members> <member> <first>Kate</first> <last>Gregory</last> <phone>705 789 1234</phone> <SIN>123 456 789</SIN> </member> <member> <first>Brian</first> <last>Gregory</last> <phone>705 678 2345</phone> <SIN>987 654 321</SIN> </member> <member> <first>Todd</first> <last>Green</last> <phone>416 345 6789</phone> <SIN>123 654 987</SIN> </member> </members> Working with XML is well-supported throughout the .NET Framework. Both Visual Studio and the Base Class Library have a wide variety of tools and methods that are founded on XML. For example, if you right-click in the editor while editing the new file, people.xml , you can choose Create Schema. This will set Visual Studio to work creating an XML schema that matches the sample XML you provided. After you generate the schema, flip back to the file of XML. You'll notice that Visual Studio edited it to reflect the name and location of the schema. What's more, once a file of XML has an associated schema, you get Intellisense when you edit it. It closes tags as you open them (if you type <member> , it will type </member> ) and provides a drop-down menu of the only elements that belong where you are typing, as in Figure 4.11. Figure 4.11. When a file of XML has a schema, you get Intellisense while editing it in Visual Studio. Once you have a schema, you can use it to generate a very useful class called a typed dataset . This is a class that inherits from the Dataset class in the System::Data sub-namespace (discussed more fully in Chapter 11) and is typically used to hold the results from a query of the database. By default, Visual Studio .NET 2003 generates a typed dataset whenever you generate a schema, and regenerates the typed dataset every time you save the schema. What good is a typed dataset? It's the definition of a class. An actual instance of that class can hold data from a database (or elsewhere as you'll see shortly) and can then be used as the data source for a control that knows how to display data. A perfect example of such a control is a DataGrid. Connecting a DataGrid to a DataSetHere's how to hook up the DataGrid in the sample application so that it displays the contents of the sample file of XML:
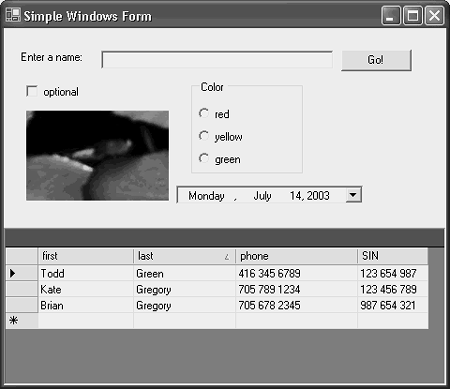
Build and run the project, and you should see something like Figure 4.12: The DataGrid displays the contents of the XML file in an intuitive grid. You can resize the columns with the mouse, click any column heading to sort by the column, and if you resize the application so that it's narrower than the DataGrid, scroll bars will appear automatically. The only thing that's a bit of a cheat here is filling the DataGrid by just reading in XML from a file. Normally, you would use a data layer to provide a DataSet for the grid to display. Figure 4.12. The DataGrid displays the contents of the XML file with very little coding effort. Working with a Data ViewFor simple filtering of records, a DataView is hard to beat. You bring all your results from the database once, and keep them in a data set. Then instead of hooking the data grid directly to the data set, you hook it to a data view, and you hook the data view to the data set. The data view has a Filter property that you can use to control which records the data grid displayswithout going back to the database over and over again. This Filter property holds an instance of the DataFilter class. Here's how to change the sample application to use a data view:
The text for the filter builds a selection clause around the context of textBox2 . For example, if textBox2 held the letter G, the filter string would be "last LIKE '*G*'" . This instructs the data view to give the data grid only records for which the column called last contains a G. If you want the text box to mean "the column should start with this string", remove the first * from the filter string. If you've been coding along, try running the sample application now. You can sort the data grid, restrict it to displaying only certain rows by entering a last name or part of a last name in the text box and clicking the button, and generally get a good feel for the way a real application (one with real database technology behind it) would work. In just a few lines of code, and a little dragging and dropping, you can create very realistic prototypes. You'll be seeing more of data grids and data sets in Chapter 11, but don't think you have to know all about databases to use them: Their power is in their simplicity for the user interface designer. |
EAN: 2147483647
Pages: 141