Creating a Multiple-Form Interface
| When you build a Windows Forms application, your first form is given to you to work with, and so is the code to display it. But what if you want to display a second form? For example, you might want to ask the user for several pieces of information at once. To display such a form, you must first write a class that represents the form. Then you must add something to your user interfacea button or a menu itemthat the user will choose to bring up the form. The handler for this user interface item must
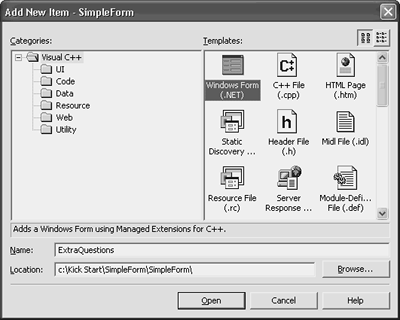
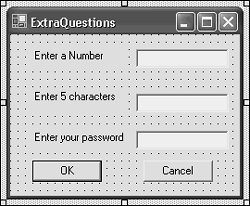
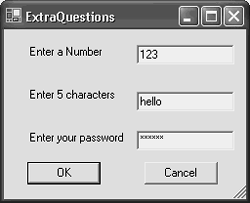
These steps are further described in the sections that follow. Writing a Form ClassLike the form class that is generated for you when you create a Windows Forms application, the new form class you write to display a form must inherit from System::Windows:: Forms::Form . To have such a class generated, right-click the project in Solution Explorer and choose Add, Add New Item. On the Add New Item dialog box, select Windows Form (.NET), as in Figure 4.14. Figure 4.14. Adding another Windows Form to the project. By entering ExtraQuestions for the form name , you arrange for a form to be created in the file ExtraQuestions.h . Double-clicking ExtraQuestions.h opens the form in the designer. Right-click either ExtraQuestions.h or the form in the designer and choose View Code to see the code that was generated. The class definition looks like this (comments have been removed to save space): public __gc class ExtraQuestions : public System::Windows::Forms::Form { public: ExtraQuestions(void) { InitializeComponent(); } protected: void Dispose(Boolean disposing) { if (disposing && components) { components->Dispose(); } __super::Dispose(disposing); } private: System::ComponentModel::Container* components; void InitializeComponent(void) { this->components = new System::ComponentModel::Container(); this->Size = System::Drawing::Size(300,300); this->Text = S" ExtraQuestions"; } }; To build the form, use the visual designer just as you would when building the primary application, dragging items from the toolbox onto the form surface. This will change your code automatically. Figure 4.15 shows the ExtraQuestions form with three labels and text boxes, plus an OK and Cancel button. Figure 4.15. The new form has three text boxes and two buttons . Properties of Text BoxesTo limit the number of characters the user can enter into a text box, use the MaxLength property. It defaults to 32,767a limit most users are unlikely to reach. If you change it, characters typed after the length has been reached are simply ignored. No error message is shown to the users, but an error beep is sounded. To keep the text box from echoing the characters the user types, type a character in the Passwordchar property. This character will appear instead of each character typed by the user. Figure 4.16 shows the form echoing stars in the third text box while the user types a password. Figure 4.16. The password character replaces the text a user types with the character of the programmer's choice. Displaying a FormWhen you display a new form (a dialog box is a special kind of form, with OK and Cancel buttons and no menu), you can display it either as a modal or a modeless form. Most of the forms you will code will be modal. A modal form is on top of all the other windows in the application: The user must deal with the form or dialog box and then close it before going on to other work. An example of this is the dialog box that appears when the user chooses File, Open in any Windows application. A modeless form enables the user to click the underlying application and do some other work and then return to the form. An example of this is the dialog box that appears when the user chooses Edit, Find in many Windows applications. In unmanaged C++, when using MFC, modeless dialog boxes are quite a bit more trouble than modal ones. This is primarily a memory-management issue, so when you're working with garbage-collected form classes in managed C++, modeless forms are not much harder than modal ones, because the framework manages memory for you. You can make your decision based on the way you want your application to behave. Displaying a Modal FormTo display a modal form, first add a user interface component, such as a button, to the application's main form. Then write the handler for the user interface component: it should create an instance of the form class, and then call that instance's ShowDialog() method. Here's a handler for a button added to the sample application for this chapter: private: System::Void button3_Click(System::Object * sender, System::EventArgs * e) { ExtraQuestions* extraquestionsform = new ExtraQuestions(); extraquestionsform->ShowDialog(); } If you run this application and click the Show Modal Form button to bring up the form as a modal form, you will not be able to click back on the original form or interact with the application other than through the new ExtraQuestions form that is being displayed. You can close the form by clicking the X in the upper-right corner; neither the OK nor the Cancel button will close the form until you write code to make them do so.
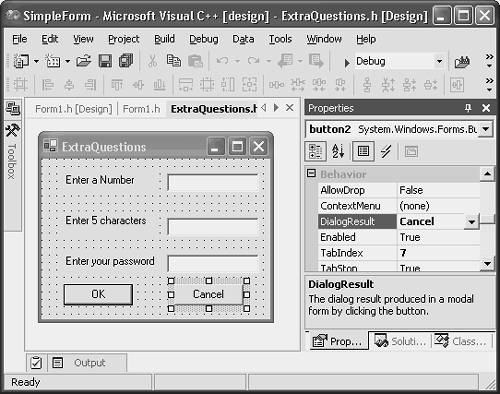
ShowDialog() actually returns a value: an instance of the enumeration Windows::Forms::DialogResult . This enumeration has the values Abort, Cancel, Ignore, No, None, OK, Retry, and Yes. When you write code in the form class that sets the DialogResult property of the form, and the form is being displayed as a modal form, ShowDialog hides (but does not destroy) the form and returns the value that you assigned to the DialogResult property. It's very common to have button handlers assign this property, so as a useful shortcut, buttons have a DialogResult property. If you set this property, when the button is clicked, the value you specify will be assigned to the DialogResult property of the form, which will in turn end the ShowDialog() method. This is excellent for a Cancel button (see Figure 4.17), when the only processing you are likely to want is to set this DialogResult property. Figure 4.17. The DialogResult property can save a lot of coding. While you're using the Properties window with the form open in the designer, there are two interesting properties of the form itself you should examine: Accept Button and Cancel Button. If the user presses Enter, and you have an Accept Button property set, it's as though the user clicked that button. Similarly, if the user presses Escape, and you have a Cancel Button property set, it's as though the user clicked that button instead. This can save you having to code handlers for those keys while giving your users a more convenient and intuitive user interface. For an OK button, you might want to do some validation before returning a result of OK. In that case you should still write a handler for the OK button. For example, here is the handler for the OK button on the ExtraQuestions form: private: System::Void button1_Click(System::Object * sender, System::EventArgs * e) { try { System::Decimal number = Convert::ToDecimal(textBox1->Text); if (textBox1->Text->CompareTo(number.ToString()) == 0) { //user typed a number DialogResult = OK; } } catch (Exception* e) // probably a format exception on the Convert { MessageBox::Show("First box must hold a number"); } } This code attempts to convert the string in textBox1 into a decimal number such as 12.34 . If the string is not in a format that can be converted like this, the framework code will throw a FormatException . This code just catches any exception and displays an error message. If there is no exception, the DialogResult is set, which ends the ShowDialog() method and returns control to the calling form. The calling form, should, of course, do something with the information that the user entered on the form. It can also clean up the form by calling Dispose , although this isn't strictly necessary. The decision hinges on whether the form holds scarce unmanaged resources, such as database connections or open files. If it does, you should clean it up right away. If it doesn't, you might as well leave it around in case the user brings the form up again. It will come up more quickly the second time if it has not been disposed. Retrieving Information from a FormThe controls you drag onto the form with the toolbox are private members of the form class: public __gc class ExtraQuestions : public System::Windows::Forms::Form { // . . . private: System::Windows::Forms::TextBox * textBox1; private: System::Windows::Forms::TextBox * textBox2; private: System::Windows::Forms::TextBox * textBox3; There's no need to keep repeating the private: access modifier like this, but it made the designer simpler to write. Because the text boxes (as well as the labels and buttons) are private, you can't write code in the application's main form to retrieve the text that was entered in the text boxes. You must therefore write public methods of the form class that return this information. Here are the ones for the ExtraQuestions form: public: String* getText1() {return textBox1->Text;} String* getText2() {return textBox2->Text;} String* getText3() {return textBox3->Text;} Because the first text box is supposed to hold an integer, you could have this first function return an integer instead of a string, and perform the conversion here. It all depends on the use to which you will put this information back in the calling form. You're the programmeryou decide which functions to add and what they return. Code in the calling form can use these functions after the call to ShowDialog() , like so: ExtraQuestions* extraquestionsform = new ExtraQuestions(); Windows::Forms::DialogResult answer = extraquestionsform->ShowDialog(); if (answer == OK) { System::Text::StringBuilder* sb = new System::Text::StringBuilder(S" You entered "); sb->Append(extraquestionsform->getText1()); sb->Append(", "); sb->Append(extraquestionsform->getText2()); sb->Append(", and "); sb->Append(extraquestionsform->getText3()); MessageBox::Show(sb->ToString()); } else { MessageBox::Show("You cancelled"); } Passing Information to a FormIt's quite common for a form to need information from the calling application, and to use this information to determine the initial values for some of the controls on the form. You achieve this by writing a constructor for the form that takes parameters, and using these parameters to initialize the controls. The only trick (and it's a small one) is to use the parameters after calling InitializeComponent() . I usually just edit the constructor that was generated, adding a parameter to it, like this: public: ExtraQuestions(String* start2) { InitializeComponent(); textBox2->Text = start2->Substring(0,5); } Of course, if you change the only constructor to take a parameter, you'll have to change the code in the calling form to pass a parameter: ExtraQuestions* extraquestionsform = new ExtraQuestions("hello"); In this example, I take a substring of the parameter because the second text box has a MaxLength property set to 5 , and it would confuse the user to see more than five characters in the text box when the form loads. You might see examples elsewhere that catch the OnLoad event, or override the OnLoad() method and put control initialization in there. Usually, they take a parameter in the constructor and save it in a member variable, and then use it in the OnLoad code. For almost all cases, there's no need to do that. Most forms become visible (are loaded) as soon as they are constructed . Putting your initialization code entirely in the constructor is more efficient and makes your forms load more quickly.
Displaying a Modeless FormTo display a modeless form, you can use the same form class as for the modal form; the difference comes down to whether you call ShowDialog() or just Show() . Here's the handler for the Show Modeless Form button in the sample application: private: System::Void button4_Click (System::Object * sender, System::EventArgs * e) { ExtraQuestions* extraquestionsform = new ExtraQuestions("hello"); extraquestionsform->Show(); } This code passes a string to the form constructor because this particular form class takes a string. Many form classes take no parameters in their constructors. The Show() method does not return a value. You have to write your application so that it doesn't matter whether the second form is being displayed or not, which can be more complicated than working with modal forms. |
EAN: 2147483647
Pages: 141
- ERP System Acquisition: A Process Model and Results From an Austrian Survey
- Data Mining for Business Process Reengineering
- Healthcare Information: From Administrative to Practice Databases
- A Hybrid Clustering Technique to Improve Patient Data Quality
- Development of Interactive Web Sites to Enhance Police/Community Relations