Writing a Remoting Client
| The client can be any kind of application: console application, Windows application, Windows service, and so on. In this section, you'll create a Windows application to use the remoted class. Add a new Windows Forms project called GreetingClient to the same solution. As first discussed in Chapter 4, "Building Simple User Interfaces with Windows Forms," you use the toolbox to build a simple user interface on the blank form that is generated for you. Add the following controls:
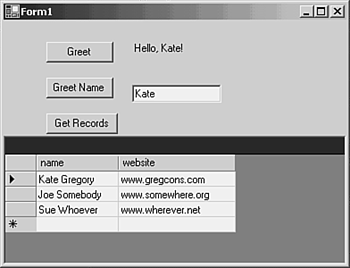
The completed form should resemble Figure 14.1. Figure 14.1. Creating a user interface for a client that uses the remoted interface. Add a reference (using the Project tab) to the Greeting project, and then edit the code, adding this private variable: Greeting::Greeter* greet; Add this line to the constructor, after the call to InitializeComponent() : greet = new Greeting::Greeter(); The handlers for the three buttons will each use this variable to call methods of the remoted class. At the moment, it's not remotedthat's simpler to do once you know the client is working. Debugging across remoting is a little more difficult than ordinary debugging. Continue to develop the client by double-clicking the Greet button in Design View, and then editing the handler to use the remoted object, so that it reads like this: private: System::Void Greet_Click(System::Object * sender, System::EventArgs * e) { Greeting->Text = greet->Greet(); } This code puts the return value from the Greet() method into the Text property of the label on the form. Similarly, add this code for the GreetName handler: private: System::Void GreetName_Click(System::Object * sender, System::EventArgs * e) { Greeting->Text = greet->Greet(Namebox->Text); } This code uses the text from the text box and passes it to the overload of Greet() that takes a String* , and then puts the result in the Text property of the Greeting label. The button handler for the third button will fill the data grid. Double-click the button and edit the handler to read like this: private: System::Void GetRecords_Click(System::Object * sender, System::EventArgs * e) { Data::DataSet* ds = greet->Records(); RecordsGrid->DataSource = ds->Tables->get_Item(0); } To test this code, right-click GreetingClient in Solution Explorer and choose Set As Startup Project. This will ensure that the Windows form runs when you run the solution. Build the code to ensure there are no errors, and then start debugging by pressing F5. Click the Greet button; you should see Hello! next to the button. Enter a name in the text box and click the Greet Name button; the label should change to greet that name. Finally, click the Get Records button; the data grid should fill in, as in Figure 14.2. Figure 14.2. Testing the client application while the class library is still on the same machine. Once you've established that the client and the class library work together, it's time to add remoting to it. |

EAN: 2147483647
Pages: 141
- Context Management of ERP Processes in Virtual Communities
- Data Mining for Business Process Reengineering
- Healthcare Information: From Administrative to Practice Databases
- A Hybrid Clustering Technique to Improve Patient Data Quality
- Development of Interactive Web Sites to Enhance Police/Community Relations