Flylib.com

Books Software


Unit Testing


Unit Testing

To test the Text Editor:

  1. Set the path of the bin directory of J2SDK by executing the following command at the command prompt:

    set path=%path%;D:\j2sdk1.4.0_02\bin;
    
  1. Set the classpath of the lib directory of J2SDK by executing the following command at the command prompt:

    set classpath = %classpath%;d:\j2sdk1.4.0_02\lib;
    
  1. Copy the Editor.java, ActionPerform.java, ColorClass.java, FontClass.java, PrintClass.java, and Help.java files to a folder on your computer. Compile the files using the following javac command:

    javac *.java
    
  1. To run the Text Editor, specify the following command at the command prompt:

    java Editor
    
  1. Select the File->New command from the menu bar. A new text file is opened in the Text Editor, as shown in Figure 6-7:

    click to expand: this figure shows a new text file in the text editor.
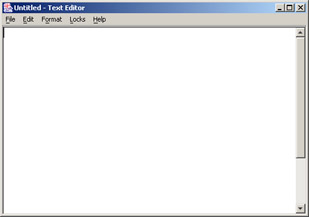
    Figure 6-7: The Untitled Text Editor Window

  1. Write Hello, this is a sample file, in the currently untitled text file.

  2. Select the File->Save As command from the menu bar to save the file. A Save As dialog box appears, as shown in Figure 6-8:

    click to expand: this figure shows the save as dialog box. to save the untitled file, you need to specify a location and a file name.
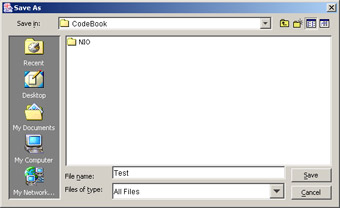
    Figure 6-8: Save As Dialog Box

  1. In the Save As dialog box, specify the file name as Test and location as C:\CodeBook.

  2. Select the File->New command from the menu bar to clear the text area.

  3. Select the File->Open command from the menu bar to open the file, Test.txt. The Open dialog box appears, as shown in Figure 6-9:

    click to expand: this figure shows the open dialog box.
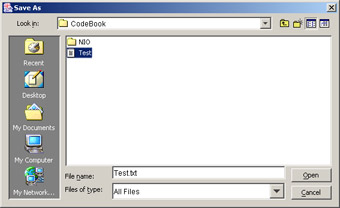
    Figure 6-9: Open Dialog Box

  1. Click the Open button of the Open dialog box that opens the Test.txt file from C:\CodeBook in the Text Editor, as shown in Figure 6-10:

    click to expand: this figure shows the contents of the test.txt file.
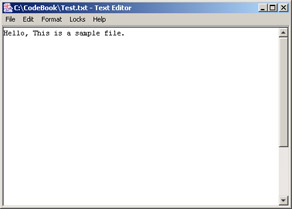
    Figure 6-10: Displaying the Test.txt File

  1. Select the Format->Font command from the menu bar to open the Font dialog box, as shown in Figure 6-4. Specify the font as Verdana, size as 20, and style as Italic. Click the OK button to apply the font changes to the file, as shown in Figure 6-11:

    click to expand: this figure shows the test.txt file that has been modified to verdana, 20 points, italic.
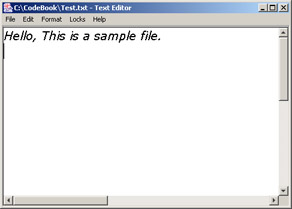
    Figure 6-11: Displaying the Test.txt File with Selected Font

  1. Select the Format->Color command from the menu bar to open the Color dialog box, as shown in Figure 6-10. Specify the RGB values in this dialog box and click OK. The color of the file is modified, as shown in Figure 6-12:

    click to expand: this figure shows the contents of the test.txt file modified to blue.
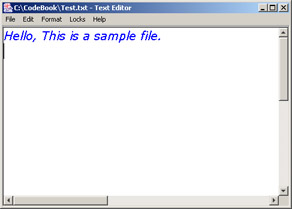
    Figure 6-12: Displaying the Test.txt File with Selected Color

  1. Select the Lock->Exclusive Lock command from the menu bar. This locks the Test.txt file.

  2. Select the Start->Programs->Accessories->Notepad command to open a Windows notepad utility.

  3. Select the File->Open command from the menu bar of the Notepad utility. Open the Text.txt file from the C:\CodeBook location.

  4. Change the contents of the file and select the File->Save command from the menu bar. An error message appears because the file is locked, as shown in Figure 6-13:

    click to expand: this figure shows an error message box that is appears when an enduser tries to modify a locked file.
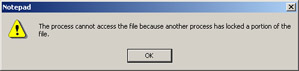
    Figure 6-13: Displaying Error Message


Chapter 7: Creating a Network Information Application

The New Input/Output (NIO) API provides the java.nio, java.nio.channels, and java.nio.charset packages for buffer management, socket handling, and data transfer. The java.nio package contains the ByteBuffer and CharBuffer classes that you can use to read and store the bytes and characters. To connect the application to a network, you can use the SocketChannel class that is available in the java.nio.channel package. The java.nio.charset package provides two classes, Charset and CharsetDecoder. You can use these classes to set the character sets and decode the bytes to characters .

This chapter explains how to develop a Network Information application using the java.nio, java.nio.channels, and java.nio.charset packages.

Architecture of the Network Information Application

The Network Information application displays a list of computers connected in a network. Using this application, you can display the echo time or the current system date and time of a specific computer. For example, ABC Inc has corporate offices in three countries , X, Y, and Z. A network administrator in ABC Inc's office in X wants to know the time displayed in the HR Manager's computer, which is located at Y. The Network Information application gives the network administrator the ability to retrieve this information. The Network Information application uses the following files:

  • NetCompFrame.java: Creates a user interface for the Network Information application that helps display a list of network computers.

  • NetCompConnect.java: Implements the functions of the Network Information application. This file connects the application to the network using socket channels.

  • CompInfo.java: Provides information about the network computer.

  • CompInfoDialog.java: Creates a dialog box that displays the echo time and current system date and time of a computer.

Figure 7-1 shows the architecture of the Network Information application:

click to expand: this figure shows the files the network information application uses and the sequence in which it uses them.
Figure 7-1: Architecture of the Network Information Application

In the Network Information application, the NetCompFrame.java file calls the NetCompConnect.java and CompInfoDialog.java files. The NetCompConnect.java file connects the application to the network at the specified port number and calls the CompInfo.java file to retrieve the computer information. The CompInfoDialog.java file displays the computer information by calling the CompInfo.java file.