Starting with a Boot Disk
In most cases, you can install Red Hat Linux directly from your CD drive. All you should need to do is reconfigure the settings in your BIOS menu to boot directly from that drive, as described near the end of Chapter 02 . However, there are situations where you need a boot disk:
-
You re unable to set your BIOS to boot from your CD.
-
Your CD is unable to read the boot files from the first Red Hat installation CD.
-
You re installing Red Hat Linux from another source, such as a remote computer through the network (covered in Chapter 04 ). If you can boot from a CD, you may prefer to create the fairly small boot.iso CD for this purpose.
If you need to install Red Hat Linux from a boot floppy, you may need anywhere from one to four 1.44MB floppy disks, depending on your installation method and hardware.
You can create these floppies from .img files in the /image directory of the first Red Hat installation CD. The key files in this directory are summarized in Table 3.1.
| Image File | Description |
|---|---|
| bootdisk.img | Standard boot disk for all local and network installations. |
| drvblock.img | Driver disk for block (storage) devices. |
| drvnet.img | Driver disk for network adapters. |
| pcmciadd.img | Driver disk for PCMCIA hardware. |
| boot.iso | All-in-one boot disk with drivers; while this does not fit on a single 1.44MB floppy, it can be installed on a CD. |
This section is closely related to (and is somewhat repetitive of) the boot disk section in Chapter 04 .
Creating a Boot or Driver Disk
Red Hat Linux provides four utilities that help you create boot and driver floppies. Two of them ( dd , cat ) work in Linux; the other two ( RAWRITE.EXE , RAWWRITEWIN.EXE ) work in Microsoft Windows.
The Linux utilities are standard commands that you can run from other Linux or Unix computers; the image files and Microsoft utilities are available on the first Red Hat Linux installation CD.
If you re currently running a Linux computer, use these steps to create a boot disk. Remember, you ll probably also need one or more driver disks, as described in the following sections.
-
At a command-line interface, find the image files. For example, if you use the command
# mount /mnt/cdrom
to mount the first Red Hat Linux installation CD, the image files will be located in the /mnt/cdrom/images directory.
-
Insert a 1.44MB disk into a floppy drive. You do not need to use the mount command on that drive.
-
Use one of the following commands to convert the boot disk image, bootdisk.img , to a series of files on your floppy disk ( /dev/fd0 is the device associated with the first floppy drive on your computer):
# dd if=/mnt/cdrom/images/bootdisk.img of=/dev/fd0 # cat /mnt/cdrom/images/bootdisk.img > /dev/fd0
-
Repeat these steps with any driver disks that you might require from the images directory.
If you re in Microsoft Windows and want to create a boot disk from the command-line interface, use these steps to create that disk. Remember, you ll probably also need to repeat the process for one or both driver disks, as described in the following sections.
-
Insert the first Red Hat installation CD into a drive. Let s assume it s drive F:, but if your drive letter is different, substitute accordingly .
-
Access a MS-DOS prompt. Click Start Run. In the Run dialog box that appears, type CMD in the text box and press Enter. This should open a command prompt window.
-
In the command prompt window, type F: and press Enter.
-
Start the RAWRITE.EXE utility and run the following commands; insert a 1.44MB disk into your floppy drive when prompted:
F:\> /DOSUTILS/RAWRITE.EXE Enter disk image source file name: /IMAGES/BOOTDISK.IMG Enter target diskette drive: A: Please insert a formatted diskette into drive A: and press -ENTER-:
-
Repeat the process with other required disk images in the IMAGES directory.
You can also use Microsoft Windows to create a boot disk by using the graphical RAWWRITEWIN.EXE utility. Remember, you ll probably also need one or both driver disks, as described in the sections that follow.
-
Insert the first Red Hat installation CD into a drive. Let s assume the CD is using drive H:, but if your drive letter is different, substitute accordingly.
-
Access the utility. Open Microsoft Windows Explorer. Click Start Run. In the Run dialog box that appears, type EXPLORER in the text box and press Enter. This should open Microsoft Windows Explorer.
-
Navigate to the H: drive, and then access the RAWRITEWIN folder, which is inside the DOSUTILS folder. You can then double-click on the RAWWRITEWIN.EXE utility. (Yes, the spelling of the RAWRITEWIN folder differs from the RAWWRITEWIN.EXE utility.)
-
This opens the RawWrite dialog box, shown in Figure 3.1. Click the Write tab if necessary. Click on the button to the right of the Image File text box; you should be able to access the image file of your choice from the H:\IMAGES directory in the Open dialog box.
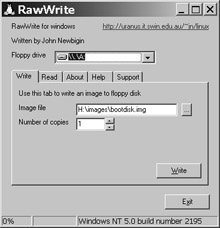
Figure 3.1: Creating a boot floppy with RawWrite -
Insert a 1.44MB disk into the floppy drive and click Write. Repeat this process with other required disk images.
Analyzing the Red Hat Boot Floppy
Whatever method you use to create it, the purpose and contents of the Red Hat Linux 9 boot floppy remain the same. It s created from the bootdisk.img file in the images directory on the first Red Hat installation CD and is used to boot your computer. On this floppy, the syslinux.cfg file provides a roadmap to what comes next , as shown in Figure 3.2.
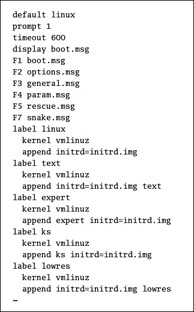
Figure 3.2: The Linux Boot roadmap
Take a careful look at this file. Table 3.2 describes the key commands and should help you interpret the syslinux.cfg file.
| Command | Description |
|---|---|
| default | Specifies the default boot option, in this case, default linux . |
| prompt | Sets out the boot: prompt. |
| timeout | Configures the delay time, in tenths of a second, before the boot disk automatically starts the default option; normally set to 600, or one minute. |
| display | Points to the initial message file to display on the screen. |
| F x option .msg | Sets the function key associated with a particular message file. |
| label command | Specifies the actions associated with a particular command. |
| kernel | Sets the name of the compressed kernel image on the boot disk. |
| append | Adds the parameters with which the boot disk loads the kernel. |
| initrd | Specifies the Initial RAM disk. |
| text | Starts installation in text mode; see Chapter 04 . |
| expert | Starts installation in expert mode, where you specify the hardware drivers. |
| ks | Starts the installation with a Kickstart file; see Chapter 05 . |
| lowres | Starts the installation in a low-resolution 640 X 400 graphics mode with a basic VESA (SVGA) driver. |
As you can see, the default is to load the compressed Linux kernel, vmlinuz , with the Initial RAM disk. As you can see in Figure 3.2, other options add different parameters.
| Tip | You can use a Red Hat Linux boot floppy as a rescue disk. Using the techniques described in Chapter 11 , it can help you recover from a number of failures, such as corrupted boot configuration files. |
Analyzing the Storage Device Driver Disk
You can t install Red Hat Linux unless Anaconda detects a hard drive attached to your computer. The standard boot disk (from bootdisk.img ) often recognizes standard IDE, SCSI, and even some USB hard drives that are connected to a PC; the required drivers are integrated into the compressed kernel.
That is why you may want to create a 1.44MB floppy from the drvblock.img file in the images directory of the first Red Hat Linux installation CD. Use any of the techniques described earlier in this chapter to create this disk. It loads five files onto a floppy, which we briefly describe in Table 3.3.
| File | Description |
|---|---|
| modinfo | Contains a list of device drivers and descriptions |
| modules.cgz | Has a compressed version of all drivers listed in modinfo |
| modules.dep | Includes a list of dependencies; in other words, other drivers required by each device |
| pcitable | Configures PCI settings for each device |
| rhdd-6.1 | Labels this driver disk: Supplemental Block Device Drivers |
Analyzing the Network Device Driver Disk
You can t install Red Hat Linux over a network unless Anaconda detects a network card on your computer. The standard boot disk (from bootdisk.img ) does not include any network drivers, so you need a supplemental driver disk for network installations.
You can create a 1.44MB floppy from the drvnet.img file in the images directory of the first Red Hat Linux installation CD. Use any of the techniques described earlier in this chapter to create this disk. It loads five files onto a floppy, which are functionally similar to those on the storage device driver disk described in Table 3.3. While the contents have changed, the filenames are the same as before.
Analyzing the PCMCIA Driver Disk
Installing Red Hat Linux on a laptop computer often creates special issues. Laptops often rely on PCMCIA cards, as specified by the Personal Computer Memory Card International Association to connect to networks, SCSI devices and more. These credit card “ sized adapters are sometimes known as PC Cards. Naturally, Red Hat provides many of the major PCMCIA socket, network, and SCSI drivers in the pcmciadd.img file.
You can create a 1.44MB floppy from the pcmciadd.img file in the images directory of the first Red Hat Linux installation CD. Use any of the techniques described earlier in this chapter to create this disk. It loads five files onto a floppy, which are functionally similar to those on the storage device driver disk described in Table 3.3. Although the contents have changed, the filenames are the same as before.
The Boot ISO
There is one more file of note in the /images directory of the first Red Hat Linux installation CD: boot.iso . You can create a boot CD from this 3.5MB file, using the techniques described for the cdrecord command in Chapter 14 . It s suitable for simultaneous network installations where you don t want to run around loading and unloading boot and driver disks.
When you burn the boot.iso image onto a CD, the contents appear quite similar to the standard Red Hat boot floppy. There are two major differences: the files are all in an isolinux subdirectory, and the drivers associated with the aforementioned driver disks are combined in the Initial RAM disk image file, initrd.img .
EAN: 2147483647
Pages: 220