Configuring a DNS Server
A Domain Name Service (DNS) server is a flexible database of fully qualified domain names (FQDN), such as www.sybex.com , and IP addresses, such as 63.99.198.12. The Linux version of DNS is based on BIND, which powers most of the DNS servers on the Internet.
No one DNS server can hold all of the FQDNs and IPv4 addresses on the Internet. If a DNS server does not have a FQDN in its database, it can refer to other DNS servers. Once the server finds the right IP address, it adds the FQDN and IP address to its database.
DNS is configured through the basic configuration files /etc/named.conf and /etc/named.custom , as well as through detailed configuration files in the /var/named directory. It is still best to edit these files directly to configure DNS.
However, as of this writing, Red Hat encourages the use of redhat-config-bind to configure your DNS server. Configuring DNS is not easy; redhat-config-bind is probably a better option for less experienced Linux administrators. This tool requires a GUI such as GNOME or KDE.
Packages
Not all of the RPM packages that you need for DNS are installed by default. The required packages are listed in Table 24.1; as you might remember from Chapter 10 , you can use the rpm -q packagename command to see if they re installed. Once the packages are installed, you can use the rpm -ql packagename command to see the associated files.
| Package | Function |
|---|---|
| bind-* | The DNS name server software |
| bind- devel -* | DNS development tools; not required |
| bind- utils -* | DNS tools such as dig and host |
| caching-nameserver-* | Basic configuration files for a caching DNS server; includes sample /etc/named.conf and /var/named/localhost.zone files |
| redhat-config-bind-* | The Red Hat GUI DNS configuration tool; required |
DNS Concepts
As we mentioned earlier, no single DNS server can contain the database of FQDN and IP addresses for the entire Internet. Because of the volume of associated data, it isn t practical to centralize DNS information. Therefore, DNS servers are organized in zones . Each DNS server has its zone of responsibility . DNS zones are based on the way FQDNs are organized.
Start with a basic FQDN, www.mommabears.com. . This includes a root zone, which is not the .com , but the period to the right of the .com .
| Note | The root DNS servers are listed in /var/named/named.ca , which is part of the caching-nameserver-* RPM package. |
The next phrase may be .com , .net , .org , and so on; these are known as top-level domains . In this case, mommabears is a subdomain of .com , and www is the name (or more likely the alias) of a computer with the Momma Bears web server.
A master DNS server on the mommabears.com . network would be the authoritative server for that zone. Conversely, mommabears.com . is the Forward (or Primary) Master Zone for that DNS server.
These database zones aren t complete unless you can reverse the process. In other words, you should be able to find an IP address from a FQDN ”and you should be able to reverse the process by finding a FQDN from an IP address. The reverse database is known as a Reverse Master Zone.
You can configure four different types of DNS servers. As you ll recall from Chapter 21 , the IP address of any DNS server that you use should be listed in /etc/resolv.conf .
Master A master DNS server is the authoritative server for a specific zone, such as sybex.com . Queries for IP addresses from computers on the sybex.com network normally go to this server. Other DNS servers refer to this master for addresses of other networks and computers within sybex.com .
Slave Queries for IP addresses from within sybex.com can go to this server; it gets its FQDN/IP address database from a master DNS server.
Caching-only A caching-only DNS server stores recent requests for IP addresses. If you have a caching-only DNS server on your LAN and your DNS server is on a remote network, your computers can often get quicker answers by using the caching-only DNS server.
Forwarding A forwarding DNS server does not store any FQDN/IP address information. It does store the IP addresses of other DNS servers in /etc/named.conf .
Initial DNS Configuration
Normally, I encourage users to configure Linux services at the command-line interface. If you do so, you learn more about the service and can better customize the service for the network.
However, Red Hat has reconfigured the DNS configuration files to encourage users to use the Red Hat GUI DNS configuration tool, redhat-config-bind . Even trivial errors in the main DNS configuration file can keep you from running DNS. If you re fairly new at Linux, using redhat-config-bind to edit /etc/named.conf can keep these errors to a minimum. If you need to customize your DNS server further, include the additional information in the /etc/named.custom file. This format is similar to the LPD printer configuration files discussed in Chapter 25 .
| Tip | You don t have to use redhat-config-bind ”you can still edit /etc/named.conf directly. However, any subsequent changes made through redhat-config-bind will overwrite anything that you ve added to /etc/named.conf . If you prefer to edit /etc/named.conf directly, don t install the redhat-config-bind-* RPM. You can also skip to the next section, on DNS configuration files. |
Configuring a Primary DNS Server
To configure a primary DNS server, start the GUI of your choice, open a text console window, and enter the redhat-config-bind command to open a Domain Name Service window similar to the one in Figure 24.1. When you first install DNS, the only entries are based on the local computer.
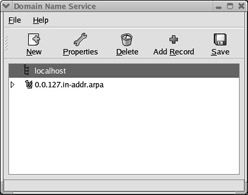
Figure 24.1: redhat- config-bind
| Note | Alternatively, in GNOME or KDE, you can select Main Menu (or K Menu) ˜ System Settings ˜ Server Settings ˜ Domain Name Service. |
When you configure a primary or master DNS server, you re configuring /etc/named.conf and various files in /var/named . In the Domain Name Service window, click New. In the Select a Zone Type window, click the Forward Master Zone option. Enter a domain name; if you don t have one, example.com is an official generic domain name that you can use, as shown in Figure 24.2.
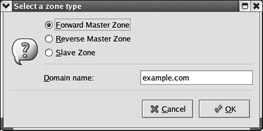
Figure 24.2: Selecting a zone
When you click OK, this opens the Name To IP Translations window shown in Figure 24.3. In this window, enter the hostname of your Primary Nameserver (SOA) ”your DNS server. Remember to add a period at the end of the hostname.
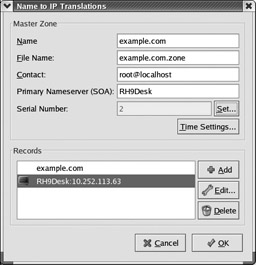
Figure 24.3: Adding a DNS server
You also need to enter the IP address for your DNS server. When you click Add, the Add a Record window appears; click the Nameserver tab as shown in Figure 24.4. In the Domain Name text box, enter the hostname of your DNS server computer; note that the rest of the FQDN is already filled in. Also observe how your information is added by default to the reverse address table. In the Served By text box, enter the IP address of that computer. When you re done, click OK twice to return to the Domain Name Service window.
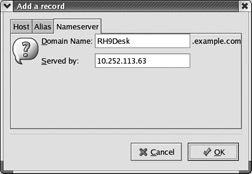
Figure 24.4: Adding the DNS server record
Now you ll add the Reverse Master Zone. Click New; this time, select Reverse Master Zone in the Select A Zone Type window. The text box now reads IP Address (first 3 Octets). IPv4 addresses include four numbers , also known as octets. For example, if your network IP address is 10.252.113.0, enter 10.252.113 in the text box and click OK. This opens a new IP To Name Translations window, as shown in Figure 24.5.
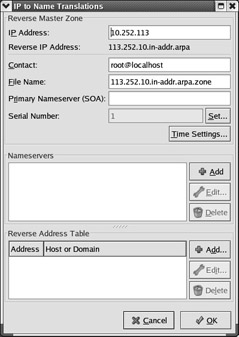
Figure 24.5: Configuring a reverse zone
You need to reenter the information for your Primary Nameserver (SOA). You ll also need to click Add in the Nameservers section to add at least the IP address of that DNS server to the list. Click OK and repeat as needed.
Next, click Add in the Reverse Address Table section to open the New Reverse Zone Pointer window, shown in Figure 24.6. In this window, enter the IP address for a computer on your LAN and its hostname or FQDN.
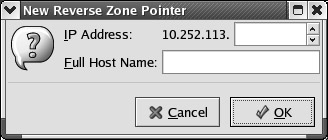
Figure 24.6: Adding information to the reverse zone
Repeat the process until you ve added all the computers on your LAN to the Reverse Address Table. Don t forget the computer on your network with the DNS server. Click OK to exit the IP to Name Translations window. Now you ve created a master DNS server. To save the configuration, click the Save button. This saves your configuration in /etc/named.conf and in various /var/named files.
You can now start DNS using the instructions shown in the Starting DNS section later in this chapter. You can also configure a DNS slave server using redhat-config-bind , or configure all of your DNS servers by directly editing the appropriate configuration files.
A DNS Slave Server
You can also use redhat-config-bind to create a DNS slave server. Slave DNS servers are, by definition, on a different computer. They look to a master DNS server for database information.
Start redhat-config-bind on the second computer. Click New. When the Select A Zone Type window in Figure 24.2 appears, select Slave Zone, and enter the domain name for your network. Using the current example, that would be example.com . Click OK.
The Slave Zone Settings window should appear, as shown in Figure 24.7. The name of your domain and database filename should automatically appear in the Name and File Name text boxes. Enter the IP address for your primary DNS server in the Masters List text box, and then click Add.
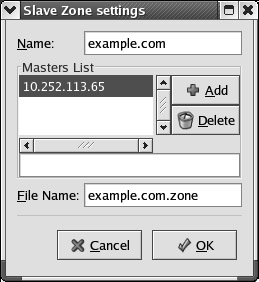
Figure 24.7: Slave zone DNS server settings
DNS Configuration Files
Several configuration files are required for a DNS server: /etc/named.conf and database files in the /var/named directory. You can use redhat-config-bind to create the settings for these files, or you can add them directly to these files with the text editor of your choice. It s helpful to examine each of these files in detail.
DNS /etc/named.conf
The main DNS configuration file is /etc/named.conf . A working example of this file (built through redhat-config-bind ) is shown in Figure 24.8. You can just as easily create this file in any text editor. However, if you use redhat-config-bind , be sure to add any additional parameters to /etc/named.custom .
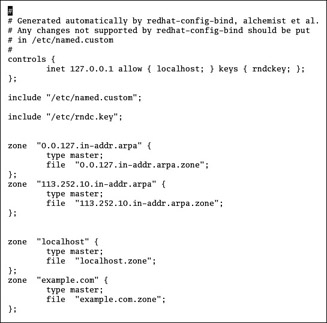
Figure 24.8: /etc/named.conf
It s useful to break down this file, command by command. First, the following command allows only users on the local computer to use the rndc command to maintain this DNS server:
controls { inet 127.0.0.1 allow { localhost; } keys { rndckey; }; }; | Note | Most administrators use SSH (see Chapter 23 ) to connect to remote DNS servers. However, you could also set the controls line in /etc/named.conf to the IP address and name of another computer on your LAN. You could then use rdnc , the name server control utility, to manage your DNS server remotely. |
Next, the include directive adds the contents of the stated files:
include "/etc/named.custom"; include "/etc/rndc.key";
The options directive specifies the directory with your DNS database files, usually /var/named :
options { directory "/var/named"; }; | Note | If you used redhat-config-bind , you should find the options command entry in your /etc/named.custom file. |
This DNS server has basic zones of authority. The localhost computer, IP address 127.0.0.1, is by default a zone of authority. The domain of your LAN ”in this case, example.com ”is a second zone of authority. Inverse zones, as indicated by the in-addr.arpa statement, are also an important part of the DNS database. Because these are reverse IP addresses, the 0.168.192.in-addr.arpa zone is based on the 192.168.0.0 network address.
zone "0.0.127.in-addr.arpa" { type master; file "0.0.127.in-addr.arpa.zone" }; zone "0.168.192.in-addr.arpa" { type master; file "0.168.192.in-addr.arpa.zone" }; zone "localhost" { type master; file "localhost.zone" }; zone "example.com" { type master; file "example.com.zone" }; But this does not include the database for the entire Internet; it is important to give your DNS server a way to access that database. It s available as the /var/named/named.ca file from the caching-nameserver-* RPM. You should add the following stanza to your /etc/named.conf configuration file to refer other queries to the root servers for the Internet:
zone "." { type hint; file "named.ca" }; | Note | If you used redhat-config-bind , you should find this zone command in your /etc/named.custom file. |
If this were a secondary (slave) DNS server for the example.com network, you d need to first get information from the master DNS server (if the IP address for your DNS server is different, substitute accordingly ):
zone "example.com" { type slave; file "example.com.zone"; masters { 192.168.0.213 } }; Alternatively, if this is a forwarding-only DNS server, for all domains you might see a different options statement, where the forwarders are the IP addresses of other DNS servers, perhaps for your ISP:
options { directory "/var/named"; forward only; forwarders { 10.11.12.13; 10.11.12.14; 10.11.12.15; }; Finally, for a caching-only DNS, you ll need the caching-nameserver-* RPM package. It includes a version of /etc/named.conf that should work in most cases. The only question is whether there might be a firewall that blocks your requests to other DNS servers. If so, remove the two forward slashes from in front of this command, which serve as comment characters :
// query-source address * port 53
As you ve seen in Chapter 22 , even the default high-security Linux iptables firewall allows DNS requests through TCP/IP port 53. Without this command, requests to other DNS servers might be blocked since the latest versions of BIND often use other ports.
DNS Database Files
The database files that support a DNS server are by default located in /var/named . The files stored depend on the name of your domain, the IP address of your network, and whether you re supporting a regular or a caching-only DNS server. Some of the files you might see are listed in Table 24.2.
| File | Function |
|---|---|
| 0.0.127.in-addr.arpa.zone | Specifies the reverse zone file for localhost. |
| netaddr .in-addr.apra.zone | Specifies the reverse zone file for the LAN, where netaddr is the first three octets of a network address, backwards ; e.g., for the 192.168.4.0 network, this file would be 4.168.192.in-addr.arpa.zone . |
| domain .zone | Specifies the zone file for the LAN, where an address such as example.com is substituted for domain . |
| localhost.zone | Specifies the zone file for localhost. |
| named.ca | Lists Internet root servers; from the caching-nameserver-* RPM. |
| named.local | Specifies the PTR , a reverse zone record for localhost. |
Now let us examine a forward and a reverse zone database file. Start with Figure 24.9, which is a view of the zone file for the hypothetical example.com LAN.
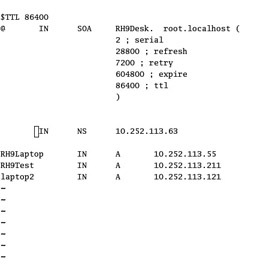
Figure 24.9: /var/named/ example.com.zone
As you can see, this file contains a number of strange -looking commands. It essentially sets RH9 as the nameserver ( ns ) for the example.com domain, with three other computers on that network.
You may want to configure a couple of other types of servers on this network. For example, the following lines set up two different mail servers; the lowest number gets higher priority:
MX 10 mail.example.com ; Primary Email Server MX 20 mail2.example.com ; Secondary Email Server
If you configure different servers on the same computer, you should set up aliases. For example, the following commands set up a news server and a web server on the same computer as an FTP server:
ftp IN A 192.168.0.34 www IN CNAME ftp news IN CNAME ftp
Table 24.3 explains some of the commands in this zone file.
| Command | Description |
|---|---|
| $TTL | Specifies the time to live (TTL) on records on this database before deletion; normally in seconds; alternatively 3D = 3 days. |
| @ | Sets a reference to the local computer. |
| IN | Assigns Internet class data. |
| SOA | Start of authority; specifies the DNS server for this zone. |
| root.localhost | Contains the e-mail address of the administrator for this DNS; reinterpreted as root@localhost . |
| serial | Specifies the serial number associated with this file; you should update it any time you ve changed your DNS configuration, or other DNS servers might forget that your DNS server exists. |
| refresh | Notes the time between checks to the primary DNS server for this zone, in seconds. |
| retry | Sets a time to try to contact a DNS server if the first attempt fails. If a refresh attempt can t reach a DNS server, try again after this many seconds. |
| expire | Notes a stop time; If refresh and retry attempts don t reach a DNS server, stop activity on this zone after this much additional time; in seconds. |
| ttl | Sets the time to live for individual records in this DNS server. |
| NS | Specifies the name of the nameserver, a.k.a. the DNS server. |
| A | Contains an address record for this hostname and IP address. |
| CNAME | Specifies the canonical name; alias for a different hostname. |
| MX | Specifies a mail server. |
| PTR | Contains the pointer, or a reverse record, in a reverse zone file. |
Now look at the reverse database file in Figure 24.10. As you can see, it includes the same basic commands as in a regular DNS database file. The PTR records may appear a bit strange.
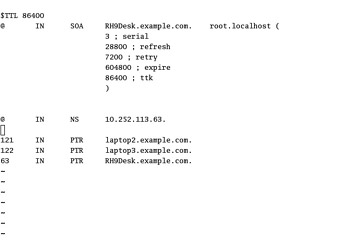
Figure 24.10: A reverse zone file
To find the IP address, you need the PTR record number as well as the name of the file. For example, the first PTR record line starts with the number 121, and the FQDN is laptop2.example.com . When correlated with the name of the file, 113.252.10.in-addr.arpa.zone , that means the IP address of laptop2.example.com . is 10.242.113.121
Starting DNS
Once you ve configured DNS, you ll want to try out your new server. The easiest way to do this in Red Hat Linux is with the DNS service script. Remember, named is the daemon that runs the Linux DNS server:
# service named start
Next, you ll want to see if it works. As described in Chapter 21 , the IP addresses of DNS servers are normally listed in /etc/resolv.conf . Once you ve started your nameserver, you can see how it works. Try the dig command, the DNS lookup utility, to look up a specific FQDN on the Internet. Figure 24.11 shows how this works. Note the SERVER line near the bottom of the figure, which illustrates that this comes from a DNS server on a computer on my local network, with an IP address of 10.252.113.63.
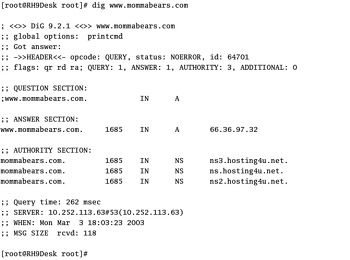
Figure 24.11: The dig command
If you re satisfied with the result, remember to make sure named starts the next time you restart Linux. Use the chkconfig --level 235 named command to ensure this daemon starts at runlevels 2, 3, and 5.
| Tip | When you start DNS during the boot process, you can also check startup messages in the /var/log/messages file. If there is a problem, such as a syntax error in /etc/named.custom , you ll see an indication here. |
EAN: 2147483647
Pages: 220