Understanding RAID
Two different labels are associated with RAID: Redundant Array of Independent Disks and Redundant Array of Inexpensive Disks. Neither works in this case, because they don t accurately describe how the software version of RAID works in Red Hat Linux.
A Redundant Array of Independent Disks implies that every disk in a RAID array is physically independent. If one disk fails, the others in the array can take over its functionality. Several versions of RAID exist where Linux can use the other working disk drives to reconstruct the data on any single failed disk drive. One version of RAID includes two separate hard disks with identical information.
You can also include spare hard disks in a RAID array. If there is a failure in any RAID 1 or RAID 5 hard disk, Linux can immediately begin rebuilding the data on the spare disk.
Using a RAID array provides three main advantages.
High availability A RAID array always lets you get to your data. With appropriate hardware, you can even change a hard disk while the computer is on. This is not possible with a Red Hat Linux software RAID array.
Fault tolerance With most hardware RAID arrays, the data is always accessible even if one hard disk fails. You can set up fault tolerance in a Red Hat Linux software RAID array, as long as you configure each RAID partition in the array on separate physical hard drives.
Failover When a hard disk fails, a RAID system can automatically switch to a reserve hard disk. Data is automatically transferred to the backup hard disk or partition.
RAID Options
Three versions of RAID are associated with Red Hat Linux: RAID 0, RAID 1, and RAID 5. Briefly, RAID 0 can speed access to hard disks, without fault tolerance. RAID 1, since it has two separate disks with identical information, complete fault tolerance. RAID 5 is based on an array of three or more disks and also provides fault tolerance.
You learned to configure a basic RAID array during the Red Hat Linux installation, as discussed in Chapter 03 .
| Note | Although the latest Linux kernel also supports RAID 4, the Red Hat Linux installation program does not support configuring this version of RAID. There is one difference between RAID 4 and RAID 5. In RAID 4, all parity information is stored on one partition or hard disk. In RAID 5, parity information is distributed on all hard disks in the array. |
RAID 0
This level of RAID includes two or more drives or partitions, grouped together. When these are separate physical drives, your computer can use the buffers on each drive. This is one way RAID 0 can speed reading and writing to your hard disks.
However, RAID 0 provides no data redundancy. In other words, if any disk or partition in a RAID 0 array fails, you lose all of the data in that array.
| Note | RAID 0 is sometimes known as striping without parity. |
RAID 1
At this level, RAID is like a mirror. It includes two separate disks or partitions with identical data. When RAID 1 is used for two separate hard disks, either hard disk can be used. If one hard disk fails, the other hard disk is ready to step in. No data is lost.
The drawback to RAID 1 is that it takes longer to write data to disk. With RAID 1, writes are not complete until the data is written to both disks. The hardware version of RAID 1 is secure but expensive; if you were to implement RAID 1 on all of your computers, you would need to purchase and install twice as many hard disks.
| Note | RAID 1 is sometimes known as disk mirroring. |
RAID 5
At this level, RAID requires three or more disks. RAID 5 stripes parity information evenly across all disks in the array. If one disk fails, Linux can reconstruct the lost information from the parity data on the remaining disks. Although data retrieval is slower when a RAID 5 disk fails, your system can still run.
If there is a spare hard disk available in a RAID 5 array, Linux immediately begins to write this lost information onto the spare disk.
This level of RAID is generally preferred in most cases. Data integrity is ensured. The space of only one disk is sacrificed to hold the parity information. And performance is good.
| Note | RAID 5 is sometimes known as disk striping with parity. |
Software and Hardware RAID
The software RAID that you can configure in Red Hat Linux is a bit different from the hardware RAID, because it uses partitions, not separate physical disk drives. If you use RAID on Red Hat Linux, I highly recommend that you avoid using partitions from the same hard disk for any single RAID array. Otherwise, any failure of that hard disk could destroy all data in that RAID array.
Several hardware RAID systems are available, with their own software support for Linux. However, the principles discussed in this chapter work for any version of RAID associated with Red Hat Linux.
Dedicated RAID hardware can help ensure that your data survives any catastrophic physical failure on any single hard disk.
Creating RAID Partitions
You can create RAID partitions after installing Red Hat Linux. As an example, assume you have several SCSI hard disks available. You ve installed Red Hat Linux on the first SCSI hard disk, /dev/sda . You have three other hard disks available for a RAID array, /dev/sdb , /dev/sdc , and /dev/sdd .
| Note | You can also create RAID partitions during the Red Hat Linux installation process. See Chapters 3 or 4 for details. |
After installation, the standard utility for creating new partitions is fdisk . For more information on the basics of this utility, please refer to Chapter 07 .
To create a RAID array in Red Hat Linux, you need two or more partitions of approximately equal size . If you want your array to survive the failure of any physical hard drive, each of the partitions in a RAID array must be on a separate physical drive.
Once you have the partitions for a RAID array, you can use the fdisk utility to change the partition type to one suitable for a RAID array. For example, the commands shown in Figure 14.5 change the partition /dev/sdb1 to one that you can make part of a RAID array.
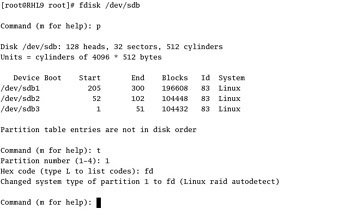
Figure 14.5: Creating a RAID partition
| Note | Warning Never change the file type of a partition with data you need, unless you ve already backed it up in a secure location. When you use fdisk to change the file type, that action can destroy any data currently stored on that partition. |
Once you ve created the disks or partitions for your RAID array, you ll need to format them. As discussed in Chapter 07 , you need the mkfs -j partitiondevice command to format your new partition to the ext3 filesystem. For example, the following command properly formats the partition just created:
# mkfs -j /dev/sdb1
Repeat the process to create the RAID partitions that you need. Remember to format all the partitions that you re using in your RAID array.
Configuring /etc/raidtab
When you have the RAID partitions that you need, the next step is to edit the RAID configuration file, /etc/raidtab . This file is fairly easy to configure. The following sections illustrate example configurations for RAID 0, RAID 1, and RAID 5 arrays.
There are several commands in /etc/raidtab that you may use for any of these arrays, as shown in Table 14.6.
| Command | Function |
|---|---|
| raiddev | RAID device filename. |
| raid-level | RAID array type, usually 0, 1, or 5. |
| nr-raid-disks | Number of disks assigned to this RAID array. |
| nr-spare-disks | Number of backup disks assigned to this RAID array. |
| persistent-superblock | If this =1, Linux can detect this RAID array. |
| chunk -size | Amount of data to be read/write, in KB. |
| parity-algorithm | How RAID 5 calculates parity. |
| device | Device name of a RAID partition. |
| raid-disk | Number assigned to a partition in a RAID array, in sequence, starting with 0. |
| spare-disk | Number assigned to a reserve partition in a RAID array, in sequence, starting with 0. |
RAID 0 /etc/raidtab
RAID 0 is disk striping without parity. Because there is no data redundancy, no spare disk partition is configured in this RAID array. The following excerpt from a RAID 0 /etc/raidtab file configures a RAID array of two partitions, /dev/sda1 and /dev/sdb1 , with a fairly large chunk-size (16KB), to maximize data transfer speed:
raiddev /dev/md0 raid-level 0 persistent-superblock 1 chunk-size 16 nr-raid-disks 2 nr-spare-disks 0 device /dev/sda1 raid-disk 0 device /dev/sdb1 raid-disk 1
RAID 1 /etc/raidtab
RAID 1 is known as disk mirroring. Because this is the ultimate in redundancy, one spare disk partition is included in the following excerpt from /etc/raidtab . The two partitions in the array are /dev/sda2 and /dev/sdb2 . The spare partition is /dev/sdc2 .
raiddev /dev/md1 raid-level 1 persistent-superblock 1 chunk-size 4 nr-raid-disks 2 nr-spare-disks 1 device /dev/sda2 raid-disk 0 device /dev/sdb2 raid-disk 1 device /dev/sdc2 spare-disk 0
RAID 5 /etc/raidtab
RAID 5 is known as striping with parity. This can be run with a large number of disks or partitions. Since it provides redundancy, two spare disk partitions are included in the following excerpt from
/etc/raidtab . The four RAID partitions in the array are /dev/sda3 , /dev/sdb3 , /dev/sdc3 , and /dev/sdd3 . The spare partitions are /dev/sde3 and /dev/sdf3 .
raiddev /dev/md2 raid-level 5 persistent-superblock 1 chunk-size 4 nr-raid-disks 4 nr-spare-disks 2 device /dev/sda3 raid-disk 0 device /dev/sdb3 raid-disk 1 device /dev/sdc3 raid-disk 2 device /dev/sdd3 raid-disk 3 device /dev/sde3 spare-disk 0 device /dev/sdf3 spare-disk 1
Creating the RAID Device
OK, we re almost there! You ve created the partitions you want in your RAID array. You ve set them to the Linux RAID file type. You ve formatted each partition. You ve set up the configuration for the RAID array in /etc/raidtab . Now you re ready to create and format the RAID device.
For example, take the RAID 5 configuration created in the previous section. The RAID device file is /dev/md2 . You ll want to create the file and then format it. You can then mount the filesystem of your choice on that partition. If you want to have it mounted automatically the next time you boot Linux, you ll also need to incorporate it into /etc/fstab .
The following commands create and then format the RAID device:
# mkraid -R /dev/md2 # mkfs -j /dev/md2
| Warning | The mkraid -R raiddevice command deletes all data from all partitions associated with the raiddevice in /etc/raidtab . |
Mounting RAID
At this point, you re ready to mount your new RAID array on the filesystem of your choice. For example, if you want to set up RAID for your home directories, copy all files (including hidden files) from the /home directory to another location, mount your new RAID device on /home , and then restore the files. Assuming /tmphome exists, the following commands work for the /dev/md2 RAID device just created:
# cp -r /home /tmphome # mount /dev/md2 /home # cp -r /tmphome/home /
Finally, to make the change permanent, label your new device and then add an appropriate entry in /etc/fstab . For the directory and device shown, you first run the e2label /dev/md2 /home command, and then create a new entry such as the following in /etc/fstab :
LABEL=/home /home ext3 defaults 1 2
When you reboot, Linux should automatically mount the /home filesystem on your new RAID device, /dev/md2 .
EAN: 2147483647
Pages: 220