Section 3.2. Configuring YaST Patch Management for a LAN
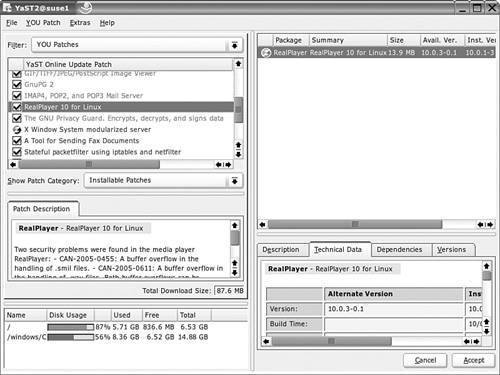
3.2. Configuring YaST Patch Management for a LANThere are two ways to configure an update server for SUSE Linux Professional. You can configure a mirror using a YaST Online Update Server on SUSE Linux Enterprise Server. Alternatively, you can configure a mirror using the rsync command. One relative advantage of rsync is that it is customizable; if you use the YaST Online Update Server for regular PCs, you'll end up with updates for 32-bit and 64-bit systems. In either case, you'll need to select a mirror. You can find a current (but not necessarily complete) list at http://www.novell.com/products/linuxprofessional/downloads/ftp/int_mirrors.html. Before you select a mirror, check it out in the browser of your choice. A mirror you see in this list may be redirected to a different URL. For example, the mirror I use, http://suse.oregonstate.edu, is automatically redirected to http://suse.osuosl.org. 3.2.1. Creating a Local Mirror with YaST Online Update ServerIf you have a SUSE Linux Enterprise Server, you can create a mirror for SUSE Linux Professional computers on your network by using the YaST Online Update Server. First, select a mirror. Note This section assumes you're maintaining updates for SUSE Linux Professional version 9.2. If you're maintaining updates for a different version of SUSE Linux Professional, substitute version numbers accordingly. Selecting a MirrorYou've seen how this server works earlier in this chapter. To open YaST in the GUI, click Main Menu -> System -> Control Center (YaST). Select Software in the left pane, and select YOU Server Configuration. In the YaST Online Update Server Configuration window, select Add. This opens a window similar to that shown previously in Figure 3-12. In this unnamed window, you'll need to enter four parameters:
SynchronizingAfter you've entered the parameters of your choice, click OK. Back in the YaST Online Update Server Configuration window, select Synchronize now. The YaST Online Update Server proceeds through any products configured in this menu. Depending on the timing of your update, you may be downloading several gigabytes of data. This process may take some time. If there are problems, you'll see a message such as "Synchronization failed." The mirror of your choice may not be available. If successful, you'll find update RPMs and patches in the /var/lib/YaST2/you/mnt/i386/update directory. In my case, where I've created an update server for SUSE Linux Professional 9.2, they are located in the following subdirectories:
YaST Online Update Server TroubleshootingIf you do have problems, you can troubleshoot the YaST Online Update Server. Exit from the server. Check the current version of the associated log file in /var/log/YaST2/y2log. If you can't figure out the problem from the log file, there is more that you can do. By default, YaST Online Update Server settings are stored in the you_server_settings file, in the /var/lib/YaST2/you directory. If you've configured authentication settings, usernames and passwords are stored in the password file in the same directory. For the next troubleshooting step, move these files. The following commands move them to your /root home directory (default permissions won't allow you to move these files as a regular user): mv /var/lib/YaST2/you/you_server_settings ~ mv /var/lib/YaST2/you/password ~ If you've previously downloaded packages to your system using the YaST Online Update Server, they'll still be there. Note By default, the /var/lib/YaST2/you/password file is "world-readable"; in other words, associated with 644 permissions. And this file can display your passwords in clear text. You can change the permissions of this file to be readable only by the file owner without affecting the performance of the YaST Online Update Server. Return to YaST. Reopen the YaST Online Update Server. You'll see the original two products (SUSE SLES and SUSE CORE) in the update list. You'll need to re-edit these products for the required usernames and passwords. Re-enter the information described earlier for your SUSE Linux Professional mirror. Try the synchronization process again. 3.2.2. Creating a Local Mirror with rsyncOne thing to remember when creating a local mirror is that YaST Online Update looks for patches in the i386/update/9.2/patches subdirectory. Except for the version number, this is true for all SUSE Linux distributions. So when you create a mirror, make sure updates are downloaded to that subdirectory. Otherwise, YaST Online Update won't be able to find what you've so laboriously downloaded to your LAN. Therefore, make sure that this subdirectory is part of the tree where you download the update mirror. You might even want to create a separate partition for this mirror, to keep it from crowding (or being crowded out by) other demands on your system. For convenience, I've created this mirror on an external Firewire (IEEE 1394) hard drive, on partition /dev/sdb3. I've also created a /mnt/yast directory to mount these updates. For those distributions with mirrors, you can create and then update your systems with a local mirror server. While you could use commands such as wget or FTP clients to create a mirror, I prefer the rsync command. After you create an rsync mirror, updates download only the data that changed since the last download. Therefore, you can keep a rsync mirror up to date fairly quickly and keep the load on your Internet connection to a minimum. Note The first time you create a repository mirror, chances are that you'll be downloading several gigabytes of data. Be sure you have a sufficiently high-speed connection to the Internet before attempting to create a mirror. The first time I downloaded a SUSE repository on my home cable modem (which runs up to 5 Mb/s), the process took approximately 20 hours. For this purpose, you need a public mirror which accepts rsync connections. Some trial and error may be required. Many FTP sites listed in the official SUSE Linux Professional list of international mirrors also accept rsync connections. The rsync command is important for anyone interested in patch management. It helps the administrator create and maintain a local patch management server with a minimum of load on the Internet connection. When created, updates download only data that has changed since the last update. This is the briefest of introductions to the world of rsync; for more information, see the rsync man page, as well as its Web site at http://rsync.samba.org. In its simplest invocation, you can copy all files, in archive mode (-a), from /home/michael to /home/donna with the following command: rsync -a /home/michael /home/donna When you repeat this command in the future, it only copies what has changed within each file in Michael's home directory, and nothing more. Naturally, this is a powerful tool for backups. You can use rsync over a Secure Shell connection. For example, the following command takes the files from the /home/michael directory on the computer named remotepc.example.com and copies them locally to /tmp: rsync -a -e ssh michael@remotepc.example.com:/home/michael /tmp Now, determine whether your preferred mirror site supports rsync, and on what directories. For example, you can find the applicable directories on the distro.ibiblio.org site with the following command (don't forget both colons at the end of the URL): rsync -n mirrors.kernel.org:: If the site you try does not have an rsync server, you won't see a response, and you may need to interrupt the command (with Ctrl-C) to get back to the command line. Watch for hints in the message that you see. For example, this particular command included in the response: suse Novell SUSE mirror This gives me a hint to the directory structure I need for the rsync command. I could synchronize all SUSE related contents, using the ::suse/ subdirectory, but that would download all available SUSE Professional distributions and versions, which might be several dozen more gigabytes than I really need. With a look at the directory structure at this site, I can find a list of updates with the following command: rsync -n mirrors.kernel.org::suse/i386/update/9.2/ As discussed earlier, I've created a separate partition, /mnt. I can copy and then synchronize the contents of /mnt with this particular server. Don't forget to create the /mnt/i386/update/9.2 directory. The fastest way is with the following command, which creates all needed directories: mkdir -p /mnt/i386/update/9.2 command. With the following command, I can download patches to the /mnt/i386/update/9.2/patches directory. But don't run this command, at least not yet: rsync -a mirrors.kernel.org::suse/i386/update/9.2/. /mnt/i386/update/9.2 While this command should work, you won't know until it's done. There is more that you can and should do with this command. As with most commands, the -v switch allows you to watch the progress as rsync does its work. Fortunately, rsync allows you to "double" the messages; you can expand this command to rsync -avv <whatever you're syncing>. But that's still not enough. If you don't need the source code associated with the download, you can shorten the required time. You know that source code RPMs normally end with the .src.rpm extension, so you can exclude those files with the --exclude=*.src.rpm switch. Finally, you can collect statistics associated with the download to make sure you're not getting overloaded. For this purpose, rsync supports the --stats switch. Finally, we're ready to start the process. If the ibiblio.org mirror is closest, you could start the rsync process with the following command: rsync -avv --stats --exclude=*.src.rpm mirrors.kernel.org::suse/i386/update/9.2/. /mnt/i386/update/9.2 When the process is complete, you'll have a mirror, fresh with SUSE updates, ready for use by the other SUSE Linux Professional computers on your network. Pointing Updates to the MirrorNow you can point your updates to the local mirror. It's a simple process. If the SUSE Professional or SUSE Linux computer that you want to update is local, all you need to do is point YaST Online Update to the correct mirror directory. As described in the previous section, I've configured my own SUSE Professional Linux update mirror site in the /mnt/i386/update/9.2 directory. I know this includes a patches subdirectory. Because YaST Online Update looks for an i386/update/9.2/ patches subdirectory, all I need to do is point it to /mnt. If I have a SUSE Professional Linux system on the same computer as the update mirror, I can configure the update with the following steps:
Sharing the Update DirectoryNow that you've updated the local SUSE Linux workstation, you can share the local repository with the rest of your network. As you've seen, YaST Online Update allows you to configure updates from local and network sources. While this is not a book on networking, the most straightforward way to share directories with other Linux computers is with an NFS server. For more information on the NFS, see Linux Administration Handbook by Evi Nemeth, Garth Snyder, and Trent Hein (Upper Saddle River, NJ: Prentice Hall, 2002). The server and client tools are normally available even in a minimal Linux installation. To share the directory that you created earlier, follow these steps:
Updating Neighboring ServersNow you can proceed to updates of remote SUSE Linux Enterprise Servers, Professional Workstations, and later systems on your network. To do so, follow these steps:
|
EAN: 2147483647
Pages: 80