Section 3.1. The YaST Update System
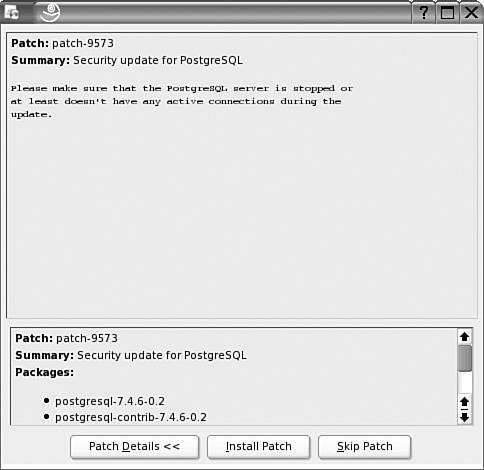
3.1. The YaST Update SystemWhile you learned to update a SUSE Linux Professional system in Chapter 1, you were just scratching the surface of how you can manage patches with YaST. To explore what else you can do, open YaST. Click Software on the left screen. In SUSE Linux Professional, you'll see six options. In SUSE Linux Enterprise Server, you'll see slight variations, as shown in Figure 3-1. Figure 3-1. SUSE Linux Enterprise Server Update options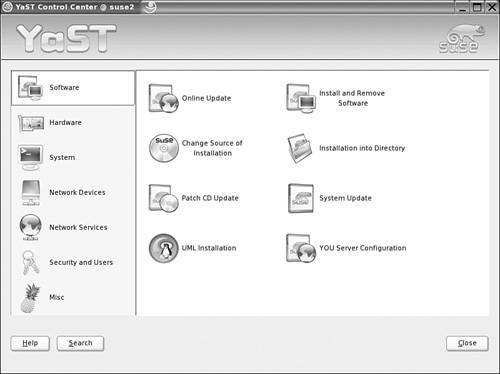 Note If you're using SUSE Linux Professional 9.3/SUSE Linux 10.0, you'll see some additions from SUSE Linux Professional 9.2. It includes Installation into directory for Xen, which allows you to create a Xen virtual machine, as described at www.xensource.com. The Media Check option allows you to check the integrity of installation CDs or DVDs. Because neither option is related to patch management, details are beyond the scope of this book. You already learned about the Online Update process in Chapter 1. I'll explore each of the remaining options in more detail. While I'm illustrating using the GUI version of YaST, SUSE has made a low-resolution version of this tool available for those who prefer to work from the command line. As you read through this section, you'll notice that some of the sections are interactive; in other words, the changes you can make for one option may affect what you do with other options. After you've made initial changes, you may want to run YaST Online Update again. 3.1.1. The YaST Package ManagerIn this section, we'll examine the Install and Remove Software option, which is known as Software Management in SUSE Linux 10. It allows you to manage the SUSE packages on your system. If you want to install additional packages, the Install and Remove Software option looks by default to the source from where you originally installed SUSE Linux. If you've installed SUSE from a DVD and want to change that to a network source, read the next section. When you select Install and Remove Software, you're taken to a search screen. If there are any current conflicts in your packages, you'll see them here, as shown in Figure 3-2. Figure 3-2. This computer wasn't patch managed well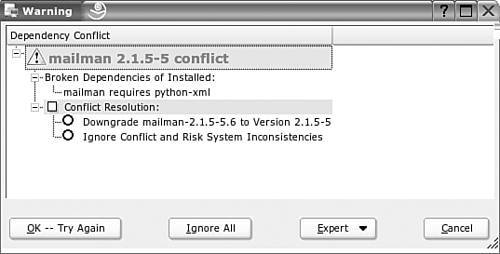 In this case, I have a problem because I downloaded and installed a new version of the GNU mailing list manager, mailman, without regard to dependencies. Because I didn't use YaST to manage this patch, SUSE didn't catch this dependency until now. Fortunately, I was able to downgrade the mailman package, as suggested during this process. As you can see from Figure 3-2, I could have ignored the dependency. Under the Expert drop-down menu, I could have saved the dependency list to a text file. Now you can search for the packages of your choice. As you can see in the left pane of Figure 3-3, you can run your search based on any of the following criteria: Figure 3-3. Identifying email-related packages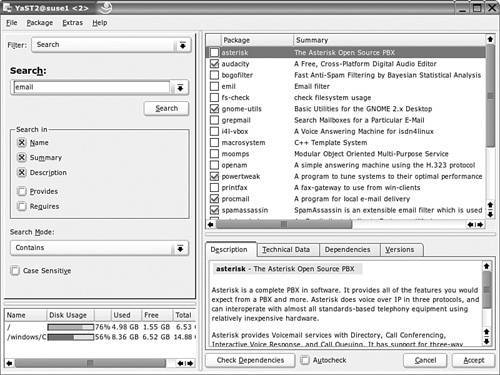
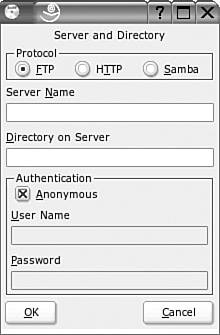
For example, if you're looking for all packages related to "email," you could use it as a search term, specifying Name, Summary, and Description to list all available SUSE packages related to email. As you can see in Figure 3-3, the list probably goes beyond what you might need; for example, YaST includes asterisk in this list because the text string "email" is part of the word "Voicemail," which is in the description of the asterisk package (which is related to Internet telephones, a.k.a. Voice over IP). You can change how this works. Click on the Search Mode drop-down text box. It allows you to change how the search term is used. The options include Begins With, Exact Match, Use Wild Cards, and Use Regular Expression. You can also use the Case Sensitive option to make the search term case sensitive. However, the list also reveals packages that may be useful for the email administrator. As you can see in Figure 3-4, the ximian-connector package allows your client's Evolution email managers to act as clients on a Microsoft Exchange network. The package name was changed for SUSE Linux 10.0 to evolution-exchange. Figure 3-4. More details about each package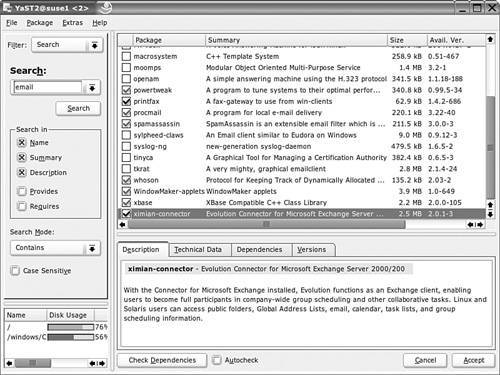 You can also review the size and version numbers associated with each candidate package. Size may be important if the target partition is near its limits. Version numbers can help you verify functionality or security. You can also check for dependencies with the Check Dependencies button at the bottom of the window. For example, when I include the printfax package and use this function, YaST identifies dependencies, as shown in Figure 3-5. Alternatively, YaST provides a message that "All package dependencies are OK." Figure 3-5. Dependencies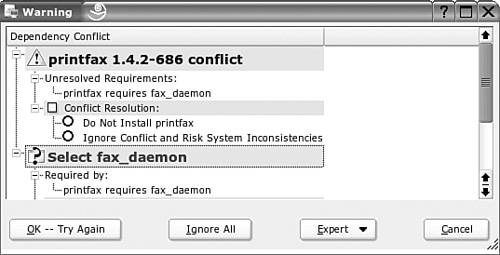 Select the Autocheck box at the bottom of the window to automate dependency checking and click Accept. The update process begins. YaST looks to your original installation source. If it's a DVD, it checks your drive. If the DVD isn't there, YaST prompts you to insert it. YaST then installs and removes those packages you've identified (along with dependencies). It then writes the system configuration. In most cases, it backs up any configuration files associated with upgraded packages. When complete, it prompts you as to whether you want to install more packages. If you do, you're returned to the screen similar to that shown in Figure 3-3. If you've copied your installation CDs to another location (or have configured a different installation source directory), you'll be interested in the next section. When you've changed your installation source, you can return to this menu and make changes without having to find your DVD. 3.1.2. Change Source of InstallationOne option that simplifies patch management on a network is a common installation source. In other words, I've copied my installation CDs to a server, which can provide the original installation files for the other SUSE computers on my network. For the rest of this chapter, I refer to the directory where I've copied the installation CDs as the "installation source." After you copy your installation files to a server, return to the YaST Software module. Select Change Source of Installation (Installation Source on SUSE Linux 10.0). This opens the Software Source Media window shown in Figure 3-6, where you can add your new installation source. YaST allows you to change your source to one of seven different types, which we can divide into five categories: supplementary packages, an authenticated network server, a NFS server, local media, and a local directory. Figure 3-6. Software Source Media Note I had to use the CDs to create my SUSE Linux Professional 9.2 network installation source. YaST does not appear to recognize a network installation source created from the SUSE DVD. Supplementary PackagesIn some cases, SUSE makes supplementary packages available online at ftp.suse.com and through mirrors. For example, to update my KDE system, I could use the supplementary packages from a nearby mirror, with a subdirectory such as i386/supplementary/KDE/update_for_9.2 Naturally, I can add this to the Software Source Media list. However, this does not work unless the directory includes the media.1 subdirectory, which you can copy from the first installation CD. Authenticated Network ServerYou can configure your installation source on a network server. FTP, HTTP, and Samba servers may require authentication. If you select any of these three options, you're taken to the Server and Directory window shown in Figure 3-7. Figure 3-7. Configuring a network installation source For example, assume that you've configured a local FTP server at IP address 192.168.1.1, in the pub/ subdirectory. You'd enter the IP address in the Server Name, and the pub/ subdirectory in the places shown. If you've configured more than one source, you'll see it in the Software Source Media window. You can select the source of your choice in that window and then click Up to make YaST look at that source before others on your list. If you've configured an authenticated username and password on the FTP server, you can also enter it in the appropriate text boxes shown in Figure 3-7. Otherwise, FTP and HTTP servers support anonymous authentication. Naturally, unless you actually want others to access your installation source online, you should protect your FTP or HTTP server through your network firewall and other settings detailed in good Linux networking texts, such as Linux Administration Handbook by Evi Nemeth, Garth Snyder, and Trent Hein (Upper Saddle River, NJ: Prentice Hall, 2002). On the other hand, Samba generally requires a username and password, based on how you might configure a Microsoft Windows-style network. NFS ServerThe Network File System (NFS) is native to Unix/Linux computers and is often considered more efficient if your networks are limited to those operating systems. If you configure an NFS share with your Linux computers, you can configure your installation source as a shared NFS directory. All you need is the following:
Local MediaIf you've installed SUSE over a network, your software source points to that installation source. However, you might want a different software source, such as the SUSE installation DVD, for computers such as laptops. Insert the CD or DVD. Click Add -> DVD (or CD). YaST mounts the CD/DVD, and then adds the CD/DVD to your Software Source Media list. Local DirectoryIf you're experimenting with SUSE at home, you may choose to configure an installation source on a dedicated directory on your local computer. All you need is the name of the directory. 3.1.3. Installation Into DirectoryReturn to the YaST Software Menu. Select the Installation Into Directory option. You can configure and then install another copy of SUSE Linux into a subdirectory. By default, the subdirectory is /var/tmp/dirinstall. You could use this option to create a sample SUSE installation, which you could then copy to other computers on your network. If you do so, keep in mind that standard cron jobs purge files in /var/tmp directories on a regular basis. Because this is not really related to patch management, we will not explore it further. 3.1.4. Patch CD UpdateIf you have a subscription to SUSE Linux Enterprise Server, you can get patch CDs on a regular basis. In the YaST Software Menu, click Patch CD Update. You'll see a window similar to SUSE Online Update, as described in Chapter 1. When you get a patch CD, you can either insert it at this time or redirect this screen to point to a network location for the patch CD. As with other SUSE Online Updates, you can configure YaST to point to a local directory; an FTP, HTTP, or Samba server; a shared NFS directory; or a CD or DVD. After you connect to the patch CD, whether local or over a network, the process is the same as the Online Update that you learned about in Chapter 1. 3.1.5. System UpdateIn the YaST Software Menu, select System Update. You're taken to an Installation Settings screen similar to Figure 3-8. This menu allows you to patch applications and services on your system. First, it allows you to update your system based on the current version of the installed distribution. When you select this option, as you can see, there are four parts to the YaST System Update: Update Options, Packages, Backup, and Language. Figure 3-8. Options associated with YaST System Update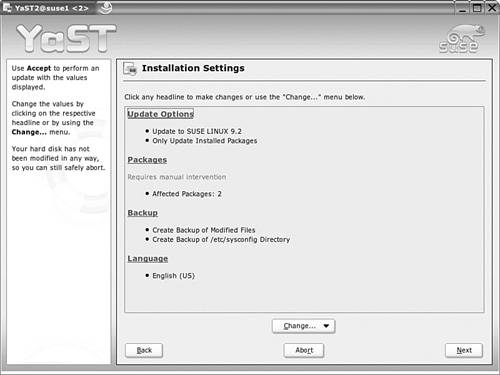 Update OptionsUpdate Options allow you to customize how you update and manage patches for your system from appropriate SUSE servers or mirrors. When you select Update Options, an Update Options screen displays similar to Figure 3-9. By default, YaST allows you to update only those packages which you have installed. However, you can update with other packages associated with your distribution. The options depend on your distribution. If you're running SUSE Linux Enterprise Server, your Update options include the following: Figure 3-9. YaST System Update options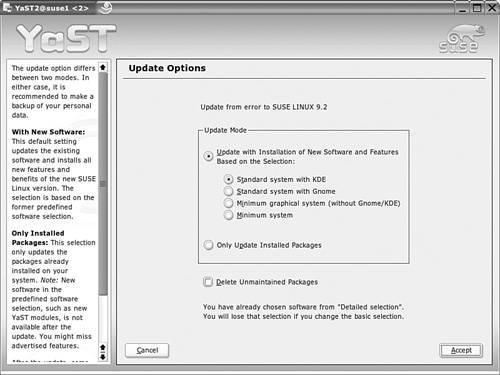
In contrast, if you're running SUSE Linux Professional, there is no default or full installation option. Instead, you can select
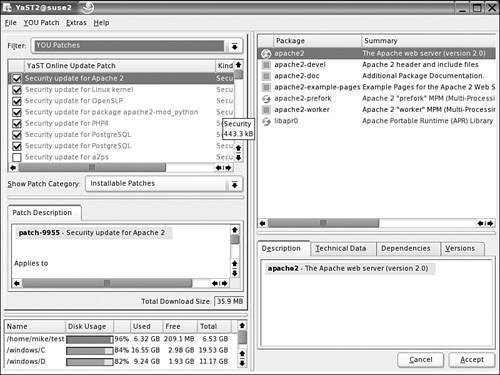
In both cases, the Delete Unmaintained Packages option is economical. If there are packages that won't work after an update, such as older, or superseded services, they are deleted. PackagesThe number of packages listed is the number of packages that will be updated. In many cases, you'll be warned of packages that can't be upgraded or updated automatically. But the number shown is just a summary. Select the Packages link. If you've included some packages not directly associated with your SUSE distribution, you'll probably get a list similar to that shown in Figure 3-10. Figure 3-10. YaST System Update Problems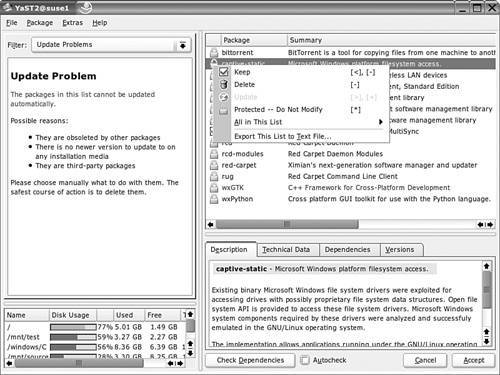 As you can see, most of the packages on the list are protected from changes during this process. They are mostly third-party packages that I don't want changed. However, I can set up each package to be updated or deleted. Right-click the package of your choice to review your options. Additional options are available from the All In This List submenu. Make any desired changes, and select Accept to return to the Installation Settings screen. BackupNaturally, when you update applications, it is in your interest to back up associated configuration files. In fact, it is always best to keep a backup of those files, at least those in the /etc directory. However, YaST will back up configuration files associated with updated packages. You can change what YaST does. Select Backup, and you can make YaST
LanguageYou can configure YaST to use the language of your choice during this process. SUSE supports over 20 different languages. 3.1.6. UML InstallationUser Mode Linux (UML) allows you to configure virtual Linux machines within SUSE Linux. While it may be useful for you to test specific SUSE features, it is not related to patch management and is therefore not covered in this book. UML has been superseded by Xen in the latest SUSE distribution. 3.1.7. YOU Server ConfigurationSUSE Linux Enterprise Server supports one method of caching updates to a LAN, known as YaST Online Update (YOU). When configured, updates are saved to the following directory: /var/lib/YaST2/you By default, it's configured to use your authorized SUSE Enterprise account to cache updates locally, in two channels:
Figure 3-11. YaST Online Update (YOU)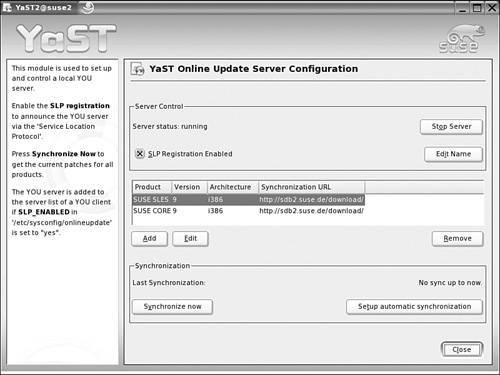 To set this up, first synchronize your SUSE Linux Enterprise Server with one of the available portals. As with Red Hat Enterprise Linux, sites for SUSE updates are limited. You can synchronize with one of two sites, described in Table 3-1. For the latest list, see http://support.novell.com/techcenter/articles/SLES_Updating.html.
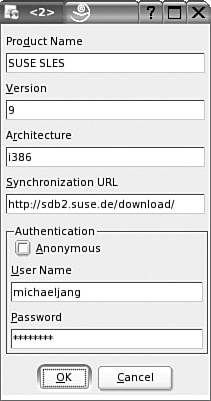
You can edit the update server information as shown in Figure 3-12. You'll need to add at least your authentication information for each channel. Highlight the product, and select Edit. The User Name and Password should correspond with what you use on your Novell account. Figure 3-12. YaST Online Update (YOU) The Product Name, Version, and Architecture need not change (unless you've recently upgraded to a new version of this distribution). Enter the Synchronization URL from Table 3-1. After you've configured your servers, select Synchronize Now. YaST Online Update should now contact your servers. If there's a problem, you'll see a message like "Synchronization failed for..." If you've verified your user name, password, and associated information as shown in Figure 3-12, the problem might simply be related to the download server. I've had problems on occasion connecting to both servers from Table 3-1. You might not see any results in this window for some time. Remember, you're downloading several hundreds of megabytes of packages, patches, and more. If you want to monitor the progress of the download, monitor changes to the /var/lib/YaST2/you/mnt/i386/update directory. For example, i586 RPM packages for SUSE Linux Enterprise Server version 9 downloading through the SUSE-CORE channel can be found in the SUSE-CORE/9/rpm/i586 subdirectory. Therefore, you can monitor the download with the following commands: cd /var/lib/YaST2/you/mnt/i386/update ls -ltr SUSE-CORE/9/rpm/i586 Naturally, after you've downloaded packages for your update server, you'll want to keep it up to date. Select the Setup automatic synchronization option. This opens the YOU Server Automatic Synchronization Setup window, which allows you to configure updates as a daily cron job. The results are stored in /etc/cron.d/yast2-you-server. This file points to a syncfile script in the /var/lib/YaST2/you directory, which you can run at any time. My version of this script includes the following commands, which synchronizes updates with the SUSE-SLES and SUSE-CORE repositories, as well as a mirror of a SUSE Linux Professional 9.2 update mirror: #!/bin/sh /usr/bin/online_update -G -p "SUSE SLES" -v 9 -a i386 -u http://sdb.suse.de/download/ /usr/bin/online_update -G -p "SUSE CORE" -v 9 -a i386 -u http://sdb.suse.de/download/ /usr/bin/online_update -G -p "SUSE LINUX" -v 9.2 -a i386 -u http://sdb.osuosl.org/suse/ 3.1.8. A Local YaST Online UpdateAfter the download is complete, you can update SUSE Linux Enterprise Servers on your local network from this location. All you need to do is point your computer to the appropriate directory. Share the appropriate directory and point your Online Update to this location. Updating the Local ServerIf you've downloaded the cache to a local SUSE Linux Enterprise Server, you may want to update that server. It's a straightforward process. Just follow these steps:
Sharing the Update DirectoryNow that you've updated the local SUSE Linux Enterprise Server, you can share the local repository with other SUSE Linux Enterprise Server computers on your network. As you saw earlier, YaST Online Update allows you to configure updates from local and network sources. While this is not a networking book, the most straightforward way to share directories with other Linux computers is with a Network File System server. For more information on the NFS, see Mastering Red Hat Enterprise Linux 3 by Michael Jang (Alameda, CA: Sybex, 2004).The server and client tools are normally available, even in a minimal Linux installation. To share the directory that you created earlier, follow these steps:
Updating Neighboring ServersNow you can proceed to updates of remote SUSE Linux Enterprise Servers on your network. To do so, follow these steps:
|
EAN: 2147483647
Pages: 80