Certification Objective 13.03-Dynamic Host Configuration Protocol (DHCP)
There are two protocols that allow a client computer to get network configuration information from a server: DHCP (Dynamic Host Configuration Protocol) and BOOTP. DHCP works if you have a DHCP server on the local network. The BOOTP protocol is required if you're getting information from a DHCP server on another network.
DHCP servers can simplify and centralize network administration if you're administering more than a few computers on a network. They are especially convenient for networks with a significant number of mobile users. The BOOTP protocol is essentially just a way to access a DHCP server on a remote network.
As of this writing, Red Hat does not include any GUI tool to configure a DHCP server. You'll have to do your work in this section from the command line interface.
While DHCP knowledge is not explicitly listed in the current Red Hat Exam Prep guide, it is a part of the associated curriculum. Based on their outlines, the RHCT course, RH133, examines the configuration of a DHCP client. The RHCE course, RH300, addresses DHCP servers. It is important for any network administrator to know DHCP. However, it's not in the Red Hat Exam Prep guide; you'll have to make your own decision about whether to learn how to create a DHCP server for your RHCE exam.
Installing DHCP Packages
As with most network services, DHCP has a client and a server. These are based on the dhcp and dhclient RPM packages. The dhclient RPM package should be installed by default; if you're using a service such as NetworkManager, you'll also need the dhcdbd package. If you're working with IPv6, you'll need the dhcpv6_ client. On the server side, the dhcp RPM package is installed by default with the Network Server package group.
| On the Job | Red Hat seems to change the commands and packages related to the DHCP client frequently. Older versions of Red Hat have used dhcpcd and pump as DHCP client commands. Just be aware of this if you're working with an older version of Red Hat. |
DHCP Server Configuration
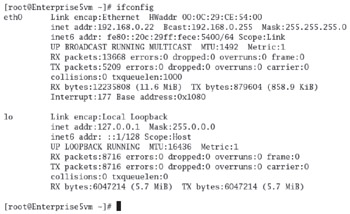
A DHCP server sends messages to multiple computers on a LAN. This is also known as a multicast. It should be enabled by default. You can confirm this with the ifconfig command. The output should resemble Figure 13-4, which includes a MULTICAST setting for the active network card.

Figure 13-4: Active network interfaces MULTICAST
If you don't see MULTICAST associated with your network card, someone has compiled this feature out of your kernel. For more information on the kernel management process, see Chapter 8.
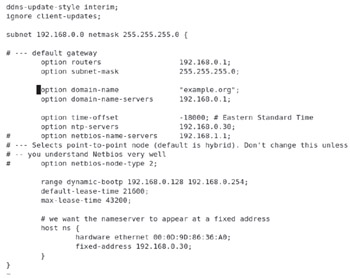
Now configure the DHCP server daemon, dhcpd, by creating or editing the /etc/dhcpd.conf configuration file. Normally, this file allows the DHCP server to assign IP addresses randomly from a specific range. But the default version of this file is blank. You can start with the dhcpd.conf.sample file in the /usr/share/doc/dhcp-versionnum directory. The lines that start with a hash mark (#) are comments in the file. Let's analyze this sample file in detail:
-
ddns-update-style interim With this command, the RHEL DHCP server conforms as closely as possible to the current Dynamic DNS standard, where the DNS database is updated when the DNS server renews its DHCP lease. It is "interim" because the standards for DDNS are not complete as of this writing.
-
ignore client-updates A good setting if you don't want to allow users on client computers to change their host names.
-
subnet 192.168.0.0 netmask 255.255.255.0 Describes a network with an address of 192.168.0.0 and a subnet mask of 255.255.255.0. This allows the local DHCP server to assign addresses in the range 192.168.0.1 to 192.168.0.254 to different computers on this network. If you've configured a different network IP address, you'll want to change these settings accordingly.
-
option routers Lists the default router. You can use more than one option routers directive if you have more than one connection to an outside network. This information is passed to DHCP clients as the default gateway, which supports access to outside networks such as the Internet. You'll want this command to reflect the IP address for the gateway for your network.
-
option subnet-mask Specifies the subnet mask for the local network.
-
option nis-domain Notes the server that provides the NIS shared authorization database. If you've configured NIS on your network, you'll want to substitute the name of your NIS domain for domain.org. Otherwise, you should comment out this command.
-
option domain-name Adds the domain name for your network. Substitute the IP address for the DNS servers you want your clients to use.
-
option domain-name-servers Notes the IP address for the DNS server for your network. You can add more commands of this type to specify additional DNS servers.
-
option time-offset Lists the difference from Greenwich Mean Time, also known as UTC (a French acronym), in seconds.
-
option ntp-servers Notes any Network Time Protocol (NTP) servers for keeping the time on the local computer in sync with UTC. I describe NTP later in this chapter.
-
option netbios-name-servers Adds the location of any Windows Internet Naming Service (WINS) servers for your network. As this is a Microsoft service, I refer to it briefly in the description of Samba in Chapter 10.
-
option netbios-node-type 2 Peer-to-peer node searches, associated with WINS.
-
range dynamic-bootp 192.168.0.128 192.168.0.254 Specifies the assignable IP addresses to remote networks, using the BOOTP protocol.
-
default-lease-time Specifies the lease time for IP address information, in seconds.
-
max-lease-time Specifies the maximum lease time for IP address information, in seconds.
-
next-server Notes the boot server for network computers. If you don't have any network computers, you can comment out this entire stanza.
You can also assign a specific IP address to a computer based on a client's Ethernet address. Just add an entry similar to the following to /etc/dhcpd.conf:
host mommabears { hardware ethernet 08:00:12:23:4d:3f; fixed-address 192.168.0.201; } This specifies what the DHCP server does when a network card with a hardware address of 08:00:12:23:4d:3f tries to connect via Ethernet. In this case, the IP address 192.168.0.201 is assigned to a client named mommabears.
Naturally, you'll want to modify this file accordingly for your particular network. For example, if you've configured computers on the example.org network described earlier in this book, you'll want to substitute example.org and the associated IP addresses in your /etc/dhcpd.conf file. I've done this for my network in Figure 13-5.

Figure 13-5: Sample DHCP configuration file
| On the Job | To assign an IP address to a specific network card on a specific computer, you need the hardware address, which can be found next to the HWaddr in the output to the ifconfig command. |
DHCP can be customized for individual computers. You can set up static IP addresses for servers. Once you're ready, start the dhcpd service with the following command:
# service dhcpd start
By default, this starts a DHCP server, which listens for requests on the eth0 network card. Alternatively, to have a DHCP server listen on the eth1 network interface, run the following command:
# service dhcpd start eth1
If these commands don't get a response, you probably haven't created a /etc/dhcpd .conf configuration file.
You can watch the DHCP server in action. Stop the DHCP server with the service dhcpd stop command. You can then restart it in the foreground with standard error descriptors with the following command:
# /usr/sbin/dhcpd -d -f
Start another Linux/Unix client. Make it look for another DHCP lease with the dhclient -r and dhclient commands, and then watch the console of the server. You'll see a number of DHCP communication messages on the server that illustrates the process of leasing an IP address to a client.
| On the Job | A second way to get the MAC address for a given client is to watch the DHCP server messages, normally sent to /var/log/messages. |
Once you've configured your DHCP server to your satisfaction, remember to activate it at the appropriate runlevels with a command such as:
# chkconfig dhcpd on
DHCP and Microsoft Windows
In order for the DHCP server to work correctly with picky DHCP clients such as Microsoft Windows 9x, the server needs to send data to the broadcast address: 255.255.255.255. Unfortunately, Linux insists on changing 255.255.255.255 into the local subnet broadcast address. The mixed message results in a DHCP protocol violation, and while Linux DHCP clients don't notice the problem, Microsoft DHCP clients do. Normally, such clients can't see DHCPOFFER messages and therefore don't know when to take an IP address offered from the DHCP server. If you're configuring a DHCP server for a network with Microsoft Windows computers, run the following command,
# route add --host 255.255.255.255 dev eth0
where eth0 is the name of the NIC that connects the server to the network.
Client Configuration
You can set up DHCP as a client using the dhclient command, or you can use the Red Hat Network Configuration tool (which you can also start with the System | Administration | Network command). Alternatively, configuring a DHCP client at the command line is not difficult (and is faster on the Red Hat exams). Make sure that the /etc/sysconfig/network configuration file includes the following line:
NETWORKING=yes
Next, make sure that the /etc/sysconfig/network-scripts/ifcfg-eth0 script contains the following lines (if you're using a different network device, modify the appropriate file in /etc/sysconfig/network-scripts directory):
BOOTPROTO='dhcp' ONBOOT='yes'
If you don't want the DHCP server to assign a DNS server in the client's /etc/ resolv.conf, add the following directive:
PEERDNS=no
The next time you reboot, your network configuration should look for DHCP address information automatically from the DHCP server for your network.
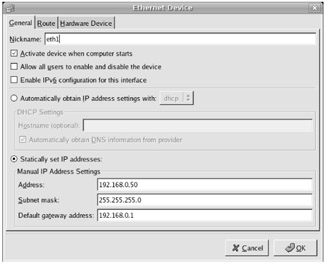
Alternatively, you can use the Network Configuration tool from a GUI to configure DHCP. You can also start it from a GUI terminal console with the system-config-network command. When the tool opens, select your network card and click Edit. You should see a window similar to what is shown in Figure 13-6.

Figure 13-6: Configuring your network card
If you want to use DHCP on this computer, select the Automatically Obtain IP Address Settings With option. You'll then get to choose between getting IP address information from a DHCP server on your local network, using BOOTP to get IP address information from a remote network, or going through a dial-up connection, such as to an ISP. Once you've activated the changes, restart the network daemon with the service network restart command. Your network card will then look for IP address information from a DHCP server.
DHCP Client Troubleshooting
If the DHCP client configuration instructions in this chapter are not working, there may be a problem with the way the network is set up on your Linux computer. For example,
-
The NIC is not configured properly. See Chapter 7 for information on reconfiguring your network card.
-
If the computer is still having problems finding a DHCP server, check your firewall. If port 67 or 68 is blocked, your computer won't be able to get a message to the server.
Exercise 13-3: Configuring DHCP
To run this exercise, you'll need two different computers: a DHCP server and a DHCP client on the same LAN. The IP addresses listed in this exercise are just examples; substitute IP addresses appropriate for your network.
-
Open /etc/dhcpd.conf. Configure the server with an IP address range of 192.168.11.11–192.168.11.15 and with a network mask of 255.255.255.0.
-
Configure the client computer to use DHCP. Restart the network service on the client and record the IP address that it gets.
-
Add gateway and DNS server options with IP addresses of 192.168.11.254 and 12.34.45.56, respectively. If you already have a gateway and a DNS server, substitute the appropriate IP addresses. Restart the DHCP service. Restart networking on the client to make it renew the lease on the IP address.
-
Check the settings on the client. The ifconfig command should list your network card (usually eth0) with an IP address within the range described in step 1. The /etc/resolv.conf should show the DNS server address, unless the file listed in step 5 includes PEERDNS=no.
-
The /etc/sysconfig/networking/devices/ifcfg-eth0 configuration file should list the gateway address defined in step 3.
EAN: 2147483647
Pages: 227