Certification Objective 13.02-The Secure Shell Package
Red Hat Enterprise Linux installs the Secure Shell (SSH) packages by default, using the openssh-server, openssh-clients, openssh-askpass, and openssh RPMs. The Secure Shell and Secure Copy programs, ssh and scp, are replacements for the rsh, telnet, and rcp programs. They encrypt communication between different computers. The secure daemon, sshd, listens for all inbound traffic on TCP port 22. The SSH configuration files are located in the /etc/ssh directory.
The Secure Shell daemon works because it encrypts messages. RHEL incorporates SSH version 2, which includes an enhanced key exchange algorithm.
Basic Encrypted Communication
Basic encryption in computer networking normally requires a private key and a public key. You keep the private key and send the public key to others. When they want to send data to you through SSH, their messages are encrypted with the public key. Your computer can descramble the message with the private key.
Encryption keys are based on random numbers. The numbers are so large (typically 512 bits or more) that the chance that someone will break into your system, at least with a PC, is quite small in the foreseeable future. Private and public encryption keys are based on a matched set of these random numbers.
Private Keys
Your private key (essentially a file with your special number) must be secure. When you enable an application, it can attach the key to your messages. Anything you send-say, from your e-mail account-can then be digitally signed and encrypted. The public key is added to the end as part of your signature. Only the recipient will be able to decrypt the message.
Public Keys
Your public key value is just that, publicly available. A central authority such as VeriSign, GlobalSign, or Thawte provides public access to public keys they have created. If they generate a private key for you, they'll keep a secure copy on their system. You can just attach your public key to the e-mail, or the end users can publicly retrieve it from the Web site associated with the central authority.
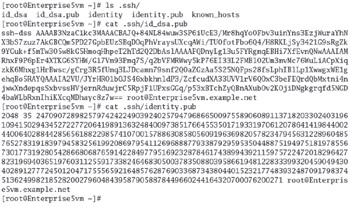
The example shown in Figure 13-1 lists the directories and files associated with SSH usage as well as a public key that has been added to your "keyring."

Figure 13-1: A public key
This key is like a password used to encrypt your data. Imagine trying to remember the 1024-bit number expressed in hexadecimal value as shown here.
3081 8902 8181 00D4 596E 01DE A012 3CAD 51B7 7835 05A4 DEFC C70B 4382 A733 5D62 A51B B9D6 29EA 860B EC2B 7AB8 2E96 3A4C 71A2 D087 11D0 E149 4DD5 1E20 8382 FA58 C7DA D9B0 3865 FF6E 88C7 B672 51F5 5094 3B35 D8AA BC68 BBEB BFE3 9063 AE75 8B57 09F9 DCF8 FFA4 E32C A17F 82E9 7A4C 0E10 E62D 8A97 0845 007B 169A 0676 E7CF 5713 1423 96E0 8E6C 9502 0301 0001
That is why the applications save this value for you, on a "public keyring." You can add as many public keys from other users, sites, and services as you wish.
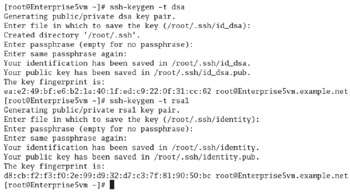
Your private key is similar, but you must keep it private, or this whole system fails. Keeping it private means no one should have access to your PC. If your PC is public, secure your system with a passphrase (password), as shown in Figure 13-2, to use this key. Don't forget the passphrase, or you'll have to remove and reinstall the Secure Shell.

Figure 13-2: Generating encryption keys
How to Generate Your Keys
There are a few SSH-oriented utilities you need to know about:
-
sshd The daemon service; this must be running for inbound Secure Shell client requests.
-
ssh-agent A program to hold private keys used for RSA authentication. The idea is that the ssh-agent command is started in the beginning of an X session or a login session, and all other windows or programs are started as clients to the ssh-agent program.
-
ssh-add Adds RSA identities to the authentication agent, ssh-agent.
-
ssh The Secure Shell command, ssh, is a secure way to log in to a remote machine, similar to Telnet or rlogin. To make this work, you need a private key on the server and a public key on the client. Take the public key file, identity.pub or id_dsa.pub, created later in this section. Copy it to the client. Place it in the home directory of an authorized user, in the ~/.ssh/authorized_ keys or ~/.ssh/authorized_keys2 file.
-
ssh-keygen A utility that will create your keys for you. The ssh-keygen -t keytype command will create the keys you desire. The keytype can be DSA (Digital Secure Algorithm) or RSA1 (RSA Security). The command works as shown in Figure 13-2.
All you need to do is transfer the public key, with the .pub extension, to an authorized user. It's important to add a passphrase to protect that digital signature. In the worst case, a cracker could use the passphrase to steal your identity.
While encryption keys are important, remember that the Red Hat exams require that you configure services for basic operation. So if you're not already familiar with SSH, stay focused on getting it working, as described in the rest of this section.
Why Use SSH?
The Internet is a public network. If you're connected to the Internet, anyone in the world could conceivably access your computer through this public network. All that is needed is Internet access from an anonymous location. In other words, a skilled cracker may be able to capture your passwords from a computer in a public library.
In contrast, private networks are used for security applications. Merchants who dial into a central server to check authorized credit card numbers are connecting to a private network. Access to such private networks can be expensive.
Unix and the network that became the Internet started in an educational setting, where there is a premium on the free exchange of information. While the resulting openness of the Internet is good, it can present security challenges. The original Unix tools developed for networks were not designed with security in mind.
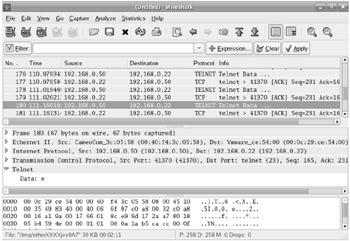
These tools include telnet, ftp, and the "r" (remote) commands (rlogin, rcp, rsh). These utilities pass all information, including login names and passwords, across the network in clear text format. Anyone with a simple protocol analyzer such as Ethereal can find your password in this way. The Wireshark (successor to Ethereal) output shown in Figure 13-3 highlights one of the letters in a Telnet password on my private LAN (it's an e). The other Telnet packets contain the other letters and/or numbers of the password.

Figure 13-3: It's easy to decipher a clear text password.
| On the Job | To take full advantage of Kerberos-based Telnet, you'll need to set up Kerberos keys for each member of your network. For more information, see the Kerberos Infrastructure HOWTO at www.tldp.org. |
| On the Job | I do not in any way endorse the cracking of passwords. However, as a system administrator, you do need to know your vulnerabilities. If you can trace clear text passwords on your own network, you are at risk. |
The Secure Shell utilities were an answer to this problem, using high encryption standards. The Secure Shell tools replaced their insecure brethren and provided full encryption of all data between the hosts that is very hard to break, even by the brute force method.
Configuring an SSH Server
You don't have to do much to configure an SSH server for basic operation. Install the packages described earlier, activate the service, make sure it's active the next time you reboot your system, and open the appropriate port in any firewalls that you've configured. Then all you need to add is host- or user-based security for the service.
The SSH server configuration file is /etc/ssh/sshd_config. The first directive (Protocol 2) configures SSH version 2, which is more secure. By default, it also includes the following directives.
SyslogFacility AUTHPRIV
The first directive sends all logging attempts, successful and otherwise, to the appropriate log file; in this case, /var/log/secure.
The next directive authorizes password authentication, based on local user passwords:
PasswordAuthentication = yes
The next directive disables PAM authentication, despite the UsePAM=yes later in this file.
ChallengeResponseAuthentication = no
This is followed by a directive that supports authentication using the Generic Security Services Application Programming Interface for client-server authentication:
GSSAPIAuthentication = yes
The next directives allow the client to set several environmental variables. The details are normally trivial between two Red Hat Enterprise Linux systems:
AcceptEnv LANG LC_CTYPE LC_NUMERIC LC_TIME LC_COLLATE LC_MONETARY LC_MESSAGES AcceptEnv LC_PAPER LC_NAME LC_ADDRESS LC_TELEPHONE LC_MEASUREMENT AcceptEnv LC_IDENTIFICATION LC_ALL
The following directive is important for anyone who needs remote access to a GUI tool:
X11Forwarding yes
For example, when I'm working from my patio, I can connect to and open GUI tools from Red Hat systems in my office when I use SSH to connect with the following command:
# ssh -X michael@enterprise5a
The final directive supports the use of SSH encryption for secure FTP file transfers:
Subsystem sftp /usr/libexec/openssh/sftp-server
I like to add two directives that promote security by user and host. For example, logins by the root user are allowed. By adding the following directive,
PermitRootLogin no
I keep administrative users from logging in with SSH. They can still use the su or sudo command (as authorized) to the administrative account once connected. This reduces the risk of crackers identifying the administrative password at the beginning of an SSH session.
I also like to limit the users allowed to access a system via SSH. The key is the AllowUsers directive. You can limit by user with a directive such as:
AllowUsers michael donna
Alternatively, you can limit access by each user to certain hosts with a directive such as:
AllowUsers michael@enterprise5vm donna@poohbear
Configuring an SSH Client
Configuring an SSH client is a simpler process. The standard configuration file for a client system is /etc/ssh/ssh_config. Individual users can have custom SSH client configurations in their ~/.ssh/config files. There are four directives included by default:
Host * GSSAPIAuthentication yes ForwardX11Trusted yes SendEnv LANG LC_CTYPE LC_NUMERIC LC_TIME LC_COLLATE LC_MONETARY SendEnv LC_MESSAGES LC_PAPER LC_NAME LC_ADDRESS LC_TELEPHONE SendEnv LC_MEASUREMENT LC_IDENTIFICATION LC_ALL
The Host * directive applies the other directives to all connections. The other directives match the same directives described earlier under /etc/ssh/sshd_config.
| On the Job | Many of us still have to administer Microsoft Windows computers. You can still take advantage of SSH security from these systems. All you need is an SSH service such as OpenSSH from http://sshwindows.sourceforge.net, and you can use SSH to administer your Linux systems even from a Microsoft Windows system. I have not tested this option from Microsoft Windows Vista. |
EAN: 2147483647
Pages: 227