Chapter 3. Automatic Numbering
| CONTENTS |
- Some Background on Autonumbering
- The Interrelated Parts of an Autonumber Format
- Creating a Numbered List
- Creating Numbering Based on Chapter Numbers
- Creating Section-Based Numbering
- A Note on Book File Numbering
- Summary
From computers to time and musical beats to universal logic, numbers play a central part of what makes the human world go round. In documents, numbers give a fixed order to things, such as steps in an exercise or categorization of topics within topics. Such an ordered sequence is often necessary for successful organization and structure in documents of any kind.
When numbers are entered into documents manually, making changes to those numbered paragraphs can be a daunting task. Throughout the writing process, editing documents happens often. Each time something within an ordered sequence is moved or deleted, all items before and after the number must be manually renumbered to reflect the change. If you've had the "pleasure" of carrying out this manual task, you know that it can be cumbersome at best. Luckily for us, that's where FrameMaker's autonumbering feature comes in.
In documents, autonumbering does just what its name implies: It automatically numbers your paragraphs so you don't have to. After autonumbers are incorporated into documents, the task of manually renumbering any numbered paragraph is almost totally eliminated. Autonumbered paragraphs always adjust themselves as the document changes. We could almost say that autonumbering provides error-free numbering in documents. In the real world, however, mistakes happen, and we have to seek solutions for those mysterious numbering anomalies.
In this chapter, you acquaint yourself with the concepts and techniques behind autonumbering in FrameMaker. You are also presented with examples of how to construct a variety of autonumbering sequences for chapter heads, appendixes, subheads, figures, tables, and more.
Whether you are just starting to use autonumbering or you use a template, this chapter gives you the information you need to go behind the scenes in FrameMaker with confidence.
Some Background on Autonumbering
Before I discuss autonumbering with some real examples and how-to's, here's some background information on the subject. If you prefer to jump right into autonumber how-to's, skip to the section "Creating a Numbered List."
Back to Basics
Use Format > Paragraphs > Designer to access Paragraph Designer (or use the keyboard shortcut Control-M).
Numbering in FrameMaker is one of six sets of paragraph properties, which you can specify in the Paragraph Designer. After numbering is set up in the Paragraph Designer as part of a paragraph tag, you can simply put it into action by applying that paragraph tag to a particular paragraph within your document. The numbering automatically increases by 1 for each successive paragraph tagged with that same paragraph tag.
Number Series
Your documents might contain numbered headings, lists, figures, tables, equations, exercises, or other types of numbered items. Each numbered item can be implemented as a paragraph or set of paragraphs. Each type of numbered paragraph can either be numbered independently of other types of numbered paragraphs or have its numbers relate to other numbered paragraphs. In the world of FrameMaker, paragraphs with related numbering are known as a number series. Understanding what number series are all about will help you to create flawless autonumbering at the start and to cope with numbering problems that may crop up later.
Independent and Related Number Series
Here's how a number series works: Say that you have numbered tables and numbered figures in a document. The table numbers start with 1 and count up from there, and the figure numbers also start with 1 and count up from there. These two series are separate entities, so they should be numbered independently.
On the other hand, two number series might be related to each other that is, they have everything to do with each other. For example, if the table and figure numbers were related, a table might appear first in a document called Table 1, followed by the first figure called Figure 2. You might have already experienced this type of numbering within your documents.
Series Labels
Series labels indicate whether the number series of two or more numbered paragraph tags are correlated or independent of each other. Series labels are specified in the Autonumber Format field of the Paragraph Designer and consist of a letter followed by a colon; for example, "F:" for figures. If two paragraph tags have the same series label in their Autonumber fields, their numbers belong to the same series. If not, their number series are independent of each other. Be careful with series labels because the letters are case-sensitive. For example, "F:" identifies a different series than "f:". If a paragraph tag has no series label, its number series is independent of any other autonumbered tag that does have a series label.
You get more clarity and hands-on experience with series labels as you carry out the exercises presented later in this chapter.
Defining Characteristics of a Number Series
Each number series that you include in your documents must have two specified characteristics: numbering style and starting number. You need to keep both of these features in mind when you create numbered paragraphs in your documents.
Numbering Style
FrameMaker offers five basic numbering styles from which you can choose:
-
n. Arabic numerals (1, 2, 3 ...)
-
A. Uppercase alphabetic (A, B, C ...)
-
a. Lowercase alphabetic (a, b, c ...)
-
R. Uppercase Roman numerals (I, II, III ...)
-
r. Lowercase Roman numerals (i, ii, iii ...)
The numbering style you choose to use for various number sequences in your documents is up to you. After you start to go through some of the exercises, you will get better acquainted with numbering styles. Experiment with the various numbering styles to get a feel for how this works. Don't limit yourself to the particular numbering style I work with in the exercises.
Starting Number
FrameMaker offers three possible ways to specify how the autonumber is to be calculated. The calculation is specified by a suffix after the letter that indicates the numbering style:
-
No suffix. Number is the same number as that of the previous item in the series.
-
+. Number is one greater than that of the previous item in the series.
-
=n (where n is a number). Number is equal to the nth number in the selected number style. (For example, "a=6" causes "f" to be displayed.)
You can start a numbering sequence with any number you choose. You don't need to do this often, but it is essential in certain circumstances. Say that you have several numbered lists in your document that must be numbered sequentially beginning with 1. If you have a numbered list on a page that contains six items numbered 1 through 6, and a different numbered list using the same paragraph tag on a later page, the first item in the later list would be automatically numbered 7. That makes a certain kind of sense, because this is autonumbering, but it isn't what you had in mind.
Fixing this problem is where the starting number comes in. For this type of list, you need two different paragraph tags. One paragraph tag (called, say, "NLfirst") will have a starting number of 1, whereas the other tag (called, say, "NLnext") will have a number that increases by 1. After you create these tags, apply the NLfirst paragraph tag, which has a starting number of 1, to the first item in each list. This resets the first item to number 1. Apply the NLnext tag to the subsequent items in the list, and they will be numbered correctly.
Series labels are also needed in this situation. You certainly want to relate these two paragraph tags to each other. Otherwise, it does you no good to have the NLfirst tag reset the starting number to 1, because the following NLnext tag would just pick up the numbering where it left off at the end of the previous list. Therefore, the NLfirst and the NLnext tag must have the same series label (for example, "N:"). Later in this chapter, I explore examples of numbered lists and how to create and use them in documents.
Including Text in Autonumbering
Autonumbering is not limited to numbers. You can use autonumber formats to insert text or symbols automatically in paragraphs. For example, you might want to include the word "Figure" along with the figure numbers, or the word "Chapter" with numbered chapter headings. These insertions are not numbers per se, but they can be set up as part of the autonumber format. Also, you can set up an "autonumber" format that doesn't include any numbers at all. Text in autonumbers make an appearance in some of the exercises presented later, but the focus of this chapter is the construction and use of numbers.
Note
For more information on using autonumber formats to insert text automatically, see Chapter 2.
The Interrelated Parts of an Autonumber Format
Now that you have some background information on autonumbers, you're ready to get started with a more in-depth look at the inner workings of numbering and the various parts that make up the whole series.
In this section, you explore the Numbering properties in the Paragraph Designer, their Building Blocks, and the Numbering properties of the document. The last of these groups relates to the document file, whereas the first two relate to individual paragraphs. Although actual autonumbering is defined in the Numbering properties of the Paragraph Designer, you can use other FrameMaker features that work hand-in-hand with autonumbering. It's important that you understand how FrameMaker's interrelated parts work together to produce the outcome that you are looking for.
Note
For more information on book files, see Chapter 8.
If you have not yet created numbering in FrameMaker, you might want to read through this section to gain some familiarity and come back to it later. If you have already created numbering in FrameMaker, this section might help clear up some things for you.
You also find out how particular settings work for numbered paragraphs within files included in a book. The next sections briefly discuss when and why to use certain numbering settings when files are included in a book.
Understanding the Numbering Properties Window
Back to Basics
Use Format > Paragraphs > Designer to access Paragraph Designer (or use the keyboard shortcut Control-M). Then click the Number tab.
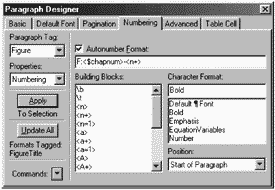
You work with the Numbering properties to construct, troubleshoot, or edit autonumber formats. The Numbering properties window (see Figure 3.1) is a page of the Paragraph Designer and comprises the Autonumber Format field and the Building Blocks, Character Format, and Position lists.
Figure 3.1. The Numbering properties window in Paragraph Designer.
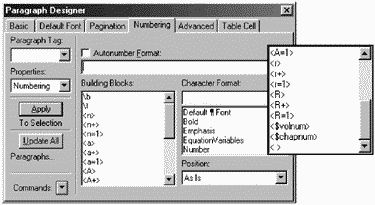
Here is a run-down of how each item contributes to autonumbers:
-
Autonumber Format
Select the check box to indicate that there is an autonumber format for a particular paragraph tag. You can use the Autonumber Format field to insert the combination of series labels, Building Blocks, text, symbols, and tabs that make up the autonumber in documents. When autonumber information is present in this field, the check box is automatically checked when this window appears. It will be turned on automatically if you click in the Autonumber Format field. To eliminate autonumbering from a paragraph tag, uncheck the check box (by clicking it two times) at any time and update the paragraph tag. Doing so automatically clears the Autonumber Format field.
-
Building Blocks
Building Blocks are counters or placeholders that you insert in the Autonumber Format field by selecting them from the Building Blocks list. Fifteen of the Building Blocks represent the different combinations of numbering style and starting number. In the document, these Building Blocks will be replaced by autonumbers computed and presented according to the selected starting number and numbering style. Two more Building Blocks, <$chapnum> and <$volnum>, can be applied when you want to display the chapter or volume number. The starting number and style for these particular Building Blocks cannot be set in the Paragraph Designer Numbering properties; instead, they must be set in the Document Numbering properties. Finally, the \b and \t Building Blocks insert a bullet and a tab, respectively.
-
Character Formats
These are the character format tags that are included in the Character Catalog in your document. Use character formats to apply a character format to only the autonumber portion of a paragraph. That is, the character format will be applied to the autonumber of the paragraph, not to the text.
-
Position
Use this to specify where numbering is displayed: at the beginning or at the end of a paragraph. Usually, numbering appears at the beginning of a paragraph. There are cases in which an autonumber at the end of the paragraph is useful, such as numbered displayed equations. Again, the choice is yours.
Understanding Building Blocks
Building Blocks are the key to autonumbering. They represent number counters, placeholders, styles, tabs or bullets, and chapter or volume numbers. They don't seem like numbers at all when they're inserted in the Autonumber Format field, but they reveal themselves as numbers on document pages.
You use Building Blocks in the Autonumber Format field to construct a model of the numbering scheme that you want to use in documents. Table 3.1 lists various building blocks and why they are used. This helps serve as a basis for understanding before you move through the exercises. The Building Blocks that begin with <r, <R, <a, and <A work exactly the same as Building Blocks beginning with <n. The only difference is that they display different numbering styles, as described in the earlier section "Numbering Style."
| Use this Building Block... | To Do the Following... |
|---|---|
| \b | Insert a bullet. |
| \t | Insert a tab. |
| <n> | Insert a number that keeps the same value as the number at this position in the format in the previous paragraph of this series. For example, if the previous autonumber with series label N: was N:<n+> and showed as 3 in the document, N:<n> will also be shown as 3. |
| <n+> | Insert a number that is one greater than the number at this position in the format in the previous paragraph of this series. |
| <n=1> | Set the value of the number at this position in the format, for reference by subsequent paragraphs in this series, to 1 (or whichever number follows the equal sign) and display that value. |
| <$volnum> | Display a volume number as specified for the document in the Numbering properties window. |
| <$chapnum> | Display a chapter number as specified for the document in the Numbering properties window. |
| < > | Keep the value of the number at this position in the format the same as in the previous paragraph of this series, but not display the value. |
| < =0> | Set the value of the number at this position in the format to zero for reference by subsequent paragraphs in this series, but not display the zero. This Building Block is not shown in the Building Blocks list. To use this, you have to type it. |
Building Blocks might still seem like a foreign language to you. At this point, they probably are. But, after you see them in action, Building Blocks will make more sense, and you'll be an expert at them in no time.
Understanding Document Numbering Properties
If you want to use the Building Blocks <$chapnum> and <$volnum> to include the chapter and volume in an autonumber format, you need to set the value and style of these variables by using your document's Numbering properties for chapter or volume, as well as book settings. You also use document Numbering properties for paragraph when document files using counter or placeholder numbered paragraphs are included in a book.
Back to Basics
Use Format > Document > Numbering to view the Numbering Properties window for chapter, volume, and paragraph.
It's likely that you might use a combination of all these numbering sequences in documents. Here's an overview of Document Numbering properties. You might want to return to this section after you go through some of the exercises in this chapter to gain clarity on the subject or to help troubleshoot settings in existing templates.
Back to Basics
When using <$volnum>, the Document Numbering properties for volume work just like those for chapter.
Chapter
Click on the Chapter tab in the Numbering Properties window to access the Chapter settings for this document (see Figure 3.2). You need this property only when paragraph autonumber formats include the <$chapnum> Building Block. Table 3.2 shows the settings available in this window.
Figure 3.2. The Chapter tab allows you to access the chapter settings for your document.
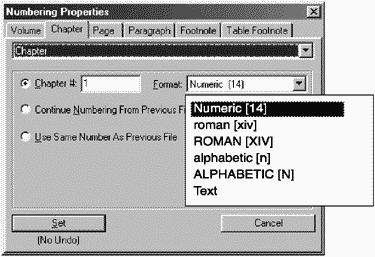
| Setting | Description |
|---|---|
| Chapter # | Use this field to set the chapter number for this document file. For example, if you want a chapter to be 9, type 9 in this field. This field accepts numbers, not letters or Roman numerals. For example, if you want your chapter to be Appendix D, then type 4 in the Chapter # field. |
| Format | Use this property to set the number style. For example, if you use <$ chapnum> for appendixes and this file is to be Appendix D, select ALPHABETIC (N) from the Format drop-down list to set the number style to A, B, C, and so forth. If you want to use lowercase Roman numerals, select roman (xiv) from the drop-down list. |
| Continue Numbering From Previous File in Book | Select this radio button if the file is included in a book and you want the chapter number to be one more than that of the previous file in the book. |
| Use Same Number As Previous File | Select this radio button if the file is included in a book and you want the chapter number to be the same number as the previous file in the book. For example, if Chapter 3 is very large and you split Chapter 3 into two separate files, you would want the second file of Chapter 3 to use the same number as the first file of Chapter 3 and not increment by 1 |
Back to Basics
Each document file uses one page number style, and each number series can use a different number style.
You'll see more of the document Numbering properties for chapters when you create chapter number-based paragraph numbering later in this chapter in the section "Creating Numbering Based on Chapter Numbers."
Paragraphs
Click on the Paragraph tab in Numbering properties to access its settings (see Figure 3.3). You use this property only when document files are part of a book and contain paragraph autonumber formats that include the counter or placeholder Building Blocks, <n>, <n+>, and their counterparts in other numbering styles. If you used a combination of <$chapnum> and these placeholder Building Blocks, you must use the Numbering properties settings for both chapter and paragraph when including files in a book. You might not actually have to use these properties, but you should have a general understanding of how these settings work.
Figure 3.3. The Numbering properties window for Paragraph.
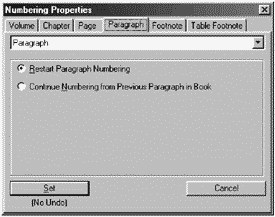
Note
Use this property only when document files are or have been included in a book.
-
Restart Paragraph Numbering
Select this radio button to restart the numbering of all paragraphs that contain counter or p laceholder building blocks in a book. For example, if figure paragraphs have the autonumber format F:<n+> and the last figure paragraph in one document file in a book is numbered 4, the first figure paragraph in the next document file in that book will be number 1. Restarting paragraph numbering does not affect the <$chapnum> and <$volnum> Building Blocks that you use in an autonumber format.
-
Continue Numbering from Previous Paragraph in Book
Select this radio button to increment the numbering of paragraphs that contain counter or placeholder Building Blocks continuously from one file to the next file in that book. For example, if figure paragraphs have the autonumber format F:<n+> and the last numbered figure paragraph in one document file is numbered 4, the first figure paragraph in the next document file in that book will be numbered 5. Continuing paragraph numbering does not affect the <$chapnum> or <$volnum> Building Blocks that you use in a an autonumber format.
Back to Basics
Book file settings override individual file settings.
Creating a Numbered List
Now that you have some background on autonumbering, it's time to dig in to some real-world examples.
You might want to include many numbering schemes in your documents, but you need to begin at the simplest level: the numbered list.
Numbered lists appear in documents in a variety of number styles: Arabic numbers, letters, Roman numerals, and they may be punctuated with periods, parentheses, or other special characters. The following exercises show you around the construction and use of numbers in lists. After you understand how to construct a numbered list, you will be able to use different number styles quickly and easily.
Restarting and Continuing a Number Series
Numbered lists of any type are often used more than once in a document. Each time a numbered list is used, the first item in the list begins with the number 1, and each subsequent item in the list increases in value by 1. For this to work correctly in FrameMaker, you must restart the first item in each list throughout your document to the number 1. If you do not reset the first item in each list to the number 1, all the numbered lists throughout your document will be numbered sequentially.
As I discussed in the earlier section "Starting Number," the way to reset the first item in each list to 1 is to create two separate paragraph tags with different autonumber formats to use for numbered lists. The first paragraph tag restarts the numbered list at number 1, and the second tag increases the number of subsequent tagged paragraphs by 1. For the following exercise, assume the two paragraph tags already exist in the document except for the number property. To keep it simple, I named the paragraph tags N1 to restart the list and N2 to increment by 1. It's a good idea to name these paragraph tags something that reminds you which one restarts a list or increments a list item.
Restarting the List at 1
Let's start in the Paragraph Designer on the Numbering property for N1, the paragraph tag that restarts the numbered list at 1:
Back to Basics
Click Update All in the Paragraph Designer after you make changes to the Numbering property.
-
Type N: in the Autonumber Format field.
N: is a series label; see the section "Series Labels" earlier in this chapter. This series label will be used for both N1 and N2 so that the numbers in N1 and N2 paragraphs relate to each other.
-
Select <n=1> from the Building Blocks list.
The Building Block <n=1> is inserted into the Autonumber Format field. This block sets the value of the number to 1 and displays the number as an Arabic numeral. You can also use this Building Block to set the value to any number. For example, <n=3> sets the number to 3 instead of 1.
-
Type a period.
A period is inserted into the Autonumber Format field. As a result, a period will be automatically displayed after the number in all the N1 paragraphs in the document. If you want to use a parenthesis or a dash instead, type that character in the Autonumber Format field.
Increasing Subsequent Items in the List by 1
Now it's time to move on to the autonumber format for N2, the paragraph tag that increments each item in the list by 1:
-
Type N: in the Autonumber Format field.
Using the series label N: for both N1 and N2 means that the N1 and N2 paragraph numbers will relate to each other. When N1 is applied to a paragraph, the number will be 1. If a paragraph tagged with N2 follows it, that paragraph is numbered 2.
-
Select <n+> from the Building Blocks list.
The Building Block <n+> is inserted into the Autonumber Format field. This block is a counter. It increases the value of the number by 1 and displays that value as an Arabic numeral.
-
Type a period.
A period is inserted in the Autonumber Format field. As a result, a period is automatically inserted after the number. If you want to use a parenthesis or a dash instead, type that character in the Autonumber Format field. Of course, you should use the same character as you did in the N1 tag.
Putting Your List into Action
Back to Basics
For N1 Basic properties, set Next Pgf Tag to N2.
Now that you created the paragraph tag autonumber formats necessary to make the numbered list work, it's time to put them into action. Type a few lines of text on your document page or just apply the tags to empty paragraph returns to test them out:
-
Apply the N1 paragraph tag to the first item in the list.
N1 is applied to the paragraph. The number 1 appears.
-
Apply the N2 paragraph tag to the subsequent items in the list.
N2 is applied to the subsequent paragraphs in that list. The numbers 2, 3, 4, and so on are displayed.
Using a Different Numbering Style
If you decide to use a numbering style other than Arabic numerals, just replace <n=1> and <n+> with one of the numbering style Building Blocks listed in Table 3.3.
| Number Style | Building Blocks |
|---|---|
| Lowercase alphabetic (a, b, c, ...) | <a=1>, <a+> |
| Uppercase alphabetic (A, B, C, ...) | <A=1>, <A+> |
| Lowercase Roman numeral (i, ii, iii, ...) | <r=1>, <r+> |
| Uppercase Roman numeral (I, II, III, ...) | <R=1>, <R+> |
Creating Numbering Based on Chapter Numbers
So far in this chapter, you encountered numbered paragraphs that are used specifically for a list. Let's kick it up a notch on the learning curve to chapter-based numbering.
You might already be familiar with chapter-based numbering in documents that you've written or read. The goal of chapter-based numbering is to number all subheadings, figures, and tables within each chapter, based on the chapter number. Chapter-based numbering systems make it easier for readers to find referenced figures, tables, and other elements, as you can see in Table 3.4.
| Heading Level | What It Looks Like |
|---|---|
| ChapterTitle | Chapter 1 Travel Through Europe |
| Subhead1 | 1.1 Getting Around |
| Subhead2 | 1.1.1 Trains |
| Subhead2 | 1.1.2 Cars |
| Figure | Figure 1-1 |
| Table | Table 1-1 |
Each numbered element in Table 3.4 is a kind of paragraph, so it can be autonumbered just as the list items were. In contrast to the list items, however, each numbered paragraph shown in Table 3.4 under the chapter heading includes the same number of the chapter heading (in this case, 1). If the chapter number changes to 2, all the numbered paragraphs under the chapter heading changes accordingly and automatically, as illustrated in Table 3.5.
| Heading Level | What It Looks Like |
|---|---|
| ChapterTitle | Chapter 2 Travel Through Europe |
| Subhead1 | 2.1 Getting Around |
| Subhead2 | 2.1.1 Trains |
| Subhead2 | 2.1.2 Cars |
| Figure | Figure 2-1 |
| Table | Table 2-1 |
Note
See Chapters 4 and 5 for more information on using chapter numbers in headers, footers, and cross-references.
Another advantage to chapter-based numbering is that the chapter number is easily included not only in paragraph numbers, but also in headers and footers, cross-references, table of contents, page numbers, and indexes.
Chapter Heading
This section discusses how to create the chapter heading before it discusses Subhead1, Subhead2, figure, and table. For each exercise, begin with the Paragraph Designer and assume that the paragraph tag already exists, except for the autonumber format. In addition, the steps to update the paragraph tag have been intentionally left out, so don't forget to press Update All when you make changes to the Autonumber Format field.
Determining What Elements Are Included
It's a good idea to plan and write out beforehand what paragraph types you want to number and how you want those numbers to be displayed. This design stage cannot be emphasized enough. Look at how the numbering of each of the example paragraph types in Table 3.4 is related to the heading level that is, the function that the paragraph is intended to perform. For example, Subhead2 is two levels below the chapter heading. It includes the chapter number, a second number that stays the same but increases with Subhead1, and a third number that counts or increases by 1, separated by periods. For ChapterTitle, the word "Chapter" is included and there is a space separating the numbered portion of the paragraph from the typed text. Likewise, in your own documents, you need to decide what types of paragraphs will be numbered and what's included.
Back to Basics
Text included as part of the autonumber is not spell-checked.
These are important things to know before you start working with autonumbers. As with everything else, however, you can always return to it later and make changes.
Creating the Autonumber
You might want to type some text on a body page and assign it the ChapterTitle paragraph tag before you get started. This gives you a good idea of what the autonumber will look like with typed text. Let's begin in the Paragraph Designer Numbering property:
Note
If you use <$chapnum> as a lone Building Block, the series label is not necessary because <$chapnum> is not a counter. Its value does not change within a file.
-
Type "Chapter" in the Autonumber Format field.
Chapter is inserted in the Autonumber Format field of the Chaptertitle paragraph tag. Chapter will be included as part of the autonumber and will be displayed in paragraphs tagged with Chaptertitle.
-
Click once on <$chapnum> in the Building Blocks list.
<$chapnum> is inserted in the Autonumber Format field. <$chapnum> represents the chapter number for this document file and will reveal itself as an actual number in paragraphs with its tag applied.
-
Press the space bar.
A space is inserted after the <$chapnum> building block (see Figure 3.4). A space is included in Chaptertitle paragraphs to separate the autonumber format from the typed text.
Figure 3.4. The ChapterTitle Autonumber format.

Setting the Chapter Number and Style
Now that you created the autonumber, there are just two things left to do. First, set the Chapter number and then, set the numbering style. Here's how to do it:
Note
<$chapnum> does not increment by 1 within the same file, only across files.
-
Select Format > Document > Numbering > Chapter.
The Document Numbering properties window for Chapter appears.
Note
This action sets the chapter number for the entire file.
-
Type 1 in the Chapter# field.
1 is inserted in the Chapter# field. Your document's Numbering properties might already have the number 1 included. Experiment by typing a different number. This means that whatever number you type in this field becomes the chapter number for this document file, including the chapter heading you are creating.
-
Select Numeric from the Format drop-down list (see Figure 3.5). After you finish, click on the Set button.
Figure 3.5. The Document Numbering properties for chapter.
Numeric is the default selection. This means that the chapter heading for this document file will be in numeric style (1, 2, 3, and so on). The changes take effect in the document the moment that you click on the Set button. Just for fun, select another numbering style to try it out.
Subhead1
Now that you created an autonumber for a ChapterTitle, move on to the next subhead level under the Chapter heading. Although you did not need to include a series label for the ChapterTitle autonumber, you must include one here. Subhead1 must relate to some other paragraph tags with autonumbering and be independent of others. Use the series label S: for Subhead1.
Back to Basics
Series labels are case-sensitive.
So far, we have
Chapter 1 Travel Through Europe
Now we will add Subhead1, which is displayed as
1.1, 1.2, ... .
Begin in the Paragraph Designer Number property for Subhead1:
-
Type S: in the Autonumber Format field.
S: is inserted into the Autonumber Format field. S: is the series label assigned to this paragraph tag. The series label either relates two or more number sequences or makes them unique from each other.
-
Click once on <$chapnum> in the Building Blocks list. Type a period after <$chapnum>.
The Building Block <$chapnum> is inserted in the Autonumber Format field followed by a period. As a result, the chapter number for this document file, whose number and style you assigned in the previous exercise, appears in the Subhead1 autonumber format. Regardless of how many times <$chapnum> is used in various autonumber formats, it's always displayed according to the settings in the document Numbering properties for Chapter.
-
Click on <n+> in the Building Blocks list.
The Building Block <n+> is inserted in the Autonumber Format field. This Building Block is a counter. As a result, for each paragraph tagged with Subhead1, the number in the second position only increases by 1.
Back to Basics
Type a hyphen instead of a period if you want the format to be 1-1, 1-2, and so on.
Table 3.6 shows the numbers that will be displayed in Subhead1 paragraphs on body pages as compared with the autonumber format. You can see that, on body pages, two numbers appear, separated by a period, just as the autonumber format contains two Building Blocks separated by a period. The number 1 in the first position in all the paragraphs on body pages corresponds to <$chapnum>, also in the first position, in the autonumber format. The number in the second position in the paragraphs on the body pages corresponds to <n+> in the second position of the autonumber format. Notice how the second-position number increases each time the paragraph tag is assigned to another subsequent paragraph, because the <n+> Building Block is a counter.
| In Paragraph on Body Pages | Autonumber Format |
|---|---|
| 1.1 | S:<$chapnum>.<n+> |
| 1.2 | |
| 1.3 |
Subhead2
The next step in creating automated lists is to create the Subhead2 autonumber format.
So far, we have
Chapter 1 Travel Through Europe
1.1 Getting Around
Now add Subhead2. As you can see Table 3.7, Subhead2 paragraphs get three numbers, as follows:
1.1.1, 1.1.2, ...
The first-position number is based on the chapter number, and the third-position number counts on its own. The second-position number is always equal to the second-position number of the most recent Subhead 1. In other words, Subhead2 is related to Subhead1. You can achieve this result by giving the Subhead2 paragraph tags the same series label that was used for Subhead1.
| Heading Level | What It Looks Like |
|---|---|
| Chaptertitle | Chapter 1 Travel Through Europe |
| Subhead1 | 1.1 Getting Around |
| Subhead2 | 1.1.1 Trains |
| Subhead2 | 1.1.2 Cars |
| Subhead1 | 1.2 Getting a Hotel |
| Subhead2 | 1.2.1 Use a Travel Agent |
Begin in the Paragraph Designer Number property for Subhead1:
-
Type S: in the Autonumber Format field.
S: is inserted in the Autonumber Format field. S: is the series label that was assigned previously to the Subhead1 autonumber format. By inserting the same series label in Subhead2, you relate the two paragraph tags, Subhead1 and Subhead2, to each other by making them use the same number series.
-
Click once on <$chapnum> in the Building Blocks list. Type a period after <$chapnum>.
<$chapnum> is inserted in the Autonumber Format field followed by a period. <$chapnum> represents the chapter number for this document file. You have already assigned the chapter number and style in previous exercises.
-
Click on <n> in the Building Block list.
The Building Block <n> is inserted in the Autonumber Format field. The <n> block is a placeholder rather than a counter. As a result, the number that is displayed will be the same as the number that appears in the same position (the second position) in the last previous paragraph that uses the same number series; that is, the last previous Subhead2 or Subhead1. This number was incremented in the last previous Subhead1 paragraph.
-
Click on <n+> in the Building Blocks list.
<n+> is inserted in the Autonumber Format field. <n+> is a counter. The number increases by 1 based on the number in the same position in the last previous Subhead2.
Table 3.8 illustrates the position of numbers displayed on body pages with respect to the autonumber format.
| In Paragraph | Autonumber Format | Paragraph Tag |
|---|---|---|
| 1.1 | S:<$chapnum>.<n+> | Subhead1 |
| 1.1.1 | S:<$chapnum>.<n>.<n+> | Subhead2 |
| 1.2 | S:<$chapnum>.<n+> | Subhead1 |
| 1.3 | S:<$chapnum>.<n+> | Subhead1 |
| 1.3.1 | S:<$chapnum>.<n>.<n+> | Subhead2 |
Just for fun, change the series label of Subhead2 to s: to see what happens to the autonumbers. Table 3.9 illustrates the results of this error. By not having the same exact series label, Subhead1 and Subhead2 don't relate to each other. Therefore, the second position number of Subhead2 has no previous number to retain its value. When this happens, the number in that position displays as 0.
| In Paragraph | Autonumber Format | Paragraph Tag |
|---|---|---|
| 1.1 | S:<$chapnum>.<n+> | Subhead1 |
| 1.0.1 | s:<$chapnum>.<n>.<n+> | Subhead2 |
| 1.2 | S:<$chapnum>.<n+> | Subhead1 |
| 1.3 | S:<$chapnum>.<n+> | Subhead1 |
| 1.0.2 | s:<$chapnum>.<n>.<n+> | Subhead2 |
Taking a Test Drive
Before moving on, you should test the autonumber formats you created so far. Autonumber formats should adjust correctly on their own under any circumstances. A good way to test autonumber formats is to press the Enter key several times to create lines of empty paragraphs. Then apply the paragraph tags with the autonumber formats at random to make sure they work properly.
If you wait until you have a huge document in front of you, troubleshooting will be more difficult as you search through tons of pages to find the problem. This way, everything is right in front of you at one time.
Figure Autonumber Format
Now that you have created three autonumber formats, you should have a good idea of how to create the Figure autonumber format. Here's how figures will be displayed:
Figure 1-1, Figure 1-2, Figure 1-3 ...
The number 1, in the first position, is based on the chapter number, and the second position number is a counter. If the chapter number were 9, the figure number would begin with 9-1. Here's how you create the Figure autonumber format:
-
Type F: in the Autonumber Format field.
The series label F: is inserted into the Autonumber Format field. This series label differs from the series label used for both Subhead1 and Subhead2. As a result, the figure number series is independent of both Subhead1 and Subhead2.
-
Type "Figure" in the Autonumber Format field, then press the space bar once.
The word "Figure" is inserted in the Autonumber Format field followed by a space. As a result, "Figure" is included as part of the Autonumber format. The space is included to separate the word "Figure" from the figure number. If you don't add a space, the word "Figure" runs into the figure number.
-
Click once on <$chapnum> in the Building Blocks list, then type a hyphen (-).
The Building Block <$chapnum> is inserted in the Autonumber Format field, followed by a hyphen. <$chapnum> represents the chapter number for this document file, which you have already set in a previous exercise. The hyphen is included to separate the chapter number from the figure counter, as in 1-1, 1-2, and so on. If you want to use a decimal, type a period instead. The result is 1.1, 1.2, and so on.
-
Click once on <n+> in the Building Blocks list, then type a space (see Figure 3.6).
Figure 3.6. The Autonumber Format field for figure based on the chapter number.
<n+> is inserted in the Autonumber Format field followed by a space. <n+> is a counter. As a result, each figure number increases by 1 in number position 2, based on the number in the same position in the previous figure caption.
After you finish, the Figure autonumber format will be based on the chapter number, as shown in Table 3.10.
| In Paragraph | Autonumber Format | Paragraph Tag |
|---|---|---|
| Chapter 6 Getting Around the Airport | Chapter <$chapnum> | ChapterTitle |
| Figure 6-1 Heathrow Airport Map | F:<$chapnum>-<n+> | Figure |
| Figure 6-2 Charles DeGaulle Airport Map | F:<$chapnum>-<n+> | Figure |
| Chapter 7 Using the Underground | Chapter <$chapnum> | ChapterTitle |
| Figure 7-1 London Underground | F:<$chapnum>-<n+> | Figure |
| Figure 7-2 Paris Underground | F:<$chapnum>-<n+> | Figure |
Table Autonumber Format
The Table autonumber format is the last format in this exercise that we work on. Now that you created the figure autonumber format, you should breeze through this one. Here's a hint: The table and figure autonumber series are independent of each other. Here's how tables will be displayed:
Table 1-1 , Table 1-2, Table 1-3 , ...
The number 1, in the first position, is based on the chapter number, and the second position number is a counter. If the chapter number is 5, the table number would begin with 5-1.
-
Type T: in the Autonumber Format field.
The series label T: is inserted in the Autonumber Format field. This series label differs from the series label used for Subhead1, Subhead2 and Figure. As a result, the table number series is independent of both subheading number series and the figure number series.
-
Type Table in the Autonumber Format field, then press the space bar once.
The word "Table" is inserted in the Autonumber field followed by a space. As a result, "Table" will be included as part of the Autonumber format. The space separates the word "Table" from the table number. If you don't add a space, the word "Table" runs into the table number.
-
Click once on <$chapnum> in the Building Blocks list, then type a hyphen (-).
The Building Block <$chapnum> is inserted in the Autonumber Format field, followed by a hyphen. <$chapnum> represents the chapter number for this document file, which you already set in a previous exercise. The hyphen separates the chapter number from the table counter, as in 5-1, 5-2, and so on. If you want to use a decimal, type a period instead. The result would be 5.1, 5.2, and so on.
-
Click once on <n+> in the Building Blocks list, then type a space (see Figure 3.7).
Figure 3.7. The Autonumber Format field for tables based on the chapter number.
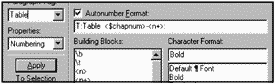
The Building Block <n+> is inserted in the Autonumber Format field followed by a space. <n+> is a counter. As a result, each table number increases by 1 in the second number position, based on the number in the same position in the previous table title.
After you finish, the table autonumber format will be based on the chapter number, as shown in Table 3.11.
| In Paragraph | Autonumber Format | Paragraph Tag |
|---|---|---|
| Chapter 6 Getting Around the Airport | Chapter <$chapnum> | ChapterTitle |
| Table 6-1 London Airport Phone Numbers | T:Table <$chapnum>-<n+> | Table |
| Table 6-2 Paris Airport Phone Numbers | T:Table <$chapnum>-<n+> | Table |
| Chapter 7 Using the Underground | Chapter <$chapnum> | ChapterTitle |
| Table 7-1 London Transport Contacts | T:Table <$chapnum>-<n+> | Table |
| Table 7-2 Paris Transport Contacts | T:Table <$chapnum>-<n+> | Table |
Just for even more fun, change the series label of Table to F:, the same series label for Figure. They are now related to each other. Table 3.12 shows the error in numbering that results. This error is one sure-fire way to disrupt the numbering schemes in your document.
| In Paragraph | Autonumber Format | Paragraph Tag |
|---|---|---|
| Figure 3-1 | F:Figure <$chapnum>-<n+> | Figure |
| Figure 3-2 | F:Figure <$chapnum>-<n+> | Figure |
| Table 3-3 | F:Table <$chapnum>-<n+> | Table |
| Figure 3-4 | F:Figure <$chapnum>-<n+> | Figure |
Creating Section-Based Numbering
Say that you are producing a book in which each chapter consists of several sections. Suppose also that each section has its own separate sequence of figures and tables. In this case, figures and tables would not be numbered just within each chapter, but within each section of that chapter. This type of numbering is substantially trickier than what you did so far in this chapter.
In the following example, you set up figure and table numbers based on a subsection heading level. You work with autonumber format building blocks that you have not yet used specifically, < > and < =0>. You saw the definition for both these building blocks in Table 3.1.
To find out what section-based numbering really means, say that you have three levels of numbered headings in your document, along with figures and tables. Table 3.13 shows the paragraph tag names for these levels and what each should look like in text.
| Paragraph Tag | Paragraph Number in Text |
|---|---|
| Section1 | Section 9 |
| Section2 | 9.1 |
| Section3 | 9.1.1 |
| Figure | Figure 9.1-1 |
| Table | Table 9.1-1 |
| Section2 | 9.2 |
| Section3 | 9.2.1 |
| Figure | Figure 9.2-1 |
| Table | Table 9.2-1 |
As you can see from Table 3.13, this document comprises three levels of section headings, whose numbers are related to each other. The numbers of the figures and tables consist of the Section2 heading number in the first two positions, followed by a counter in position 3. In other words, if the current Section2 is 9.2 and Section3 is 9.2.1, the figures are numbered 9.2-1, 9.2-2, 9.2-3, and so on, and the tables are numbered 9.2-1, 9.2-2, 9.2-3, and so on. Table and figure numbers reset themselves to start over again at 1 each time the Section2 number increases by 1. You can see this clearly when Section2 changes to 9.2.
It seems like the tables and figures are not numbered in the same sequence. Figure 9.2-1 is not followed by Table 9.2-2 . At first glance, you might guess that the figure and table tags belong to a different number series. On the other hand, if different series labels for these tags were used, they could not both be related to the series for Section2. You can't insert one series label for the sections and a second series label for the figure numbers because an autonumber format cannot contain more than one series label. Therefore, we must use a single series label for all five paragraph tags. The autonumber formats must be constructed in a way that produces the two apparently independent counters for figures and tables.
The answer to this problem? Provide positions for all the possible numbers in all the subheadings, but hide the numbers each tag doesn't use, without changing them. For example, in the figure tag, it's necessary to hide the table number without changing it. The < > and < =0> Building Blocks achieve these results.
Note that, for this numbering system to work, figures or tables must not be set between Section1 and Section2 headings. If every Section1 heading is immediately followed by a Section2 heading, such as "Introduction," you will be safe.
After you understand how to implement this numbering scheme, you can take what you learned and creatively apply it to other numbering schemes.
Section1
Section1 is the most important autonumber format to set up for this numbering scheme. It sets the stage for the other autonumber formats, which are ultimately based on it. I use H: as the series label, but you can choose any letter you want:
-
Determine how many autonumber formats are related to each other.
A total of five autonumber formats are related to each other, Section1, Section2, Section3, Figure, and Table. Therefore, five number positions must be accounted for in this autonumber format.
-
Type H: in the Autonumber Format field for Section1.
H: is inserted in the Autonumber field. H: is the series label that is used for all five paragraph tags to relate to each other.
Note
Using the chapter number in place of Section1 does not eliminate the problem of section-based numbering.
-
Select <n+> from the Building Blocks list.
The Building Block <n+> is inserted in the Autonumber field. <n+> is a counter. As a result, each time a paragraph is tagged with Section1, the number increases by 1.
Note
< =0> is not available in the Building Block list.
-
Type < =0>< =0>< =0>< =0> in the Autonumber Format field.
The Building Blocks < =0>< =0>< =0>< =0> is inserted in the Autonumber Format field. The Building Block < =0> resets a counter value to 0 and does not display it. As a result, at every Section1 paragraph in the document (where Section1 increases by 1), the values for the counters in the next four positions are reset to 0 and not displayed. This way, the numbering sequences below the first-level section head can begin again. These four number positions produce the autonumbers for the Section2, Section3, Figure, and Table paragraph tags. You have not constructed these yet, but they must be accounted for in the first-level tag.
You must break down the positions in the Section1 autonumber format. Each position represents one of the five paragraph tags that are included in this numbering scheme, as seen in Table 3.14.
| Series Label | Position 1 | Position 2 | Position 3 | Position 4 | Position 5 |
|---|---|---|---|---|---|
| H: | <n+> | < =0> | < =0> | < =0> | < =0> |
| Section1 | Section2 | Section3 | Figure | Table |
Section2
To set up Section2, do the following:
-
Type H: in the Autonumber Format field for Section2.
H: is inserted in the Autonumber field. H: is the series label that is used for all five paragraph tags to relate them to each other.
-
Select <n> from the Building Blocks list.
The Building Block <n> is inserted in the Autonumber Format field. <n> is a placeholder. As a result, each time a paragraph is tagged with Section2, the number in the first position retains the same value as the previous number in the same position. In this case, that would be the Section1 number.
-
Type a period.
A period is inserted in the Autonumber Format field. As a result, a period appears in the Section2 paragraph between the number in position 1 (the first-level section heading number) and the number in position 2 (the second-level section heading number).
-
Select <n+> from the Building Blocks list.
The Building Block <n+> is inserted in the Autonumber Format field. <n+> is a counter. As a result, each time a paragraph is tagged with Section2, the number in position 2 increases by 1.
-
Select < > from the Building Blocks list.
The Building Block < > is inserted in the Autonumber Format field. < > keeps the value in position 3 the same as the previous value in the same position, but suppresses the display of this value.
-
Type < =0>< =0> in the Autonumber Format field.
The Building Blocks < =0>< =0> is inserted in the Autonumber Format field. < =0> resets values of number positions 4 and 5 to 0. As a result, each time Section2 appears in the document (at which point it increases by 1), the values in positions 4 and 5 reset to 0, and start over again. Positions 4 and 5 represent the figure and table numbers, which start over at 1 each time a Section2-tagged paragraph occurs.
Table 3.15 shows a breakdown of the building blocks at the different number positions in the Section2 autonumber format.
| Series Label | Position 1 | Position 2 | Position 3 | Position 4 | Position 5 |
|---|---|---|---|---|---|
| H: | <n> | .<n+> | < > | < =0> | < =0> |
| Section1 | Section2 | Section3 | Figure | Table |
Section3
To set up Section3, follow these steps:
-
Type H: in the Autonumber Format field for Section3.
H: is inserted in the Autonumber Format Field. H: is the series label that is used for all five paragraph tags to relate to each other.
-
Select <n> from the Building Blocks list.
The Building Block <n> is inserted in the Autonumber Format field. <n> is a placeholder. As a result, each time a paragraph is tagged with Section3, the number in the first position retains the same value as the previous number in the same position. In this case, that's the Section1 number.
-
Type a period.
A period is inserted in the Autonumber Format field. As a result, a period appears in the Section3 paragraph between the number in position 1 (the first-level section heading number) and the number in position 2 (the second-level section heading number).
-
Select <n> from the Building Blocks list.
The Building Block <n> is inserted in the Autonumber Format field. <n> is a placeholder. As a result, each time a paragraph is tagged with Section3, the number in position 2 retains the same value as the previous number in the same position. In this case, that value is the Section2 number.
-
Type a period.
A period is inserted in the Autonumber Format field. As a result, a period appears in the Section3 paragraph between the number in position 2 (the second-level section heading number) and the number in position 3 (the third-level section heading number).
-
Select <n+> from the Building Blocks list.
The Building Block <n+> is inserted in the Autonumber Format field. <n+> is the only number position that is a counter for Section3.
-
Type < >< > in the Autonumber Format field.
The Building Blocks < >< > are inserted in the Autonumber Format field. These Building Blocks suppress the display of the values in number positions 4 and 5 and keep those values the same as the last previous values in those positions. In this example, positions 4 and 5 represent the figure and table numbers. The values of the figure and table numbers are retained so that they do not start over again at 0. The only time they should start over is at the next Section2 heading.
Table 3.16 shows the Building Blocks at the different positions in the Section3 autonumber format.
| Series Label | Position 1 | Position 2 | Position 3 | Position 4 | Position 5 |
|---|---|---|---|---|---|
| H: | <n> | .<n> | .<n+> | < > | < > |
|
| Section1 | Section2 | Section3 | Figure | Table |
Figure
To set up a figure, follow these steps:
-
Type H: in the Autonumber Format field for figure, then type the word "Figure" followed by a space.
The characters "H:Figure" are inserted in the Autonumber Format field. H: is the series label that is used for all five paragraph tags to relate them to each other. The word "Figure" is included in the autonumber format. The space prevents the word "Figure" from colliding with the figure number.
-
Select <n> from the Building Blocks list.
The Building Block <n> is inserted in the Autonumber Format field. This building block is a placeholder. As a result, each time a paragraph is tagged with Figure, the number in the first position retains the same value as the previous number in this same position, which is the Section1 number.
-
Type a period.
A period is inserted in the Autonumber Format field. As a result, a period appears in the figure paragraph between the number in position 1 (the first-level section heading number) and the number in position 2 (the second-level section heading number).
-
Select <n> from the Building Blocks list.
The Building Block <n> is inserted in the Autonumber Format field. <n> is a placeholder. As a result, each time a paragraph is tagged with Figure, the number in position 1 retains the same value as the previous number in this same position, which is the Section2 heading number.
-
Select < > from the Building Blocks list.
The Building Block < > is inserted in the Autonumber Format field. < > keeps the value in position 3 the same as the previous value in this same position (that is, the Section3 number), but suppresses the display of this value. That is, the third-level section number is not displayed in figure captions.
-
Type a hyphen.
A hyphen is inserted in the Autonumber Format field. As a result, a hyphen appears between the number in position 2 (the second-level section heading number) and the number that is displayed in position 4 (the figure number).
-
Select <n+> from the Building Blocks list.
The Building Block <n+> is inserted in the Autonumber Format field. <n+> is a counter. As a result, each time a paragraph is tagged with Figure, the number in position 4 (the figure number) increases by 1.
-
Select < > from the Building Blocks list.
The Building Block < > is inserted in the Autonumber Format field. < > keeps the value of the number position 5 the same as the previous value in this same position (the last previous table number), but suppresses the display of this value.
Table 3.17 shows the Building Blocks in the various positions in the figure autonumber format and what paragraph tags they represent in this series.
| Series Label | Text | Position 1 | Position 2 | Position 3 | Position 4 | Position 5 |
|---|---|---|---|---|---|---|
| H: | Figure | <n> | .<n> | < > | -<n+> | < > |
|
|
| Section1 | Section2 | Section3 | Figure | Table |
Table
To set up a table, follow these steps:
-
Type H: in the Autonumber Format field for Table, then type the word Table followed by a space.
The characters "H:Table" is inserted in the Autonumber Format field. H: is the series label that is used for all five paragraph tags to relate them to each other. The word Table is included in the autonumber format, followed by a space to keep the word Table from colliding with the table number.
-
Select <n> from the Building Blocks list.
The Building Block <n> is inserted in the Autonumber Format field. <n> is a placeholder. As a result, each time a paragraph is tagged with Table, the number in position 1 keeps the same value as the previous number in this same position. In this case, that would be the Section1 number.
-
Type a period.
A period is inserted in the Autonumber Format field. As a result, a period appears in the table paragraph between the number in position 1 (the first-level section heading number) and the number in position 2 (the second-level section heading number).
-
Select <n> from the Building Blocks list.
The Building Block <n> is inserted in the Autonumber Format field. <n> is a placeholder that displays the last previous value of the counter in position 2 and leaves the value unchanged. In this case, that value is the Section2 number.
-
Select < > from the Building Blocks list.
The Building Block < > is inserted in the Autonumber Format field. < > keeps the value in number position 3 the same as the previous value in this same position (that is, the value at the last Section3 heading), but suppresses the display of this value. In other words, the third-level section heading number doesn't appear in the table title.
-
Select < > from the Building Blocks list.
The Building Block < > is inserted in the Autonumber Format field. < > keeps the value in position 4 the same as the previous value in this same position (in other words, the last figure number), but suppresses the display of this value.
-
Type a hyphen.
A hyphen is inserted in the Autonumber Format field. As a result, a hyphen appears between the number in position 2 (the second-level section heading number) and the number that is displayed in position 5 (the table number).
-
Type <n+> in the Autonumber Format field.
The Building Block <n+> is inserted in the Autonumber Format field. <n+> is a counter. As a result, at each paragraph tagged table, the number in position 5 in this number series increases by 1 and is displayed as the table number.
Table 3.18 shows the building blocks at the various positions in the table autonumber format and the paragraph tags they represent in this series.
| Series Label | Text | Position 1 | Position 2 | Position 3 | Position 4 | Position 5 |
|---|---|---|---|---|---|---|
| H: | Table | <n> | .<n> | < > | < > | -<n+> |
|
|
| Section1 | Section2 | Section3 | Figure | Table |
A Note on Book File Numbering
Now that you have some autonumbering techniques under your belt, this is a good place to discuss book file settings for numbering. As mentioned earlier, you'll use document Numbering properties for volume, chapter, and paragraph to set up book file numbering. Although this chapter doesn't thoroughly cover volume numbering, you can take what you learned about chapter numbering and apply the same basic concepts.
If you used the <$chapnum> Building Block in autonumbering, use Format > Document > Numbering > Chapter to control the chapter number when the file is included in a book. This is true whether you use <$chapnum> as a Building Block by itself or along with any of the other available Building Blocks for autonumbers.
If you used any other autonumbering Building Blocks and your file is included in a book, use Format > Document > Numbering > Paragraph to control whether numbering restarts or continues from the previous file, as discussed in the section, "Paragraphs."
Here are some example results of settings for document Numbering properties. Say that you have used a combination of <$chapnum> and other Building Blocks in autonumbers. To make it easier, this example comprises only a chapter heading and one subheading. Table 3.19 shows the paragraph tag, its autonumber format, and how it's displayed in the document.
| Paragraph Tag | Autonumber Format | How It's Displayed |
|---|---|---|
| Chapter Head | Chapter <$chapnum> | Chapter 4 |
| Subhead1 | S:<$chapnum>.<n+> | 4.1 |
Now, suppose that this file is part of a book and follows Chapter 3. The last subheading1 in Chapter 3 is 3.5. Let's set the document Numbering properties for chapter to Continue Numbering from Previous File in Book and set the Document Number Properties for Paragraph to Continue Numbering from Previous Paragraph in Book. The results are shown in Table 3.20.
| Paragraph Tag | How It's Displayed | Autonumber Format |
|---|---|---|
| Chapter Head | Chapter 4 | Chapter <$chapnum> |
| Subhead1 | 4.6 | S:<$chapnum>.<n+> |
Notice that the first occurrence of Subhead1 in Chapter 4 is 4.6. FrameMaker is following the instructions; that is, it's continuing the numbering from the previous paragraph in the book (3.5).
Back to Basics
Book file document numbering properties override document settings.
If you want Subhead1 to start with 4.1, you must set the Document Numbering properties for Paragraph to Restart Numbering. This doesn't affect the <$chapnum> or <$volnum> at all.
Because you're working with autonumber properties of chapters in a book, remember to go to your book file and select Edit > Update Book.
Summary
Congratulations! You learned about the various types of autonumbers and the logic behind them. You explored some background information, as well as the methods used for a numbered list, chapter-based numbering, and section-based numbering. You can put the logic you learned to good use by creating many more types of numbering in your documents.
Be serious about planning before you use autonumbering features because it is essential to creating autonumbering (for most FrameMaker tasks). After you create the numbering, testing it is crucial to determine whether the numbering works correctly given any documentation situation. Nevertheless, you can still have fun with it.
| CONTENTS |