Exploring Graphical Objects Some people think of the macro recorder as a tool for beginners-and it is. You can use the macro recorder to build finished macros without having to understand much about how Excel objects really work. But the macro recorder is also a powerful reference tool for advanced developers. In this chapter, you'll see how you can use the macro recorder as a reference tool for learning how to work with Excel objects. Record a Macro to Create a Rectangle Graphical objects such as rectangles, ovals, text boxes, and charts can make your worksheets appealing and understandable. Microsoft Office includes an amazing collection of graphical objects. The macro recorder is an excellent tool for learning how to work with these graphical objects. Record creating a rectangle, and see how much you can learn from a simple recorded macro. Drawing  -
Select the Shapes worksheet in the Chapter04 workbook, and click the Drawing button on the Standard toolbar to display the Drawing toolbar.  Record Macro  -
Click the Record Macro button on the Visual Basic toolbar, replace the default macro name with MakeRectangle, and then click OK. Rectangle  -
Click the Rectangle button on the Drawing toolbar, and then click the upper left corner of cell B2 and drag to the lower right corner of cell B3. 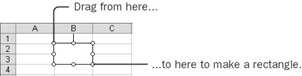 Fill Color  -
Click the arrow next to the Fill Color button on the Drawing toolbar, and then click the third box down in the first column. The interior of the rectangle changes to red. 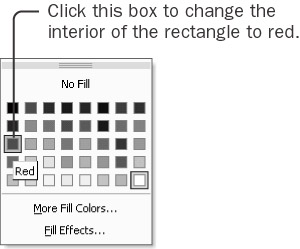 Stop Recording  -
Click the Stop Recording button, and edit the macro. The numeric values might be different and the line continuation marker in your macro might be in a different place than in the following code sample. Sub MakeRectangle() ActiveSheet.Shapes.AddShape(msoShapeRectangle, _ 48#, 13, 48#, 25.5).Select Selection.ShapeRange.Fill.ForeColor.SchemeColor = 10 Selection.ShapeRange.Fill.Visible = msoTrue Selection.ShapeRange.Fill.Solid End Sub This macro is short, but it does a lot. Look at the second statement: ActiveSheet.Shapes.AddShape(msoShapeRectangle, _ 48#, 13, 48#, 25.5).Select The statement starts by pointing at the active sheet and ends by selecting something. Shapes is a plural noun, so it might be a collection. To add a new item to most collections, you use the Add method, but Shapes is followed by the word AddShape. AddShape is followed by a list of arguments in parentheses. (The numbers in your list might differ somewhat. You can ignore the symbols after some numbers. The recorder adds them, but they're not necessary.) The first argument seems to indicate what kind of shape you created, and the numbers seem to have something to do with the location and size of the rectangle, since nothing else in the macro sets the location. The remaining statements set the fill color of the rectangle. The SchemaColor property allows you to select one of the colors from the fill color palette. You can assign any value between 0 and 56 to the SchemaColor property. The Visible property determines whether the fill of the object is transparent or visible, and the Solid method makes the pattern of the fill solid. The default fill for a new shape is to be solid and visible, so these statements are not really necessary. These recorded statements give you several clues about how to create a new rectangle. Now you can build a macro on your own, using information from the recorder coupled with the Auto Lists that Visual Basic displays. Write a Macro to Create a Rectangle -
Under the recorded macro, type Sub MakeNewRectangle and press the Enter key. Visual Basic adds the closing parentheses and the End Sub statement. For Visual Basic to display an Auto List of methods and properties for an object, it must know for sure which object's list to use. The properties ActiveSheet and Selection are too general: either one can refer to any of several types of objects. The best way to let Visual Basic know what kind of object you're using is to assign the object to a variable and declare its type. -
Type the following three statements to declare the variables and assign the active sheet to a variable: Dim mySheet As Worksheet Dim myShape As Shape Set mySheet = ActiveSheet All drawing objects belong to the Shape class. By declaring the variables, you give Visual Basic the information it needs to help you as you enter statements. -
Type Set myShape = mySheet.Shapes. (including the period). 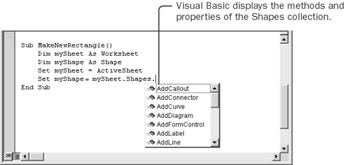 As soon as you type the period, Visual Basic shows the list of methods and properties for the Shapes collection. Apparently, you can add a lot more than just a Shape object. You can add Callouts, Curves, Connectors, and other items. That's why the Shapes collection doesn't just use a simple Add method. You know from the recorded macro that you want to use the AddShape method to add a rectangle. -
Type (or select) AddShape( and then press the Down Arrow key. 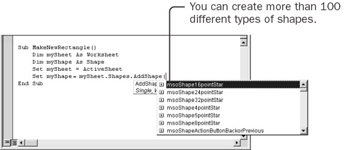 As soon as you type the opening parenthesis, Visual Basic shows you the list of possible values for the first argument. You can add well over 100 different types of shapes. You know from the recorded macro that you want the msoShapeRectangle option. (You can experiment with others later.) -
Type (or select) msoShapeRectangle,. When you type the comma, you see that the remaining arguments are Left, Top, Width, and Height. You specify each of these values in points. A point is a unit of measurement originally used by graphic designers to lay out text for publishing. It equals 1/72 inch. 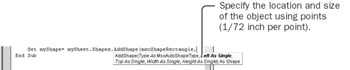 -
For the remaining arguments, type 72 for Left, 36 for Top, 72 for Width, and 36 for Height. Then type a closing parenthesis and press the Enter key. The statement in the recorded macro ended with the Select method. When you assign an object to a variable, you don't put a Select method at the end of the statement. -
Type myShape.Fill.ForeColor.SchemeColor = 10 and then press the Enter key. This statement is straight out of the recorded macro. Each time you type a period, Visual Basic helps with a list of possible methods and properties. If you hadn't assigned the rectangle to a variable-if instead you'd used Select and Selection the way the recorded macro does-Visual Basic wouldn't be able to display the Auto Lists. | Tip | A Shape object uses many subobjects to group formatting options. The Fill property returns a FillFormat object. (The object class name is different than the property name because, for chart objects, the Fill property returns a ChartFillFormat object.) A FillFormat object controls the formatting of the interior of the object. The ForeColor property returns a ColorFormat object. (This time, the object class name is different from the property name because a ColorFormat object can be returned by either the ForeColor property or the BackColor property.) Click any property name, and press F1 to see the Help topic for the property and, if applicable, for its related object. | -
Press F8 repeatedly to step through the macro. A new rectangle appears on the worksheet. Depending on your screen size and resolution, the rectangle is about ½ inch high and 1 inch wide and is located about half an inch from the top and an inch from the left margin. The rectangle never has selection handles around its border because you never select it. You just assign a reference to a variable. 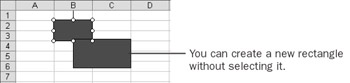 In this example, you were able to create a rectangle by following the pattern given by the recorder, and you also saw how Visual Basic Auto Lists can help you create variations of the recorded macro. Modify an Existing Shape Sometimes you'll want to modify one or more shapes that already exist on the worksheet. The macro recorder can help you see how to select a shape, and then you can use what you know about objects to convert the selection into an object variable. -
Select the Shapes worksheet in the Chapter04 workbook, and click in cell A1. Show the Drawing toolbar, and start recording a macro named SelectShapes. Select Objects  -
On the Drawing toolbar, click the Select Objects button, and then click the first, smaller rectangle you created. -
Next drag a rectangle to encompass both rectangles. 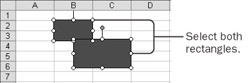 Fill Color -
Click the arrow next to the Fill Color toolbar button, and click More Fill Colors. Select the purple color at the far right edge of the hexagon, and click OK. 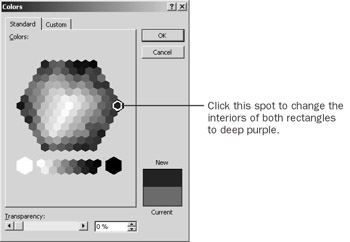 -
Turn off the recorder, click the Select Objects button to turn it off, and then select cell A1. -
Click the Run Macro button, select the SelectShapes macro, and click Edit. The macro should look something like the following code. (The names in quotation marks might be different in your macro, depending on how many rectangles you created and how you selected them.) Sub SelectShapes() ActiveSheet.Shapes("Rectangle 2").Select ActiveSheet.Shapes.Range(Array _ ("Rectangle 2", "Rectangle 3")).Select Selection.ShapeRange.Fill.Visible = True Selection.ShapeRange.Fill.ForeColor.RGB = RGB(102, 0, 102) Selection.ShapeRange.Fill.Solid End Sub The Shapes property returns a collection of all the Shape objects on a worksheet. You must specify the sheet that contains the shapes. To select a single shape, you simply select a single item from the Shapes collection, using the name or number of the item, the same as you would when selecting an item from any other collection. This action returns a Shape (singular) object, which you can select or assign to a variable. When you need to refer to more than one Shape object, Excel has a different collection- the ShapeRange collection. A ShapeRange object is like a Shape object, except that a ShapeRange object can include more than one shape. To create a ShapeRange object from a Shapes collection, you use the Range property with the Visual Basic Array function. The Array function allows you to group a list of items. When you modify the properties of one or more shapes, you always modify the ShapeRange object. The RGB property is similar to the SchemaColor property, except that the SchemaColor property allows you to specify one of the 56 colors on the Fill Color palette, while the RGB property-which stands for red, green, and blue, the three primary colors for light-allows you to specify any of the billions of colors available by combining 256 levels each of red, green, and blue components. | Tip | Visual Basic includes eight built-in color constants suitable for use with the RGB property. The constants (with their respective red, green, and blue components in parentheses) are as follows: vbBlack (0, 0, 0), vbRed (255, 0, 0), vbGreen (0, 255, 0), vbBlue (0, 0, 255), vbYellow (255, 255, 0), vbMagenta (255, 0, 255), vbCyan (0, 255, 255), and vbWhite (255, 255, 255). | -
Delete the statements containing the Visible property and the Solid method. They do not change the behavior of the macro. -
At the top of the macro, insert these two declaration statements: Dim myShape As Shape Dim myShapeRange As ShapeRange -
Convert the first selection to assign the object to the myShape variable rather than select the object. Don't change the name inside the quotation marks. The resulting statement should look something like this: Set myShape = ActiveSheet.Shapes("Rectangle 2") -
Insert a statement to change the RGB value of the foreground color of the fill of the shape to yellow. The final statement should look like the code shown below. (You could also use RGB(255, 255, 0) in place of vbYellow.) myShape.Fill.ForeColor.RGB = vbYellow -
Convert the second selection to assign the ShapeRange object to the myShape variable rather than select the object, and change it to include the sunburst shape-with the name Shape 3-rather than the Rectangle 2 shape. The resulting statement should look like this, with the possible exception of the names inside quotation marks: Set myShapeRange = ActiveSheet.Shapes.Range(Array _ ("Rectangle 3", "Shape 3")) -
Convert the final statement to change the RGB value of the foreground color of the fill of the shape range to blue. The resulting statement should look like the code below. (You could also use RGB(0, 0, 255) in place of vbBlue.) myShapeRange.Fill.ForeColor.RGB = vbBlue -
Step through the macro, watching the objects change color. 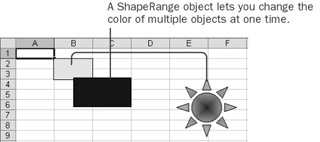 Shapes allow you to create extremely powerful graphical effects. But keeping the different types of objects straight can be a bit confusing at first. -
Shapes collectionUse the Shapes collection object for selecting all the shapes or a single shape, and use it for adding new shapes. You cannot use the Shapes collection object to format multiple objects. -
Shape objectUse the Shape object for formatting a single shape. -
ShapeRange collectionUse the ShapeRange collection for formatting multiple objects at the same time. Rename Shapes When you create a new shape on the worksheet, Excel gives it a default name, usually something like Rectangle 2 or Oval 5. When you record a macro that refers to the shape, the recorder puts that same name into the macro. You'll make your macros easier to read and less likely to have errors if you change the shape names to something meaningful. Shapes and DrawingObjects Shapes are a relatively new feature for Excel. Shapes are shared by all Microsoft Office applications and replace the earlier graphical objects that Excel used. Earlier graphical objects belonged to an object class called DrawingObjects, and you can still see some relics of DrawingObjects in Excel today. For example, Shape objects format the interior of an object using the Fill property. DrawingObjects referred to the interior of an object using the Interior property. Shape objects refer to colors that represent the red, green, and blue components of the color using the RGB property. DrawingObjects referred to the same type of color using the Color property. Shape objects refer to colors from a palette using the SchemeColor property, whereas DrawingObjects used the ColorIndex property. As you might recognize, the Range object still uses all the formatting properties that the old DrawingObjects used: Interior, Color, and ColorIndex. To maintain backward compatibility, Excel didn't remove the old DrawingObjects. They're still there, but they're hidden. Occasionally, you might see vestiges of these old graphical objects.  | -
On the Excel worksheet, click the first, smaller rectangle you created. It has a name like Rectangle 2. You can see the name in the Name box to the left of the formula bar. 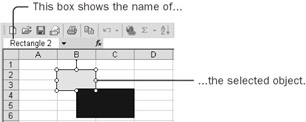 -
Click in the Name box, and type Box as a new name for the rectangle. Press the Enter key, or Excel won't recognize that you've changed the name. 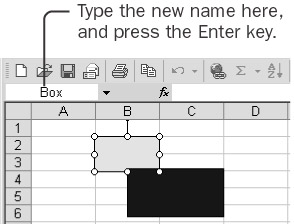 -
Click the second, larger rectangle you created, and give it the name BigBox. Then give the sun shape the name Sun. Be sure to press the Enter key after typing each name in the Name box. -
In the SelectShapes macro, change Rectangle 2 to Box, Rectangle 3 to BigBox, and Shape 3 to Sun. -
Change the colors in the macro from vbYellow to vbGreen and from vbBlue to vbMagenta, and then run the macro to test it. Here's what the final macro should look like: Sub SelectShapes() Dim myShape As Shape Dim myShapeRange As ShapeRange Set myShape = ActiveSheet.Shapes("Box") MyShape.Fill.ForeColor.RGB = vbGreen Set myShapeRange = ActiveSheet.Shapes.Range(Array _ ("BigBox", "Sun")) MyShapeRange.Fill.ForeColor.RGB = vbMagenta End Sub In the same way that you can give worksheets meaningful names (rather than keeping the default Sheet1, Sheet2, and so forth), you can give meaningful names to shapes on the worksheet, even though these names are less noticeable. Your macros will thank you for it. Excel can create hundreds of different types of shapes. All these shapes work in much the same way that rectangles do. Embedded charts are also shapes in Excel. You add, manipulate, and delete Chart objects in much the same way you do rectangles. Chart objects, of course, have additional properties that are unique to charts; the macro recorder is an effective tool for finding out what they are. |