Using the XMLSocket Class
| | ||
| | ||
| | ||
Youll use the following steps to work with an XMLSocket object:
-
Create a new XMLSocket object.
-
Set an onConnect event handler.
-
Make the connection.
-
Within the onConnect event handler, initialize the application.
-
Set up event handlers to respond to new data or an unexpected closing of the connection.
-
Configure the interface to display data.
Well start by creating an XMLSocket object.
Creating an XMLSocket connection
You can create a new XMLSocket object using this code:
var theSocket:XMLSocket = new XMLSocket();
After you have created the object, youll need to create an onConnect event handler. This handler works in a very similar way to the onLoad handler for the XML class. Flash calls the handler function when it connects to the socket server. The event handler receives a Boolean (that is, true or false) value that indicates whether the connection was successful. Ive shown an example in the following code:
theSocket.onConnect = testConnect; function testConnect(success:Boolean):Void { if (success) { trace("connection successful"); } else { trace("connection not successful"); } } After youve set the onConnect event handler, you can connect to the server using the connect method. If youre not clear about why we set the handler before connecting, you can find an explanation in Chapter 4. You will need to specify the host and the port number for the connection. The host is a string value that indicates the name or IP address for the server. If youre working locally, you can use localhost or 127.0.0.1 for the host value.
An XMLSocket object can only connect to a TCP port with a number great than or equal to port 1024. Make sure you choose the same port that you specify in your socket server. The following code shows how to connect to port 1234 of the local server:
theSocket.connect("127.0.0.1", 1234); Notice that Ive used the IP address 127.0.0.1 . I could have used localhost as shown here:
theSocket.connect("localhost", 1234); You can also use null to indicate that the connection should use the current domain of the Flash movie:
theSocket.connect(null, 1234);
The connect method returns a Boolean value that tells you whether you connected to the server. This allows you to check that you have correctly installed the server and that Flash can locate it on the port specified. This code shows how you can check this value:
if (!theSocket.connect("127.0.0.1", 1234)) { trace("Couldn't connect to server"); } else { trace ("connected to server"); } In this code, we add the connect method in an if statement. An appropriate message will appear in an Output window, depending on whether Flash makes a connection. If the connection sends a value of true , Flash calls the onConnect event handler.
Lets put this code together to test a connection to a socket server. Ive assumed that you already have a socket server installed locally. If not, youll need to install and configure one on your computer. Im using Unity.
| |
In this exercise, well connect to a socket server and test the connection. Ive used the Unity server that I described earlier in the chapter. This is set up on port 9100 on my local web server. Make sure you start the server as described earlier before you work through this exercise.
-
Open Flash and create a new movie. Save it as testconnection.fla . You dont need to save this file in a folder within your web server.
-
Add the following code to Layer 1 and rename the layer actions . The code creates a new XMLSocket object called theSocket and adds an onConnect event handler. When the movie connects to the server, it will call the testConnect function.
var theSocket:XMLSocket = new XMLSocket(); theSocket.onConnect = testConnect;
-
You can create the connection with the following code. Add it at the bottom of the actions layer. The code connects to the socket server using port 9100 . Youll need to change the port number if youre using something other than the default settings in Unity. Ive used the IP address for my local web server. I could also have used localhost . If Flash cant make a connection to the socket server, youll see the message Couldn't connect to server in an Output window.
if (!theSocket.connect("127.0.0.1", 9100)) { trace("Couldn't connect to server"); } else { trace ("connected to server"); } -
Add the following event handler function to the actions layer. If we can connect successfully, well see the message connection successful in an Output window.
function testConnect(success:Boolean):Void { if (success) { trace("connection successful"); } else { trace("connection not successful"); } }
-
Test the movie. Figure 10-3 shows the Output window that should display when you connect successfully to the socket server. Notice that weve tested the connection twice. The first test checks for the port number and existence of the socket server. The second test checks that we can actually connect using the supplied settings.
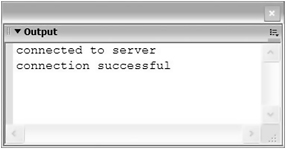
Figure 10-3: An Output window showing the success messages
In this exercise, we tested whether we could connect to a socket server using an XMLSocket object. Ive saved the completed example as testConnection.fla with your Chapter 10 resource files. Ive used the Unity socket server, and youll notice that Im connecting to port 9100, the default port, in the example file.
Once youve connected to the socket server, youll need to be able to send data and respond to incoming data. Youll also need to be able to close down the connection. Im going to cover the code that youll use in the next section. However, when we look at an example, well simplify the process by using resources provided with the Unity server Flash examples.
| |
Sending data
The XMLSocket object can send information to the socket server using the send method. You need to specify the data that youre sending as an argument. Ive shown this in the following code:
theSocket.send(someData);
If youre sending XML, you may need to create an XML object first:
var someXML:XML = new XML(XMLString); theSocket.send(someXML);
Be sure to check on the requirements of your socket server in case you need to use any special settings when sending the data.
Youre not limited to sending XML data. You could also use the send method with strings:
theSocket.send("some string"); When you call the send method, Flash converts the XML object to a string and sends it to the server followed by a zero byte. The zero byte tells the server that the message is complete. The send method doesnt return a value indicating that the data was sent successfully.
Responding to data
The XMLSocket class responds when it receives information from the server. You can use two event handlers to detect new information onData and onXML . The onData event occurs when the server sends data. This occurs before the XMLSocket parses the data into an XML tree. You could use this event if you want to do something with the raw data from the server or if youre not receiving XML information.
theSocket.onData = showData; function showData(theData:String):Void { trace(theData); } The onXML event handler responds after the XMLSocket parses the XML data. You can use this event if you know youre going to receive XML formatted information.
theSocket.onXML = showXML; function showXML(theXML:String):Void { trace(theXML); } Closing the connection
You can close the connection using the close method. For example, you might add the code shown here in a Log off button:
theSocket.close();
You can also detect whether the server loses the connection by using the onClose method:
theSocket.onClose = showClose; function showClose():Void { trace("The connection was closed"); } You can use this event handler to display an appropriate message to a user in case of accidental loss of connection.
Your use of the XMLSocket class depends on which socket server that youre using. Each socket server has its own requirements and methods of working with Flash. In the example that follows , Ill show you how to create a very simple chat room using Unity. Ive based this exercise on one of the sample applications included in the UClient applications download from the Unity web site. You can download these sample files from http:// moock .org/unity/trial/.
| |
In this exercise, Ill show you how to set up a simple chat application using the Unity socket server. Well use the starter file chatUnity.fla for this exercise. The example comes from the tutorial at http://moock.org/unity/docs/client/ simplechat /as2version/part1.html.
Before you start, make sure that you include the folder org from your Chapter 10 resources in the same folder as your Flash movie. It contains the class file USimpleChat.as , which provides most of the functionality for the chat room. This file comes with the UClient applications download. Ive modified the file slightly from the Unity version.
Well work through these steps:
-
Adding a chat room to Unity
-
Connecting to the socket server
-
Configuring the Talk button to initiate chat
When youve finished the tutorial, youll have a simple chat application with a single chat room. The tutorial creates the application on your own computer so, unfortunately , youll only be able to talk to yourself. Youll need to move the application to a shared web server if you want to test the multiuser aspects of the application. Youll also need to add a policy file to allow people from other domains to access the data. You can find out more about policy files in the section on security in Chapter 4.
Adding a chat room
In order to add a chat room, well have to change the configuration of the Unity server in the uconfig.xml file. We need to stop the server before we make any changes to the uconfig.xml file.
-
If the Unity server is running, close it down. You can use batch file from the unity folder. In Windows, you can use the file stopserver.bat . Macintosh OS X users can use the file stopserver.sh .
-
Locate the unity directory on your computer and open the file uconfig.xml in a text or XML editor. I installed my unity directory to C:\Inetpub\ wwwroot \unity so the uconfig.xml file is in that location.
-
Modify the <INSTANCE> element in the uconfig.xml file as shown here. Ive indicated the new lines in bold. This creates a new room called ChatRoom . The <AUTOJOIN>true</AUTOJOIN> setting makes users join the room automatically when they start a chat application.
<INSTANCES> <ROOM> <ID>ChatRoom</ID> <AUTOJOIN>true</AUTOJOIN> </ROOM> </INSTANCES>
-
Start the Unity server as described earlier in the chapter. Windows users will need to run the file startserver.bat; Macintosh users can run startserver.sh .
Once youve added a default chat room, youre ready to start creating your chat application. Youll need to connect to the socket server first.
Connecting to the server
Unity provides some useful tools for working with XMLSockets, including the uClientCore component. This component provides much of the functionality that youll need to work with chat rooms. Youll need to include this component in any Flash chat application that you create. The starter file chatUnity.fla already includes this component. Figure 10-4 shows it in the library, under the name uClientCore (trial) .
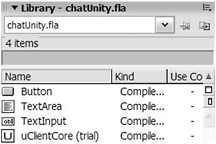
Figure 10-4: The uClientCore component in the library
-
The sample applications from Unity include a USimpleChat class that you can use to connect to the server and transmit data. Ive included the class file USimpleChat.as with your resources in the org\moock\unity\simplechat\v2 folder. Its important that you dont change the path to this folder. Feel free to open the class file and have a look at the contents.
-
Open the resource file chatUnity.fla . Figure 10-5 shows the interface. There is a TextArea component called incoming and a TextInput called outgoing . Its important that you dont change these instance names as theyre used in the USimpleChat.as class file. There is also a Talk button. Clicking the Talk button will initiate the chat process.
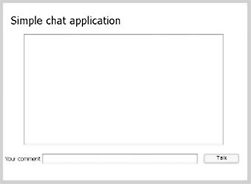
Figure 10-5: The chat application interface -
Add the following code to the actions layer to create a USimpleChat object and connect to the server:
import org.moock.unity.simplechat.v2.USimpleChat; var chat:USimpleChat = new USimpleChat(this, "localhost", 9100, null, true); chat.connect();
This code imports the USimpleChat class so that you dont have to use the fully qualified name in your code. It creates a new USimpleChat object called chat . This object manages the chat connections.
The USimpleChat constructor method takes five parameters. The first parameter, this , refers to the current timeline. The second and third parameters show the server address and port number. Ive used localhost because Im connecting to my local server. Ive used port number 9100 as thats the port specified in the uconfig.xml file. The last two parameters specify a client configuration file null and the true parameter disables the log.
-
Test the movie. You should see something similar to Figure 10-6. This shows that youve successfully connected to the socket server. If you dont see the message, youll need to go back through the steps to see where you went wrong.
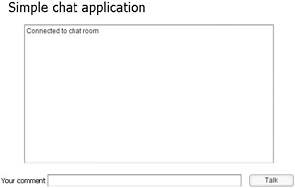
Figure 10-6: Checking the connection to the chat roomUsers will enter their comments and click the Talk button, so youll need this button to send the details to the server.
Configuring the Talk button
The USimpleChat class includes a sendMessage method that sends the message to the socket server. Well want to use this method after the user has entered text and clicked the Talk button.
-
Add the following code to the actions layer. The code handles the click of the Talk button using the onRelease handler. It checks to see if the user has entered text and, if so, calls the sendMessage method. This method is contained in the class file USimpleChat.as .
talk_btn.onRelease = function ():Void { if (outgoing.text.length > 0) { chat.sendMessage(); } } -
Test the movie and enter some text in the comment field. You should be able to see your comment in the TextArea component after you click the Talk button. Because youre testing the file locally, you wont get a response. Figure 10-7 shows a sample interface.
Figure 10-7: A chat message displaying in the application
In this example, we created a simple application that allowed you to chat with other users. We could have extended this example to create multiple chat rooms and add avatars for each user. You can see a demo of the simple chat room at www.moock.org/unity/ clients /uSimpleChat/v4/. You can also purchase a professional chat client from the site.
If you followed the instructions, youll have created the application on your local server. That means youll only be able to chat with yourself. One-sided conversations are quite boring, so youll need to copy the file to a shared server before you can chat with others.
Youll need to locate a web host with the Unity server installed. Users will then be able to use your chat application through a web browser. Dont forget that if youre using the trial version of Unity, youll only be able to work with up to five users for a maximum of five minutes.
Before you upload the Flash chat application to the web server, youll need to change the server path and port number in the movie. You can use the domain name or IP address of the web server for the path. Double-check which port your host has used for the socket server and change it in the connect method of the XMLSocket object:
theSocket.connect("name or IP address of host", 1234); You should change your publishing settings so that you choose Access network only in the Local playback security settings drop-down box. Youll also need to add a policy file so that users from different domains can share the XML data. The unity server includes a sample policy file policy.xml . Youll need to copy this file to the root directory of the web server. You can find out more about policy files in the security section in Chapter 4.
The steps to install the application on an external host are summarized here:
-
Locate a suitable web host and find out the address and port number for the socket server.
-
Modify the connect method in your chat application to reference the address and port number provided by the host.
-
Publish the chat application and upload to the web server.
-
Copy the policy.xml file from the unity folder to the root of the web server.
| |