The Admin Section of the Online Shopping Cart Application
The administration process for the online shopping cart application involves adding a category, modifying a category, deleting a category, adding a new book, updating book information, and removing a book from the shop database.
The files of the Admin section are stored in the project folder. The client folder, present in the project folder, stores all the files required to perform the online transactions, such as the new.php file used for client registration. The project folder, apart from storing the client folder, stores the files required for administration, such as the add_cat.php file used for creating a new category. You need to specify the directory path of the files of the admin section in the address bar of the Web browser, to administer the data for the online shopping cart application. For example, if the PHP files are stored in the document root, /var/www/html, of the Web server, the path to administer the online shopping cart application is, http://localhost/Project/index.php.
Accessing the Shopping Cart Application
To work with the application, end users need to log on either as a client or as an administrator. The index.php file, present in the project folder, represents the login page. The user ID and password for the administrator is admin. The end user needs to register to create a new client account. If the end user is logged in with the admin account, only then the end user can work as an administrator.
Listing 9-2 shows the index.php file that creates a login form to accept the user name and password information from the end user:
| |
<html> <body> <table border="0" width="100%" cellpadding="1" cellspacing="1" bgcolor="#FFFFFF"> <tr><td><?php print "<form method=\"get\" action=\"login.php\"> <tr bgcolor=\"#E8E8E8\" height=\"4\"> <td align=\"right\"> <font face=\"arial\" size=2 color=\"#FF0000\">USER NAME:</font> </td> <td align=\"left\"> <INPUT TYPE=\"text\" NAME=\"user_id\"> </td></tr> <tr bgcolor=\"#E8E8E8\" height=\"4\"> <td align=\"right\"> <font face=\"arial\" size=2 color=\"#FF0000\">PASSWORD:</font></td> <td align=\"left\"> <INPUT TYPE=\"password\" NAME=\"passwd\"> </td></tr> <tr bgcolor=\"#E8E8E8\" height=\"4\"> <td align=\"center\" colspan=\"2\"> <INPUT TYPE=\"submit\" value=\"LOGIN\"></td></tr> <tr bgcolor=\"#E8E8E8\" height=\"1\"> <td width=\"100%\" valign=\"middle\" align=\"center\" colspan=\"2\"> </td> </tr> <tr bgcolor=\"#E8E8E8\" height=\"1\"> <td width=\"100%\" valign=\"middle\" align=\"center\" colspan=\"2\"> <a href=\"client/new.php\">New User</a> </td> </tr></form>"; print"</td></tr></table></body></html>"; ?> </tr> <?php include "bottom.php"; ?>
| |
The above listing creates a login page to accept the user name and password information. The user name and password determines whether the end user is an administrator or a client.
Figure 9-2 shows the login page created by the index.php file:
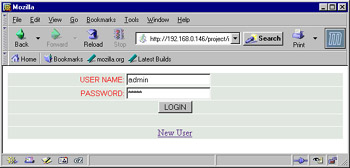
Figure 9-2: Viewing index.php File in Mozilla Web Browser
To log on as an administrator, end users need to use the login ID, admin. The password for the admin login ID is also admin. The administrator can check or change the password of the admin login in the user_profile table. When end user clicks the Submit button, the login.php file is processed to verify the user name and password.
Listing 9-3 shows the content of the login.php file:
| |
<?php $user_id=$_GET['user_id']; $passwd=$_GET['passwd']; $db=mysql_connect('localhost', 'root', ''); if (!$db) { echo "Error When connecting to Database"; } mysql_select_db("shop", $db); $result=mysql_query("select * from user_profile where user_id='$user_id' and password='$passwd'", $db); $row = mysql_fetch_array($result); $user=$row["user_id"]; if ($user=="admin") { print "<html><head><title></title><head><body> <form name=\"sess\" action=\"adminFirst.php\" method=\"post\"> </form> <script> document.sess.submit(); </script> </body></html>"; } else { print"<html><head><title></title><head><body> <form name=\"sess\" action=\"client/logon.php\" method=\"get\"> <input type=\"hidden\" name=\"login\" value=\"$user\"> </form> <script> document.sess.submit(); </script> </body></html>"; } ?> | |
The above listing verifies the submitted user name and password. If the specified user name and password do not match with the data in the tables, an error message is displayed to the end user. If the admin login ID is used, the home page of the administrative interface, adminFirst.php, is displayed in the Web browser. If any other login ID is used, the logon.php file present in the client folder of the application is displayed in the Web page.
Creating the Home Page for the Administrative Interface
All the pages in the Admin section of the application are divided into three sections: top, middle, and right.
Figure 9-3 shows the structure of the Web pages of the Admin section:
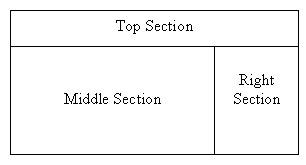
Figure 9-3: Structure of Web Pages of the Admin Section
<?php include "tophtml.php"; include "middle.php"; include "right.php"; ?>
The above code shows three PHP files included in the adminFirst.php file. The first file, tophtml.php, represents the top section.
Listing 9-4 shows the content of the tophtml.php file that the administrator can use to create the top section of the home page:
| |
<html> <head> <title>Shop Admin</title> </head> <body> <div align="center"> <center> <table border="0" width="600" cellspacing="0" cellpadding="0" bgcolor="#FFFFFF"> <tr> <td width="600" height="20" colspan="5" bordercolor="#00FF00" bgcolor="#008000"> <p align="center"><b><font face="Arial" size="3" color="#FFFFFF"> SHOP (ADMIN)</font></b></td> </tr> <tr height="2"> <td width="600" height="2" colspan="5" bgcolor="#000080"></td> </tr>
| |
The above listing creates the top section of the home page for the administrative interface of the online shopping cart application.
The middle section is represented by the middle.php file. The following code shows the content of the middle.php file:
<tr width="498" height="300" > <td colspan="2" align="center">Select any option from the menu.</td>
The above code defines the first column of the row that contains the middle and right sections.
The right section displays the administrative options, such as adding a category, retrieving the category list, adding a book, and changing the password.
Listing 9-5 shows the content of the right.php file to create the right section of the home page:
| |
<td width="1" height="300" bgcolor="#000080"></td> <td width="100" height="300" valign="top"> <table border="0" width="99" cellpadding="1" cellspacing="1" bgcolor="#FFFFFF"> <?php echo "<tr bgcolor=\"#FF0000\"> <td align=\"center\"><a href=\"logout.php\"> <font style=\"font-size:11px;\" face=\"Helvetica\" color=\"#FFFFFF\"><B> LOGOUT</font></a></td></tr> <tr bgcolor=\"#FF0000\"> <td align=\"center\"><a href=\"add_book.php\"><font face=\"verdana\" size=\"1\" color=\"#FFFFFF\"><font style=\"font-size:11px;\" face=\"Helvetica\" color=\"#FFFFFF\"><B>Add New Book</b></font></a></td></tr> <tr bgcolor=\"#FF0000\"><td align=\"center\"><a href=\"add_cat.php\"><font face=\"verdana\" size=\"1\" color=\"#FFFFFF\"><font style=\"font-size:11px;\" face=\"Helvetica\" color=\"#FFFFFF\"><B>Add Category</b></font></a></td></tr> <tr bgcolor=\"#FF0000\"><td align=\"center\"><a href=\"create_xml.php\"><font face=\"verdana\" size=\"1\" color=\"#FFFFFF\"><font style=\"font-size:11px;\" face=\"Helvetica\" color=\"#FFFFFF\"><B>Generate Order</b></font></a></td></tr> <tr bgcolor=\"#FF0000\"><td align=\"center\"><a href=\"list_cat.php\"><font face=\"verdana\" size=\"1\" color=\"#FFFFFF\"><font style=\"font-size:11px;\" face=\"Helvetica\" color=\"#FFFFFF\"><B> Category List</b></font></a></td></tr> <tr bgcolor=\"#FF0000\"><td align=\"center\"><b><font face=\"verdana\" size=\"1\" color=\"#FFFFFF\">Select category</font></b></td></tr>"; $db=mysql_connect('localhost','root',''); if (!$db) { echo "Error When connecting to Database"; <td width="1" height="300" bgcolor="#000080"></td>^M <td width="100" height="300" valign="top">^M <table border="0" width="99" cellpadding="1" cellspacing="1" bgcolor="#FFFFFF"> <?php echo "<tr bgcolor=\"#FF0000\"> <td align=\"center\"><a href=\"logout.php\"> <font style=\"font-size:11px;\" face=\"Helvetica\" color=\"#FFFFFF\"><B> LOGOUT</font></a></td></tr> <tr bgcolor=\"#FF0000\"> <td align=\"center\"><a href=\"add_book.php\"><font face=\"verdana\" size=\"1\" color=\"#FFFFFF\"><font style=\"font-size:11px;\" face=\"Helvetica\" color=\"#FFFFFF\"><B>Add New Book</b></font></a></td></tr> <tr bgcolor=\"#FF0000\"><td align=\"center\"><a href=\"add_cat.php\"><font face=\"verdana\" size=\"1\" color=\"#FFFFFF\"><font style=\"font-size:11px;\" face=\"Helvetica\" color=\"#FFFFFF\"><B>Add Category</b></font></a></td></tr> <tr bgcolor=\"#FF0000\"><td align=\"center\"><a href=\"create_xml.php\"><font face=\"verdana\" size=\"1\" color=\"#FFFFFF\"><font style=\"font-size:11px;\" face=\"Helvetica\" color=\"#FFFFFF\"><B>Generate Order</b></font></a></td></tr> <tr bgcolor=\"#FF0000\"><td align=\"center\"><a href=\"list_cat.php\"><font face=\"verdana\" size=\"1\" color=\"#FFFFFF\"><font style=\"font-size:11px;\" face=\"Helvetica\" color=\"#FFFFFF\"><B> Category List</b></font></a></td></tr> <tr bgcolor=\"#FF0000\"><td align=\"center\"><b><font face=\"verdana\" size=\"1\" color=\"#FFFFFF\">Select category</font></b></td></tr>"; $db=mysql_connect('localhost','root',''); if (!$db) { echo "Error When connecting to Database"; } mysql_select_db("shop", $db); mysql_query("use $db"); $result = mysql_query("select item_type from category"); while($row = mysql_fetch_array($result)) { print "<tr bgcolor=\"#E1E1E1\"><td align=\"center\"><a href=\"view_book.php?item_type=$row[0]&p=0\"><font style=\"font-size:11px;\" face=\"Helvetica\" color=\"#FF0000\"><B>$row[0]</font></a></td></tr>"; } ?> <tr bgcolor="#FFFFFF"><td align="center"> </font></a></td></tr> </table> </td> <td width="1" height="300" bgcolor="#000080"></td></tr></table></body></html> | |
The above listing creates the right section of the home page for the administrative interface of the online shopping cart application.
Figure 9-4 shows the home page for the administrative interface of the online shopping cart application.
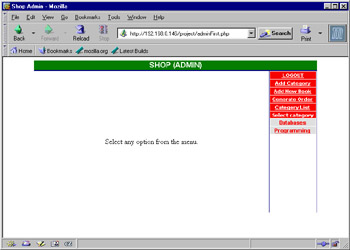
Figure 9-4: Home Page of the Administrative Interface
Logging Out as an Administrator
When the administrator clicks the LOGOUT link, the logout.php file logs you out from the online shopping cart application.
Listing 9-6 shows the content of the logout.php file that lets the administrator log out from the online shopping cart application:
| |
<?php include "tophtml.php"; echo "<tr width=\"600\" height = \"300\"><td width = \"600\" colspan = \"5\">"; ?> <table border="0" width="100%" height="300" cellpadding="1" cellspacing="1" bgcolor="#FFFFFF"> <tr bgcolor="#E8E8E8" height="4"> <td align="center" colspan="5"> <FONT SIZE="3" FACE="verdana" color="#FF3300"><b>Logout successfully</b></FONT></td></tr> <tr bgcolor="#E8E8E8"> <td align="center" colspan="5"><a href="index.php">Sign in again</a></td></tr> </table> </td></tr></table>
| |
Figure 9-5 shows a message, confirming that the administrator has logged out from the application:

Figure 9-5: Message Confirming Administrative Log Off
Adding a New Category
When the administrator clicks the Add Category link shown in Figure 9-4, the Web server executes the add_cat.php file that displays a Web page to accept information for a new category.
Listing 9-7 shows how to create a Web page to add a new category in the database:
| |
<?php include "tophtml.php"; ?> <tr width="499"><td colspan="2"> <form name="addbook" action="add_cat1.php" action="GET"> <table border="0" width="100%" height="480" cellpadding="1" cellspacing="1" bgcolor="#FFFFFF"> <tr bgcolor="E8E8E8"> <td width="100%" align="center" colspan="2" height="4"><font face="Arial" size="2"><b>ADD CATEGORY</b></font></td></tr> <tr bgcolor="#E8E8E8" height="4"> <td width="50%" valign="middle" align="right"><font size="2" face="Arial">Category Name: </font></td> <td width="50%" valign="middle" align="left"><input type="text" name="item_type"></td></tr> <tr bgcolor="#E8E8E8" height="4"> <td width="50%" valign="middle" align="center"><INPUT TYPE="button" value="Add Category" onclick="check();"></td> <td width="50%" valign="middle" align="center"><INPUT TYPE="reset"></td> </tr> <tr bgcolor="E8E8E8"> <td width="100%" align="center" colspan="2"><font face="Arial" size="2"> </font></td></tr> </table> </form> </td> <?php include "right.php" ?> <script> function check() { var error="false"; if((document.addbook.item_type.value == "") && (error == "false")) { error="true"; alert("Please Enter Book Category"); } if (error=="false") { document.addbook.submit(); } } </script> | |
The above listing creates a Web page to accept information from the administrator to add a new category to the database.
Figure 9-6 shows the Web page to add a new category to the database table:
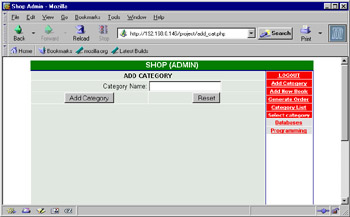
Figure 9-6: Web Page to Add a New Category
When the administrator clicks the Add Category button, the add_cat1.php file is executed by the Web server to add a new category to the database, as shown in Listing 9-8:
| |
<?php include "tophtml.php"; echo "<tr width=\"600\" height=\"300\"><td width=\"499\" colspan = \"2\">"; $db=mysql_connect('localhost', 'root', ''); if (!$db) { echo "Error When connecting to Database"; } mysql_select_db("shop", $db); $temp=$_GET['item_type']; if(!$result_in=mysql_query("insert into category(tbl_id, item_type) values('NULL', '$temp')", $db)) { $error=mysql_error(); } ?> <table border="0" width="100%" height="480" cellpadding="1" cellspacing="1" bgcolor="#FFFFFF"> <tr bgcolor="E8E8E8"> <td width="100%" align="center" height="4"><font face="Arial" size="2"><b> <?php if($error) echo "<font color=\"#FF0000\">$error</font><br><br><a href=\"javascript:history.back();\">Go Back</a>"; else echo "<font color=\"#000000\">You have added category successfully</font>"; ?> </b></font></td></tr> <tr bgcolor="E8E8E8"> <td width="100%" align="center"> </td></tr> </table> </td> <?php include "right.php"; ?> | |
The above listing inserts the category information in the database. If the category is added successfully, the message, You have added category successfully, is displayed to the administrator; else, an error message is displayed.
Adding a New Book
When the administrator clicks the Add New Book link shown in Figure 9-4, the add_book.php file creates a Web page to accept information for a new book from the administrator.
Listing 9-9 shows the add_book.php file that represents a Web page to add a new book to the database table:
| |
<?php include "tophtml.php"; ?> <tr width="499" ><td colspan="2"> <form name="addbook" action="add_book1.php" action="post"> <table border="0" width="100%" height="480" cellpadding="1" cellspacing="1" bgcolor="#FFFFFF"> <tr bgcolor="E8E8E8"> <td width="100%" align="center" colspan="2" height="4"><font face="Arial" size="2"><b>ADD NEW BOOK</b></font></td></tr> <tr bgcolor="#E8E8E8" height="4"> <td width="50%" valign="middle" align="right"><font size="2" face="Arial">Book No: </font></td> <td width="50%" valign="middle" align="left"><INPUT TYPE="text" NAME="item_no"></td> </tr> <tr bgcolor="#E8E8E8" height="4"> <td width="50%" valign="middle" align="right"><font size="2" face="Arial">Category: </font></td> <td width="50%" valign="middle" align="left"> <!-- <INPUT TYPE="text" NAME="item_type"> --> <SELECT NAME="item_type"> <?php $db=mysql_connect('localhost','root',''); if (!$db) { echo "Error When connecting to Database"; } mysql_select_db("shop", $db); $result_cat=mysql_query("select * from category", $db); while ($row_cat=mysql_fetch_array($result_cat)) { print "<option value=\"$row_cat[1]\">$row_cat[1]</option>"; } ?> </SELECT> </td> </tr> <tr bgcolor="#E8E8E8" height="4"> <td width="50%" valign="middle" align="right"><font size="2" face="Arial">Book Title: </font></td> <td width="50%" valign="middle" align="left"><INPUT TYPE="text" NAME="title"></td> </tr> <tr bgcolor="#E8E8E8" height="4"> <td width="50%" valign="middle" align="right"><font size="2" face="Arial">Book Author: </font></td> <td width="50%" valign="middle" align="left"><INPUT TYPE="text" NAME="author"></td> </tr> <tr bgcolor="#E8E8E8" height="4"> <td width="50%" valign="middle" align="right"><font size="2" face="Arial">Book Price($): </font></td> <td width="50%" valign="middle" align="left"><INPUT TYPE="text" NAME="price"></td> </tr> <tr bgcolor="#E8E8E8" height="4"> <td width="50%" valign="middle" align="center"><INPUT TYPE="button" value="Add Book" onclick="check();"></td> <td width="50%" valign="middle" align="center"><INPUT TYPE="reset"></td> </tr> <tr bgcolor="E8E8E8"> <td width="100%" align="center" colspan="2"><font face="Arial" size="2"> </font></td></tr> </table> </form> </td> <?php include "right.php"?> <script> function check() { var error="false"; if((document.addbook.item_no.value == "") && (error == "false")) { error="true"; alert("Please Enter Book No."); } /* if((document.addbook.item_type.value == "") && (error == "false")) { error="true"; alert("Please Enter Book Category"); } */ if((document.addbook.title.value == "") && (error == "false")) { error="true"; alert("Please Enter Book Title"); } if((document.addbook.author.value == "") && (error == "false")) { error="true"; alert("Please Enter Author name."); } if((document.addbook.price.value == "") && (error == "false")) { error="true"; alert("Please Enter Book Price."); } if (error=="false") { document.addbook.submit(); } } </script> | |
The above listing creates a Web page to accept information to add a new book to the database, as shown in Figure 9-7:
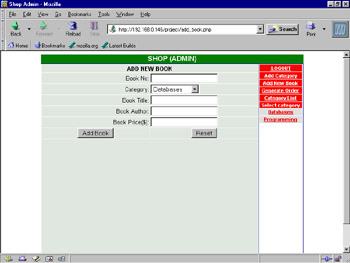
Figure 9-7: Web Page to Add a New Book
When the administrator clicks the Add Book button, the add_book1.php file adds a new book to the database.
Listing 9-10 shows the content of the add_book1.php file:
| |
include "tophtml.php"; $db=mysql_connect('localhost','root',''); echo "<tr width=\"600\" height=\"300\"><td width=\"499\" colspan=\"2\">"; if (!$db) { echo "Error When connecting to Database"; } $item_no=$_GET['item_no']; $item_type=$_GET['item_type']; $title=$_GET['title']; $author=$_GET['author']; $price=$_GET['price']; mysql_select_db("shop", $db); if(!$result_in=mysql_query("insert into book(item_no,item_type, title, author, price) values('$item_no', '$item_type', '$title','$author',$price)", $db)) { $error=mysql_error(); } ?> <table border="0" width="100%" height="480" cellpadding="1" cellspacing="1" bgcolor="#FFFFFF"> <tr bgcolor="E8E8E8"> <td width="100%" align="center" height="4"><font face="Arial" size="2"><b> <?php if($error) echo "<font color=\"#FF0000\">$error</font><BR><BR><a href=\"javascript:history.back();\">Go Back</a>"; else echo "<font color=\"#000000\">You have added one book successfully</font>"; ?> </b></font></td></tr> <tr bgcolor="E8E8E8"> <td width="100%" align="center"> </td></tr> </table> </td> <?php include "right.php" ?> | |
The above listing inserts the book data in the database. If the book is added successfully, the message, You have added one book successfully, is displayed. If an error occurs, an error message is displayed in the middle section of the Web page.
Generating Orders
End users can place an order to buy the required books. The order is stored in an XML file. When the administrator clicks the Generate Order hyperlink, the Orders.xml XML file is created if it does not already exist in the /var/www/html directory. The create_xml.php file generates the Orders.xml file.
Listing 9-11 shows the content of the create_xml.php file:
| |
<?php include "tophtml.php"; echo "<tr width=\"499\"><td colspan = \"2\" align = \"center\">"; $db=mysql_connect('localhost','root',''); if (!$db) { echo "Error When connecting to Database"; } mysql_select_db("shop", $db); $result=mysql_query("select item_no, date, status, transaction.order_no from transaction, order1 where status='Pending' and transaction.order_no=order1.order_no", $db); $doc = new_xmldoc("1.0"); $root = $doc->add_root("Orders"); while ($row=mysql_fetch_array($result)) { $result2=mysql_query("select title, author, price from book where item_no=$row[0]", $db); $row2=mysql_fetch_array($result2); $record = $root->new_child("Order", ""); $record->set_attribute("number", $row[3]); $record->new_child("BookName", $row2[0]); $record->new_child("BookID", $row[0]); $record->new_child("Author", $row2[1]); $record->new_child("Price", $row2[2]); $record->new_child("Status", $row[2]); $record->new_child("Order Date", $row[1]); } $fp = fopen("/var/www/html/Orders.xml", "w+"); $rt= $doc->dumpmem(); fwrite($fp, $rt, strlen($rt)); echo "XML File Created"; ?> </td> <?php include "right.php" ?> | |
The above listing creates the Orders.xml file in the var/www/html directory. If the file is created successfully, the message, XML File Created, is displayed in the middle section of the Web page.
Listing Categories
When the administrator clicks the Category List hyperlink in the right panel of the home page, shown in Figure 9-4, the list_cat.php file is processed to retrieve and display all the category names .
Listing 9-12 shows how to create a Web page to display the names of all the categories:
| |
<?php include "tophtml.php"; ?> <tr width="499"><td colspan="2"> <table border="0" width="100%" height="480" cellpadding="1" cellspacing="1" bgcolor="#FFFFFF"> <tr bgcolor="#E8E8E8" height="4"> <td width="5%" valign="middle" align="center"><font size="1" face="verdana"><b>SNo.</b></font></td> <td width="85%" valign="middle" align="center"><font size="1" face="verdana"><b>Category Name</b></font></td> <td width="5%" valign="middle" align="center"><b><font size="1" face="verdana">Edit</font></b></td> <td width="5%" valign="middle" align="center"><b><font size="1" face="verdana">Delete</font></b></td> </tr> <?php $db=mysql_connect('localhost', 'root', ''); if (!$db) { echo "Error When connecting to Database"; } mysql_select_db("shop", $db); $j=0; $rec=$rec_per_page + 1; $result = mysql_query("select * from category", $db); $num = mysql_num_rows($result); while($row = mysql_fetch_array($result)) { //if ($j < $rec_per_page) { $j++; print " <tr bgcolor=\"#E8E8E8\" height=\"4\"> <td width=\"5%\" align=\"center\"><font face=\"Arial\" size=\"2\">$j</font></td> <td width=\"85%\" align=\"center\"><font face=\"Arial\" size=\"2\">$row[1]</font></td> <td width=\"5%\" align=\"center\"><a href=\"edit_cat.php?tbl_id=$row[0]\"><font face=\"Arial\" size=\"2\">Edit</font></a></td> <td width=\"5%\" align=\"center\"><a href=\"del_cat.php?tbl_id=$row[0]&item_type=$row[1]\"><font face=\"Arial\" size=\"2\">Delete</font></a></td> </tr>"; //} } print "<tr height=\"4\" bgcolor=\"E8E8E8\"> <td width=\"100%\" align=\"center\" colspan=\"4\"><font face=\"Arial\" size=\"2\">"; if ($p > 0) { $p1 = $p-1; echo "<a href=\"view_book.php?item_type=$item_type&p=$p1\">Previous Page </a>"; } print " "; if ($num > $rec_per_page) { $p2 = $p+1; echo "<a href=\"view_book.php?item_type=$item_type&p=$p2\">Next Page</a>"; } print "</font></td></tr>"; print " <tr bgcolor=\"E8E8E8\"> <td width=\"100%\" align=\"center\" colspan=\"4\"><font face=\"Arial\" size=\"2\"> </font></td></tr>"; ?> </table> </td> <?php include "right.php"?> | |
The above listing retrieves a list of all the categories that exist in the database.
Figure 9-8 shows the output when list_cat.php is viewed in the Web browser:
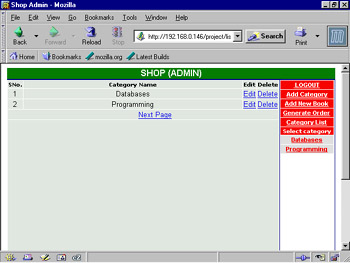
Figure 9-8: Web Page to Display All Category Names
Modifying a Category
When the administrator clicks the Edit link corresponding to a category name, as shown in Figure 9-8, the edit_cat.php file is processed. The edit_cat.php file creates a Web page that accepts data to update the category name.
Listing 9-13 shows the content of the edit_cat.php file:
| |
<?php include "tophtml.php"; $db=mysql_connect('localhost','root',''); echo "<tr width=\"499\"><td colspan = \"2\">"; if (!$db) { echo "Error When connecting to Database"; } mysql_select_db("shop", $db); $temp=$_GET['tbl_id']; $result=mysql_query("select * from category where tbl_id=$temp", $db); $row=mysql_fetch_array($result); $temp_val=$row[1]; ?> <form name="editcat" action="edit_cat1.php" action="post"> <input type="hidden" name="tbl_id" value='<?php echo "$temp" ?>'> <input type="hidden" name="old_item_type" value='<?php echo "$row[1]"?>'> <table border="0" width="100%" height="480" cellpadding="1" cellspacing="1" bgcolor="#FFFFFF"> <tr bgcolor="E8E8E8"> <td width="100%" align="center" colspan="2" height="4"><font face="Arial" size="2"><b>EDIT CATEGORY</b></font></td></tr> <tr bgcolor="#E8E8E8" height="4"> <td width="50%" valign="middle" align="right"><font size="2" face="Arial">Enter Category Name</font></td> <td width="50%" valign="middle" align="left"><INPUT TYPE="text" NAME="item_type" value='<?php echo "$temp_val" ?>'></td> </tr> <tr bgcolor="#E8E8E8" height="4"> <td width="50%" valign="middle" align="center"><INPUT TYPE="button" value="Edit Category" onclick="check();"></td> <td width="50%" valign="middle" align="center"><INPUT TYPE="reset"></td> </tr> <tr bgcolor="E8E8E8"> <td width="100%" align="center" colspan="2"><font face="Arial" size="2"> </font></td></tr> </table> </form> </td> <?php include "right.php"?> <script> function check() { var error="false"; if((document.editcat.item_type.value == "") && (error == "false")) { error="true"; alert("Please Enter Book Category"); } if (error=="false") { document.editcat.submit(); } } </script> | |
The above listing displays a Web page to modify the existing categories.
Figure 9-9 shows the Web page that appears when the administrator clicks the Edit hyperlink corresponding to the Databases category:
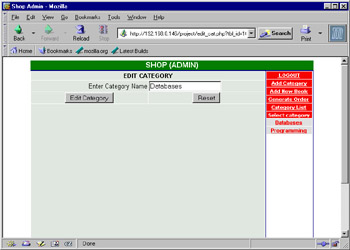
Figure 9-9: Modifying a Category Name
When the administrator clicks the Edit Category button, the edit_cat1.php file is processed to modify the data for an existing category in the database table.
Listing 9-14 shows the content of the edit_cat1.php file:
| |
<?php include "tophtml.php"; $db=mysql_connect('localhost','root',''); echo "<tr width=\"499\"><td colspan=\"2\">"; if (!$db) { echo "Error When connecting to Database"; } mysql_select_db("shop", $db); $temp1=$_GET['item_type']; $temp2=$_GET['tbl_id']; $result_catup=mysql_query("update category set item_type='$temp1' where tbl_id='$temp2'", $db); $result_catup=mysql_db_query("$db","update $book_tbl set item_type='$item_type' where item_type='$old_item_type'"); ?> <table border="0" width="100%" height="480" cellpadding="1" cellspacing="1" bgcolor="#FFFFFF"> <tr bgcolor="#E8E8E8" height="4"> <td width="5%" valign="middle" align="center"><font size="1" face="verdana"><b>SNo.</b></font></td> <td width="85%" valign="middle" align="center"><font size="1" face="verdana"><b>Category Name</b></font></td> <td width="5%" valign="middle" align="center"><b><font size="1" face="verdana">Edit</font></b></td> <td width="5%" valign="middle" align="center"><b><font size="1" face="verdana">Delete</font></b></td> </tr> <?php $j=0; $rec=$rec_per_page + 1; $result = mysql_query("select * from category", $db); $num = mysql_num_rows($result); while($row = mysql_fetch_array($result)) { //if ($j < $rec_per_page) { $j++; print " <tr bgcolor=\"#E8E8E8\" height=\"4\"> <td width=\"5%\" align=\"center\"><font face=\"Arial\" size=\"2\">$j</font></td> <td width=\"85%\" align=\"center\"><font face=\"Arial\" size=\"2\">$row[1]</font></td> <td width=\"5%\" align=\"center\"><a href=\"edit_cat.php?tbl_id=$row[0]\"><font face=\"Arial\" size=\"2\">Edit</font></a></td> <td width=\"5%\" align=\"center\"><a href=\"del_cat.php?tbl_id=$row[0]\"><font face=\"Arial\" size=\"2\">Delete</font></a></td> </tr>"; //} } print " <tr height=\"4\" bgcolor=\"E8E8E8\"> <td width=\"100%\" align=\"center\" colspan=\"4\"><font face=\"Arial\" size=\"2\">"; if ($p > 0) { $p1 = $p-1; echo "<a href=\"view_book.php?item_type=$item_type&p=$p1\">Previous Page </a>"; } print " "; if ($num > $rec_per_page) { $p2 = $p+1; echo "<a href=\"view_book.php?item_type=$item_type&p=$p2\">Next Page</a>"; } print "</font></td></tr>"; print " <tr bgcolor=\"E8E8E8\"> <td width=\"100%\" align=\"center\" colspan=\"4\"><font face=\"Arial\" size=\"2\"> </font></td></tr>"; ?> </table> </td> <?php include "right.php"; ?> | |
The above listing modifies the category name in the database table.
Deleting a Category
When the administrator clicks the Delete link corresponding to a category name, as shown in Figure 9-8, the del_cat.php file, which deletes the selected category from the database, is processed.
Listing 9-15 shows the content of the del_cat.php file that prompts the administrator before deleting a category from the database table:
| |
<?php include "tophtml.php"; $temp2=$_GET['tbl_id']; $temp1=$_GET['item_type']; echo "<tr width=\"499\"><td colspan=\"2\">"; ?> <table border="0" width="100%" height="480" cellpadding="1" cellspacing="1" bgcolor="#FFFFFF"> <tr bgcolor="#E8E8E8" height="4"> <td width="100%" valign="middle" align="center" colspan="4"> <form name="delcat" action="del_cat1.php" method="GET"> <input type="hidden" name="tbl_id" value='<?php echo "$temp2" ?>'> <input type="hidden" name="item_name" value='<?php echo "$temp1" ?>'> <font face="arial" size="2" color="#FF0000"><b>Do you want to delete this category? </b></font> <input type="submit" name="del" value="Yes"> <input type="submit" name="del" value="No"> </form> </td> </tr> <?php print "<tr bgcolor=\"E8E8E8\"> <td width=\"100%\" align=\"center\" colspan=\"4\"><font face=\"Arial\" size=\"2\"> </font></td></tr>"; ?> </table> </td> <?php include "right.php"; ?>
| |
The above listing creates a Web page, which prompts the administrator before deleting a category from the database.
Figure 9-10 shows the Web page that appears when the administrator clicks the Delete hyperlink corresponding to the Programming category, and verifies whether or not to delete the selected category:
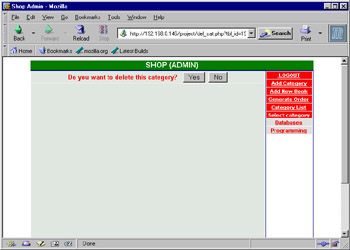
Figure 9-10: Web Page to Delete a Category
When the administrator clicks the Yes button, the del_cat1.php file is processed to delete the category from the database table, as shown in Listing 9-16:
| |
<?php include "tophtml.php"; $tbl_id=$_GET['tbl_id']; $del=$_GET['del']; $item_type=$_GET['item_name']; echo "<tr width=\"499\"><td colspan = \"2\">"; $db=mysql_connect('localhost', 'root', ''); if (!$db) { echo "Error When connecting to Database"; } mysql_select_db("shop", $db); if ($del=="Yes") { $result_catdel=mysql_query("delete from category where tbl_id='$tbl_id'", $db); } $result_book=mysql_query("delete from book where item_type='$item_type'", $db); ?> <table border="0" width="100%" height="480" cellpadding="1" cellspacing="1" bgcolor="#FFFFFF"> <tr bgcolor="#E8E8E8" height="4"> <td width="5%" valign="middle" align="center"><font size="1" face="verdana"><b>SNo.</b></font></td> <td width="85%" valign="middle" align="center"><font size="1" face="verdana"><b>Category Name</b></font></td> <td width="5%" valign="middle" align="center"><b><font size="1" face="verdana">Edit</font></b></td> <td width="5%" valign="middle" align="center"><b><font size="1" face="verdana">Delete</font></b></td> </tr> <?php $j=0; $rec=$rec_per_page + 1; $result = mysql_query("select * from category", $db); $num = mysql_num_rows($result); while($row = mysql_fetch_array($result)) { //if ($j < $rec_per_page) { $j++; print " <tr bgcolor=\"#E8E8E8\" height=\"4\"> <td width=\"5%\" align=\"center\"><font face=\"Arial\" size=\"2\">$j</font></td> <td width=\"85%\" align=\"center\"><font face=\"Arial\" size=\"2\">$row[1]</font></td> <td width=\"5%\" align=\"center\"><a href=\"edit_cat.php?tbl_id=$row[0]\"><font face=\"Arial\" size=\"2\">Edit</font></a></td> <td width=\"5%\" align=\"center\"><a href=\"del_cat.php?tbl_id=$row[0]\"><font face=\"Arial\" size=\"2\">Delete</font></a></td> </tr>"; //} } print " <tr height=\"4\" bgcolor=\"E8E8E8\"> <td width=\"100%\" align=\"center\" colspan=\"4\"><font face=\"Arial\" size=\"2\">"; if ($p > 0) { $p1 = $p-1; echo "<a href=\"view_book.php?item_type=$item_type&p=$p1\">Previous Page </a>"; } print " "; if ($num > $rec_per_page) { $p2 = $p+1; echo "<a href=\"view_book.php?item_type=$item_type&p=$p2\">Next Page</a>"; } print "</font></td></tr>"; print " <tr bgcolor=\"E8E8E8\"> <td width=\"100%\" align=\"center\" colspan=\"4\"><font face=\"Arial\" size=\"2\"> </font></td></tr>"; ?> </table> </td> <?php include "right.php"; ?> | |
The above listing deletes a category from the database table. The administrator is redirected to the Web page that displays the updated category list.
Modifying Book Data
When the administrator clicks any of the category items displayed in the right section of Figure 9-10, the view_book.php file is executed by the Web server to display a list of all the books present in that category.
Listing 9-17 shows the content of the view_book.php file:
| |
<?php include "tophtml.php"; echo "<tr width=\"499\"><td colspan=\"2\">"; $item_type=$_GET['item_type']; echo $item_type; ?> <table border="0" width="100%" height="480" cellpadding="1" cellspacing="1" bgcolor="#FFFFFF"> <tr bgcolor="#E8E8E8" height="4"> <td width="5%" valign="middle" align="center"><font size="1" face="verdana"><b>SNo.</b></font></td> <td width="85%" valign="middle" align="center"><font size="1" face="verdana"><b>Book Name</b></font></td> <td width="5%" valign="middle" align="center"><b><font size="1" face="verdana">Edit</font></b></td> <td width="5%" valign="middle" align="center"><b><font size="1" face="verdana">Delete</font></b></td> </tr> <?php $j=0; $rec=$rec_per_page + 1; $db=mysql_connect('localhost', 'root', ''); if (!$db) { echo "Error When connecting to Database"; } mysql_select_db("shop", $db); $result=mysql_query("select * from book where item_type='$item_type'", $db); $num = mysql_num_rows($result); while($row = mysql_fetch_array($result)) { $j++; print " <tr bgcolor=\"#E8E8E8\" height=\"4\"> <td width=\"5%\" align=\"center\"><font face=\"Arial\" size=\"2\">$j</font></td> <td width=\"85%\" align=\"center\"><font face=\"Arial\" size=\"2\">$row[2]</font></td> <td width=\"5%\" align=\"center\"><a href=\"edit_book.php?tbl_id=$row[0]\"><font face=\"Arial\" size=\"2\">Edit</font></a></td> <td width=\"5%\" align=\"center\"><a href=\"del_book.php?tbl_id=$row[0]&item_type=$row[1]\"><font face=\"Arial\" size=\"2\">Delete</font></a></td> </tr>"; //} } print " <tr height=\"4\" bgcolor=\"E8E8E8\"> <td width=\"100%\" align=\"center\" colspan=\"4\"><font face=\"Arial\" size=\"2\">"; if ($p > 0) { $p1 = $p-1; echo "<a href=\"view_book.php?item_type=$item_type&p=$p1\">Previous Page </a>"; } print " "; if ($num > $rec_per_page) { $p2 = $p+1; echo "<a href=\"view_book.php?item_type=$item_type&p=$p2\">Next Page</a>"; } print "</font></td></tr>"; print " <tr bgcolor=\"E8E8E8\"> <td width=\"100%\" align=\"center\" colspan=\"4\"><font face=\"Arial\" size=\"2\"> </font></td></tr>"; ?> </table> </td> <?php include "right.php"; ?> | |
The above listing displays a Web page that contains information about all the books present in a category.
Figure 9-11 shows the output of the view_book.php file when the Database category is selected from the right section of the adminFirst.php Web page:
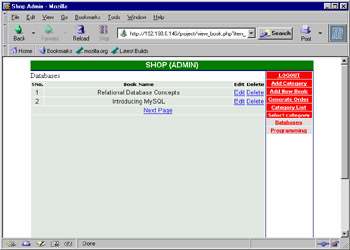
Figure 9-11: Books Present in the Database Category
The administrator needs to click the Edit hyperlink to modify the data of a book in the database. When the administrator clicks the Edit hyperlink corresponding to a book name, the edit_book.php file is executed, which lets the administrator enter new data for the selected book.
Listing 9-18 shows the content of the edit_book.php file:
| |
<?php include "tophtml.php"; echo "<tr width=\"499\"><td colspan=\"2\">"; $db=mysql_connect('localhost','root',''); $tbl_id=$_GET['tbl_id']; if (!$db) { echo "Error When connecting to Database"; } mysql_select_db("shop", $db); $result=mysql_query("select * from book where item_no='$tbl_id'", $db); $row=mysql_fetch_array($result); ?> <form name="addbook" action="edit_book1.php" action="GET"> <input type="hidden" name="item_no" value='<?php echo"$tbl_id" ?>'> <input type="hidden" name="item_type" value='<?php echo"$item_type" ?>'> <input type="hidden" name="p" value='<?php echo"$p" ?>'> <table border="0" width="100%" height="480" cellpadding="1" cellspacing="1" bgcolor="#FFFFFF"> <tr bgcolor="E8E8E8"> <td width="100%" align="center" colspan="2" height="4"><font face="Arial" size="2"><b>EDIT YOUR BOOK</b></font></td></tr> <tr bgcolor="#E8E8E8" height="4"> <td width="50%" valign="middle" align="right"><font size="2" face="Arial"> Book No.</font></td> <td width="50%" valign="middle" align="left"><?php echo"$row[0]" ?></td> </tr> <tr bgcolor="#E8E8E8" height="4"> <td width="50%" valign="middle" align="right"><font size="2" face="Arial">Enter Book Category</font></td> <td width="50%" valign="middle" align="left"> <!-- <INPUT TYPE="text" NAME="item_type" value='<?php echo"$row[1]" ?>'></td> --> <SELECT NAME="item_type"> <?php $result_cat=mysql_query("select * from book", $db); while ($row_cat=mysql_fetch_array($result_cat)) { if ($row[1] == $row_cat[1]) print "<option value=\"$row_cat[1]\" selected>$row_cat[1]</option>"; else print "<option value=\"$row_cat[1]\">$row_cat[1]</option>"; } ?> </SELECT> </tr> <tr bgcolor="#E8E8E8" height="4"> <td width="50%" valign="middle" align="right"><font size="2" face="Arial">Enter Book Title</font></td> <td width="50%" valign="middle" align="left"><INPUT TYPE="text" NAME="title" value='<?php echo"$row[2]" ?>'></td> </tr> <tr bgcolor="#E8E8E8" height="4"> <td width="50%" valign="middle" align="right"><font size="2" face="Arial">Enter Book Author</font></td> <td width="50%" valign="middle" align="left"><INPUT TYPE="text" NAME="author" value='<?php echo"$row[3]" ?>'></td> </tr> <tr bgcolor="#E8E8E8" height="4"> <td width="50%" valign="middle" align="right"><font size="2" face="Arial">Enter Book Price ($)</font></td> <td width="50%" valign="middle" align="left"><INPUT TYPE="text" NAME="price" value='<?php echo"$row[4]" ?>'></td> </tr> <tr bgcolor="#E8E8E8" height="4"> <td width="50%" valign="middle" align="center"><INPUT TYPE="button" value="Edit Book" onclick="check();"></td> <td width="50%" valign="middle" align="center"><INPUT TYPE="reset"></td> </tr> <tr bgcolor="E8E8E8"> <td width="100%" align="center" colspan="2"><font face="Arial" size="2"> </font></td></tr> </table> </form> </td> <?php include "right.php" ?> <script> function check() { var error="false"; if((document.addbook.item_type.value == "") && (error == "false")) { error="true"; alert("Please Enter Book Category"); } if((document.addbook.title.value == "") && (error == "false")) { error="true"; alert("Please Enter Book Title"); } if((document.addbook.author.value == "") && (error == "false")) { error="true"; alert("Please Enter Author name."); } if((document.addbook.price.value == "") && (error == "false")) { error="true"; alert("Please Enter Book Price."); } if (error=="false") { document.addbook.submit(); } } </script> | |
The above listing creates a Web page to accept modified data for an existing book from the administrator, as shown in Figure 9-12:
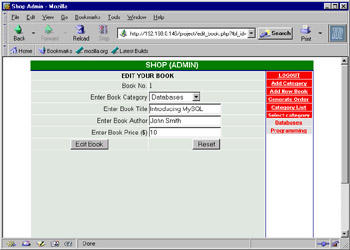
Figure 9-12: Modifying Book Data
When the administrator clicks the Edit Book button, the edit_book1.php file executes to modify the data for an existing book in the database table.
Listing 9-19 shows the content of the edit_book1.php file:
| |
<?php include "tophtml.php"; echo "<tr width=\"499\"><td colspan=\"2\">"; $item_no=$_GET['item_no']; $item_type=$_GET['item_type']; $author=$_GET['author']; $price=$_GET['price']; $title=$_GET['title']; $db=mysql_connect('localhost','root',''); if (!$db) { echo "Error When connecting to Database"; } mysql_select_db("shop", $db); $result_edit=mysql_query("update book set item_type='$item_type',title='$title',author='$author',price=$price where item_no='$item_no'", $db); ?> <table border="0" width="100%" height="480" cellpadding="1" cellspacing="1" bgcolor="#FFFFFF"> <tr bgcolor="#E8E8E8" height="4"> <td width="32" valign="middle" align="center"><font size="1" face="verdana"><b>SNo.</b></font></td> <td width="64" valign="middle" align="center"><font size="1" face="verdana"><b>Item No.</b></font></td> <td width="85" valign="middle" align="center"><font size="1" face="verdana"><b>Category</b></font></td> <td width="85" valign="middle" align="center"><font size="1" face="verdana"><b>Title</b></font></td> <td width="68" valign="middle" align="center"><b><font size="1" face="verdana">Author</font></b></td> <td width="33" valign="middle" align="center"><b><font size="1" face="verdana">Price($)</font></b></td> <td width="39" valign="middle" align="center"><b><font size="1" face="verdana">Edit</font></b></td> <td width="39" valign="middle" align="center"><b><font size="1" face="verdana">Delete</font></b></td> </tr> <?php $j=0; $rec=$rec_per_page + 1; $result = mysql_query("select * from book where item_type='$item_type'", $db); $num = mysql_num_rows($result); while($row = mysql_fetch_array($result)) { print " <tr bgcolor=\"#E8E8E8\" height=\"4\"> <td width=\"32\" align=\"center\"><font face=\"Arial\" size=\"2\">$j</font></td> <td width=\"64\" align=\"center\"><font face=\"Arial\" size=\"2\">$row[0]</font></td> <td width=\"85\" align=\"center\"><font face=\"Arial\" size=\"2\">$row[1]</font></td> <td width=\"85\" align=\"center\"><font face=\"Arial\" size=\"2\">$row[2]</font></td> <td width=\"68\" align=\"center\"><font face=\"Arial\" size=\"2\">$row[3]</font></td> <td width=\"33\" align=\"center\"><font face=\"Arial\" size=\"2\">$row[4]</font></td> <td width=\"33\" align=\"center\"><a href=\"edit_book.php?tbl_id=$row[0]\"><font face=\"Arial\" size=\"2\">Edit</font></a></td> <td width=\"6\" align=\"center\"><a href=\"del_book.php?tbl_id=$row[0]\"><font face=\"Arial\" size=\"2\">Delete</font></a></td> </tr>"; } print " <tr height=\"4\" bgcolor=\"E8E8E8\"> <td width=\"100%\" align=\"center\" colspan=\"8\"><font face=\"Arial\" size=\"2\">"; if ($p > 0) { $p1 = $p-1; echo "<a href=\"view_book.php?item_type=$item_type&p=$p1\">Previous Page </a>"; } print " "; if ($num > $rec_per_page) { $p2 = $p+1; echo "<a href=\"view_book.php?item_type=$item_type&p=$p2\">Next Page</a>"; } print "</font></td></tr>"; print " <tr bgcolor=\"E8E8E8\"> <td width=\"100%\" align=\"center\" colspan=\"8\"><font face=\"Arial\" size=\"2\"> </font></td></tr>"; ?> </table> </td> <?php include "right.php"; ?> | |
The above listing modifies the book data in the database table and redirects the administrator to the Web page that displays the books data for the selected category.
Removing a Book
The administrator needs to click the Delete hyperlink corresponding to a book name, as shown in Figure 9-11, to delete a book from a category. The del_book.php file executes to delete the book from the category when the administrator clicks the Delete hyperlink. The del_book.php file represents a Web page that prompts the administrator before deleting the book from the database.
Listing 9-20 shows the content of the del_book.php file:
| |
<?php include "tophtml.php"; echo "<tr width=\"499\" ><td colspan=\"2\" align=\"top\">"; $item_no=$_GET['tbl_id']; ?> <table border="0" width="100%" height="100%" cellpadding="1" cellspacing="1" bgcolor="#ffffff"> <tr bgcolor="#E8E8E8" height="4"> <td width="32" valign="middle" align="center"><font size="1" face="verdana"><b>SNo.</b></font></td> <td width="64" valign="middle" align="center"><font size="1" face="verdana"><b>Item No.</b></font></td> <td width="85" valign="middle" align="center"><font size="1" face="verdana"><b>Category</b></font></td> <td width="85" valign="middle" align="center"><font size="1" face="verdana"><b>Title</b></font></td> <td width="68" valign="middle" align="center"><b><font size="1" face="verdana">Author</font></b></td> <td width="33" valign="middle" align="center"><b><font size="1" face="verdana">Price($)</font></b></td> </tr> <?php $j=0; $db=mysql_connect('localhost','root',''); if (!$db) { echo "Error When connecting to Database"; } mysql_select_db("shop", $db); $result = mysql_query("select * from book where item_no='$item_no'"); while($row = mysql_fetch_array($result)) { $j++; print " <tr bgcolor=\"#E8E8E8\" height=\"4\"> <td width=\"32\" align=\"center\"><font face=\"Arial\" size=\"2\">$j</font></td> <td width=\"64\" align=\"center\"><font face=\"Arial\" size=\"2\">$row[0]</font></td> <td width=\"85\" align=\"center\"><font face=\"Arial\" size=\"2\">$row[1]</font></td> <td width=\"85\" align=\"center\"><font face=\"Arial\" size=\"2\">$row[2]</font></td> <td width=\"68\" align=\"center\"><font face=\"Arial\" size=\"2\">$row[3]</font></td> <td width=\"33\" align=\"center\"><font face=\"Arial\" size=\"2\">$row[4]</font></td> </tr>"; print " <tr bgcolor=\"#E8E8E8\" height=\"4\" > <td width=\"100%\" align=\"center\" colspan=\"6\"><font face=\"Arial\" size=\"2\" color=\"#FF0000\"><b>Do you want to delete this record. </b> <a href=\"del_book1.php?item_no=$row[0]&item_type=$row[1]&title=$row[2]&p=$p& del=y\">Yes</a> <a href=\"del_book1.php?item_no=$row[0]&item_type=$row[1]&p=$p&del=n\"> No</a></font></td></tr>"; } ?> <tr height="400" bgcolor="E8E8E8"><td colspan="6"> </td></tr> </table> </td> <?php include "right.php"; ?> | |
The above listing creates a Web page that prompts the administrator before deleting a book from the database.
Figure 9-13 shows the Web page that lets the administrator delete a book from the shop database:
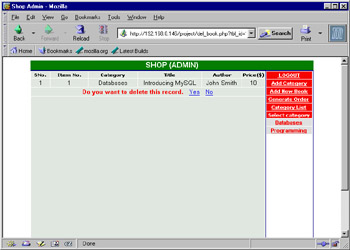
Figure 9-13: Deleting a Book
Listing 9-21 shows the content of the del_book1.php file:
| |
<?php include "tophtml.php"; echo "<tr width=\"499\"><td align=\"center\" colspan=\"2\">"; $title=$_GET['title']; $del=$_GET['del']; $db=mysql_connect('localhost', 'root', ''); if(!$db) { echo "Error when connecting to database"; } mysql_select_db("shop", $db); if ($del == 'y') { mysql_query("delete from book where title='$title'", $db); print " Book Deleted !"; }else print " Book is not deleted."; echo "</td>"; include "right.php"; //print "<script>location.replace(\"view_book.php?item_type=$item_type&p=$p\")</script >"; ?> | |
The above listing deletes a book from the database table if the administrator clicks the Yes hyperlink in Figure 9-13. If the administrator clicks the No hyperlink, the message, Book is not deleted, is displayed.The administrator is redirected to the Web page that displays the books for a selected category.