Section 10.5. Updating with SQL and ADO.NET
10.5. Updating with SQL and ADO.NETThere are two aspects to writing web applications that allow users to update data. The first aspect is providing the user with a form that facilitates data modification. The second is to provide the programmatic support for the update: how do you insert new records, or modify or delete existing records once you know what changes you want to make, if you use the ADO.NET object model directly? Updating data in a database is simple if you update a single table, but once you update related tables, things get complicated. You can use transactions to ensure the integrity of your data, as shown below. The simplest way to update the database using ADO.NET objects directly is to generate a SQL Insert , Update , or Delete statement, and execute it using the Command object's ExecuteNonQuery method. To see this at work, create a new web site called UpdatingDBDirectly. Drag a GridView to display the Shipper 's table and add a Select button to the first column of the grid. Below the grid, add three buttons and two text boxes. Name the buttons btnAdd , btnEdit and btnDelete , and name the text boxes txtName and txtPhone , as shown in Figure 10-14. Figure 10-14. Updating DB Directly user interface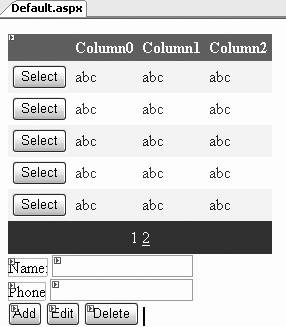 The content file to create this is shown in Example 10-9. Example 10-9. default.aspx for UpdatingDBDirectly<%@ Page Language="C#" AutoEventWireup="true" CodeFile="Default.aspx.cs" Inherits="_Default" %> <!DOCTYPE html PUBLIC "-//W3C//DTD XHTML 1.1//EN" "http://www.w3.org/TR/xhtml11/DTD/xhtml11.dtd"> <html xmlns="http://www.w3.org/1999/xhtml" > <head runat="server"> <title>Updating Directly</title> </head> <body> <form id="form1" runat="server"> <div> <asp:GridView ID="GridView1" runat="server" CellPadding="4" ForeColor="#333333" GridLines="None" PagerSettings-Mode="Numeric" AllowPaging="True" DataKeyNames="ShipperID" AutoGenerateColumns="true" PageSize="5" > <FooterStyle BackColor="#5D7B9D" Font-Bold="True" ForeColor="White" /> <RowStyle BackColor="#F7F6F3" ForeColor="#333333" /> <PagerStyle BackColor="#284775" ForeColor="White" HorizontalAlign="Center" /> <HeaderStyle BackColor="#5D7B9D" Font-Bold="True" ForeColor="White" /> <SelectedRowStyle BackColor="#E2DED6" Font-Bold="True" ForeColor="#333333" /> <AlternatingRowStyle BackColor="White" ForeColor="#284775" /> <Columns> <asp:CommandField ButtonType="Button" ShowSelectButton="True" /> </Columns> </asp:GridView> <asp:Label ID="Label1" runat="server" Text="Name: "></asp:Label> <asp:TextBox ID="txtName" runat="server" Width="135px"/><br /> <asp:Label ID="Label2" runat="server" Text="Phone" /> <asp:TextBox ID="txtPhone" runat="server" Width="137px"/><br /> <asp:Button ID="btnAdd" runat="server" Text="Add" OnClick="btnAdd_Click" /> <asp:Button ID="btnEdit" runat="server" OnClick="btnEdit_Click" Text="Edit" /> <asp:Button ID="btnDelete" runat="server" Text="Delete" OnClick="btnDelete_Click" /> </div> </form> </body> </html> This time, you set AutoGenerateColumns to true , but you add an additional column for the CommandField . You can do this declaratively (in the .aspx ) or through the properties in the Design window. There are four tasks for this program:
The code to populate the data grid is familiar and is shown in Example 10-10. Example 10-10. Populating the DataGrid private void PopulateGrid( ) { // connection string to connect to the Orders Database string connectionString = "Data Source=Brahams;Initial Catalog=Northwind;Integrated Security=True"; // Create connection object, initialize with // connection string and open the connection System.Data.SqlClient.SqlConnection connection = new System.Data.SqlClient.SqlConnection(connectionString); DataSet dataSet; try { connection.Open( ); // Create a SqlCommand object and assign the connection System.Data.SqlClient.SqlCommand command = new System.Data.SqlClient.SqlCommand( ); command.Connection = connection; command.CommandText = "select * from Shippers"; // create a data adapter and assign the command object // and add the table mapping for bugs SqlDataAdapter dataAdapter = new SqlDataAdapter( ); dataAdapter.SelectCommand = command; dataAdapter.TableMappings.Add("Table", "Shippers"); // Create the dataset and use the data adapter to fill it dataSet = new DataSet( ); dataAdapter.Fill(dataSet); GridView1.DataSource = dataSet.Tables["Shippers"]; GridView1.DataBind( ); } finally { connection.Close( ); } } // end createDataSet Each of the buttons has an event handler. The Add button picks up the text from the name and phone textboxes and adds a new record to the database by passing a command string to UpdateDB . Once the database is updated, it calls PopulateGrid (again) to repopulate the grid: protected void btnAdd_Click(object sender, EventArgs e) { string cmd = @"Insert into Shippers values ('" + this.txtName.Text + "', '" + this.txtPhone.Text + "')"; UpdateDB(cmd); PopulateGrid( ); } The interesting work is done in UpdateDB , which takes the command string to execute, as shown in Example 10-11. Example 10-11. UpdateDB private void UpdateDB(string cmd) { // connection string to connect to the Orders Database string connectionString = "Data Source=Brahams;Initial Catalog=Northwind;Integrated Security=True"; // Create connection object, initialize with // connection string and open the connection System.Data.SqlClient.SqlConnection connection = new System.Data.SqlClient.SqlConnection(connectionString); try { connection.Open( ); // Create a SqlCommand object and assign the connection System.Data.SqlClient.SqlCommand command = new System.Data.SqlClient.SqlCommand( ); command.Connection = connection; command.CommandText = cmd; command.ExecuteNonQuery( ); } finally { connection.Close( ); } } The CommandText property of the Command object is set to whatever is passed in, and then ExecuteNonQuery is called on the Command object. This Command returns the number of rows affected, and you could easily build error checking to ensure the expected number of rows were added. The Edit button works the same way, but it must get the ID of the selected row. For that, you have a helper method: protected int GetSelectedRecord( ) { int shipperID = -1; int index = GridView1.SelectedIndex; if (index != -1) { DataKey key = GridView1.DataKeys[index]; shipperID = (int)key.Value; } return shipperID; }
The Edit button gets the shipperID and then formulates the update statement to send to UpdateDB : protected void btnEdit_Click(object sender, EventArgs e) { int shipperID = GetSelectedRecord( ); string cmd = @"Update Shippers set CompanyName = '" + this.txtName.Text + "', Phone = '" + this.txtPhone.Text + @"' where ShipperID = " + shipperID; UpdateDB(cmd); PopulateGrid( ); } Finally, the Delete button deletes the selected entry in the database: protected void btnDelete_Click(object sender, EventArgs e) { string cmd = @"delete from Shippers where ShipperID = " + GetSelectedRecord( ); UpdateDB(cmd); PopulateGrid( ); } Before running the program, check that your Page_Load method has been copied properly: protected void Page_Load(object sender, EventArgs e) { if (!IsPostBack) { DataSet ds = CreateDataSet( ); GridView1.DataSource = ds.Tables[0]; GridView1.DataBind( ); } } The running program is shown in Figure 10-15. Figure 10-15. Updating Directly |
EAN: 2147483647
Pages: 173