Flylib.com

Books Software


Navigation Bars with Four-State Buttons


Navigation Bars with Four-State Buttons

Moving up the complexity ladder is a navigation bar with four-state buttons. The Set Nav Bar Image behavior is used to create this type of navigation bar, where the buttons not only have rollovers, but also communicate to the user which page is currently being browsed.

A navigation bar using this behavior has four states. Each state represents the button's appearance in reaction to a mouse event:

  • The Up state is the default or untouched appearance of the button.

  • The Over state is the way the button appears when the pointer is moved over it.

  • The Down state represents the button after it is clicked.

  • The Over While Down state is the appearance when the user moves the pointer over a button that is in the Down state.

To add the Set Nav Bar Image behavior, follow these steps:

1.

First, you need to build a navigation bar. Begin by creating a background shape and a piece of text.

2.

Next, make those graphics into a Button symbol by choosing Modify, Symbol, Convert to Symbol (F8) and select Button in the dialog box. Make sure you replace the default Symbol name with a more meaningful name .

3.

Press OK to convert the text and image into a button symbol.

4.

Double-click the new button symbol to launch the Button Symbol Editor. Modify the button attributes in the editor for each of the four states (see Figure 4.10).

Figure 4.10. Use the Button Symbol Editor to create four states (Up, Over, Down, and Over While Down) to each button in the navigation bar.


5.

In the Down and the Over While Down states, make sure that the Include in Nav Bar option (located at the top of the editor) is checked. These options should be checked by default.

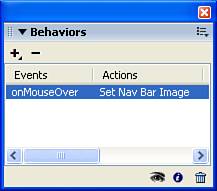
Repeat this process for the rest of your navigation bar buttons.

Tip

To make life easier after you export the navigation bar, take a moment to select each slice and enter a name for the slice, a label for the button, and a URL in the Property inspector.


Double-check that everything is going to work by selecting each button and looking in the Behaviors panel. Each slice should now have the Set Nav Bar Image behavior applied to it (see Figure 4.11).

Figure 4.11. Select each slice and use the Behaviors panel to make sure the Set Nav Bar Image behavior is selected.


For the ultimate test, you need to export the file to HTML and view it in your browser. Choose File, Export to get started. In the Export dialog box, make sure that HTML and Images is selected in the Export field.

Click the Options button to launch the HTML Setup dialog box. Click the Document Specific tab. Make sure that the Export Multiple Nav Bar HTML Pages box is checked. Click OK to close the HTML Setup dialog box so Fireworks will export additional pages for each button in the navigation bar. Click Save to complete the export.

Open the page in your browser to see how it works or preview it by clicking the Quick Export button and choosing Preview in Browser from the context menu.


Fireworks and Animation

Creating animations for the web in Fireworks is a lot more fun to think about than to do. The best animation tool is obviously Flash because the program was designed for the job of creating motion.

That being said, however, Fireworks can be used to build simple animations. In fact, there are three different methods you can use to create animations: frame-by-frame, tweened, and animation symbols. Each has its own pros and cons and is discussed later in this chapter. Before you start tweening away to make the next full-feature animation, you should take a look at what's involved in building a good animation.

Animation Planning

Motion on the web, or on film, is an illusion. Animation is a series of still images, each with a slight change in appearance from the previous image, that are rapidly presented to the viewer. The human eye processes these images and blends them into a smooth motion. If the images move too slowly, the illusion is gone. This speed is measured as frame rate. Frame rate is measured in frames per second (fps). Most movies and television shows shot on film have a frame rate of 24 fps. Most shows shot on video have a frame rate of 30 fps.

Moving to the web, there is another concern to throw into the mix. The higher the resolution of a pixel-based image, or the more points in a piece of vector artwork, the higher the file size , which results in a longer download time. Increasing the frame rate in an animation also increases the file size.

Bitmap animations have a sequence of bitmap graphics. Each bitmap graphic is added together to complete the animation in terms of file size. Although file compression helps reduce the file size, bitmap graphics can get large quickly. The most common bitmap animation type is the Animated GIF.

Vector animations have vector graphics on each frame. Vector animations just change object parameters from frame to frame and are accordingly smaller in file size than bitmap animations. The most common vector animation type is Macromedia's Flash SWF format.

Before you build an animation, however, there is another issue we need to discuss: What is the output format for the final animation?

An Animated GIF typically has a large file size, but is universally compatible with nearly all browsers. This type of animation is restricted by the GIF file format's limited 256- color palette, and it cannot incorporate sound or any other interactivity. In addition, blends and complex patterns often lose their smooth transitions because of the palette limitations. The Animated GIF is, however, a piece of cake to implement.

The Flash SWF, on the other hand, typically has a small file size, can incorporate both pixel and vector-based artwork, and is compatible with all browsers with the Flash player installed. Currently the player penetration is rated at about 94% of all browsers for the Flash player. The Flash SWF offers the capability to add sound as well as complex interactivity. Mastering Flash, however, takes some expertise that you might wish to acquire by reading the Flash chapters in this book.