| Fireworks provides you with two ways to control the optimization of your graphics: the Export Preview dialog box and the Optimize panel. Let's take a look at the Optimize panel first. Because the core of image optimization is finding that magical balance between image quality and file size , it's helpful to have a way of comparing images at different optimization settings. Use the preview buttons (Figure 27.1) to preview your images in one, two, or four panes. Figure 27.1. The Preview buttons enable side-by-side comparison of various optimization settings. 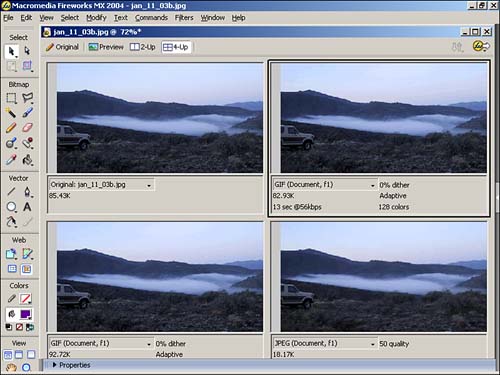
However, when you first view your image in the Preview buttons, you will see the original image in the top left, and the copies of the original in JPEG or GIF format. To change optimization settings, expand the Optimize panel. Select a Preview pane and a black border appears around it. Enter the desired settings in the Optimize panel (Figure 27.2) and the image preview changes its appearance to reflect the settings. Figure 27.2. Use the Optimization panel to change optimization settings. 
File statistics appear in the bottom of the window (Figure 27.3). Figure 27.3. File statistics appear in each of the Preview panes to show you how your optimization settings will affect file properties. 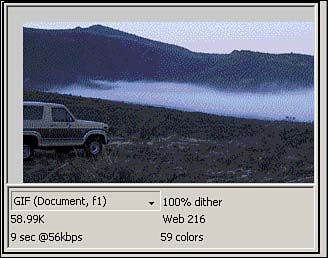
The Optimize panel (Figure 27.4) has five sections, no matter which file type is chosen : -
Title section ” This section comprises three components : the gripper, the panel name , and the Optimize Options menu. -
Saved Settings section ” This section contains all the saved optimization settings. These settings are presets that are shipped with Fireworks. You can also add or remove your own settings. -
File Type/Matte section ” This section contains a drop-down list for the file type, as well as an option that lets you select the matte color. The matte color refers to the background color of the file when it is exported. -
File Type Options section ” The contents of this section change based on the file type selected. -
Color Palette/Transparency section ” For files with 8-bit or lower color palettes, the entire color palette is displayed here. Also included are tools for adding indexed transparency (GIF and PNG-8 files only) and color palette manipulation. Figure 27.4. The Optimize panel contains five sections. 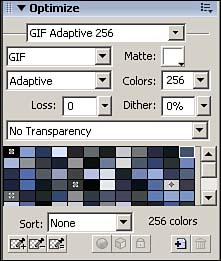
Optimize to Size Command The Options menu in the Options Panel contains several options for the optimization process. Many of these options are self-explanatory, or are only in support of specific settings. One option that is worth mentioning is the Optimize to Size command. This command launches the Optimize to Size dialog box, where you can enter a specific file size for optimized file (Figure 27.5). This command is handy if you are restricted to a specific file size, such as those required for banner advertisements. Figure 27.5. The Optimize to Size command enables you to optimize an image to a specific file size. 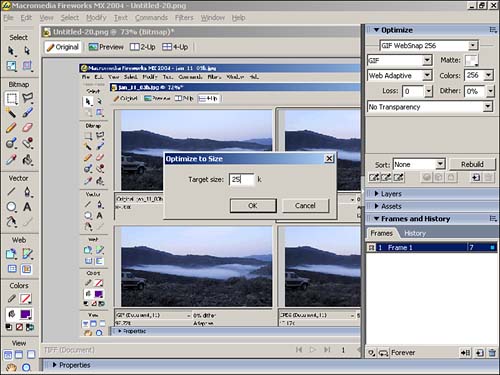
Using Saved Settings Fireworks MX 2004 ships with seven predefined optimization settings. These settings represent common configurations and are often good to use "as is" for nearly every Web project. To use one of the settings, simply select one from the Saved Settings drop-down menu at the top of the Optimize panel (Figure 27.6). Figure 27.6. Fireworks MX 2004 comes with seven Saved Settings for image optimization. 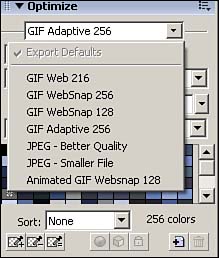
The seven settings are summarized as follows : -
GIF Web 216 ” All colors in the image are forced to the GIF 216-color Web Safe palette. Although image quality is negatively affected, this is a good setting to use if you are concerned about staying within the Web Safe palette. -
GIF WebSnap 256 ” This setting is the same as the GIF Web Snap 128, except there are 256 colors instead of 128. -
GIF WebSnap 128 ” The optimized image contains 128 colors. Colors close to those of the Web Safe palette are changed, whereas colors outside the palette are converted to their closest Web Safe color. -
GIF Adaptive 256 ” The optimized image contains up to 256 colors that are selected to best represent the original colors. It ignores the Web Safe palette. -
JPEG ”Better Quality ” The optimized image is a JPEG with quality setting of 80 and a Smoothing setting of 0. -
JPEG ”Smaller File ” The optimized image is a JPEG with quality setting of 60 and a Smoothing setting of 2. -
Animated GIF Websnap 128 ” The optimized image is an Animated GIF that uses the Websnap 128 palette. For vector art or text, GIF typically provides a better compression. Use the Preview button to determine the best of the saved GIF settings to use. For photographs and gradients, JPEG will typically be the best bet. Again, use the Preview button to select the best of the JPEG settings or even some of the GIF settings such as GIF Adaptive 256. To create your own custom setting, use the Optimize panel to modify an image. Choose Save Settings from the Options menu (Figure 27.7). Enter a name in the Preset Name dialog box and click OK. The new setting is now a part of the settings list. Figure 27.7. Create and save your own settings, using the Save Settings command in the Options menu. 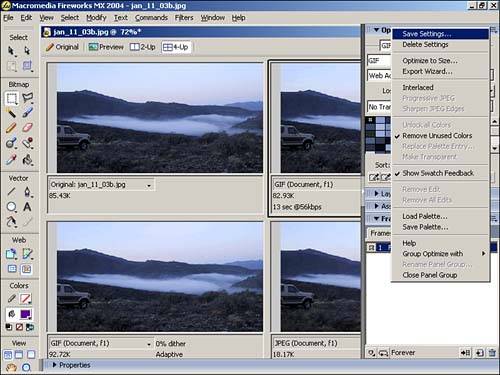
To remove a setting, make sure it is selected in the Saved Settings drop-down menu. Choose Delete Settings from the Optimize panel's Options menu and click OK in the warning dialog box. Using Manual Settings Although the saved settings are convenient and can be used for most exported Web graphics, there are still some times when you'll need to tweak an image by hand. Fortunately, Fireworks enables you to manually optimize your images in the Optimize panel. Manually Optimizing JPEGs Starting with JPEGs, use the Quality setting to control the amount of compression applied to the image. Enter a number between 1 and 100 (or use the Quality slider). The higher the number, the better the quality and lower the compression. In general, quality settings over 80 are pretty close to the original image. Settings between 60 and 80 are more compressed with generally acceptable quality. Settings below 60 are a gamble as quality begins to degrade quickly (Figure 27.8). Figure 27.8. Differences in JPEG quality can be seen between the image on the left, set at 80% quality, and the image on the right, set at 40% quality. 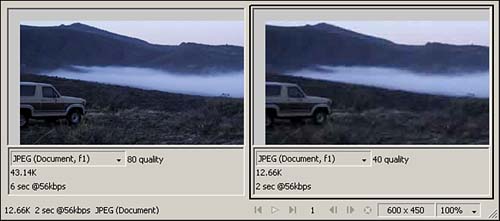
Selective Quality enables you to optimize different regions of the image separately. This control is useful for images with distinct backgrounds and foregrounds. To use selective JPEG compression, identify one region in the image that will use two different compression settings. There can be only one selective JPEG mask. Use any of the bitmap selection tools (Marquee, Oval Marquee, Lasso, Polygon Lasso, Magic Wand, and so on) to enclose a region. (Figure 27.9). Figure 27.9. Define a selective JPEG mask, using the bitmap selection tools. 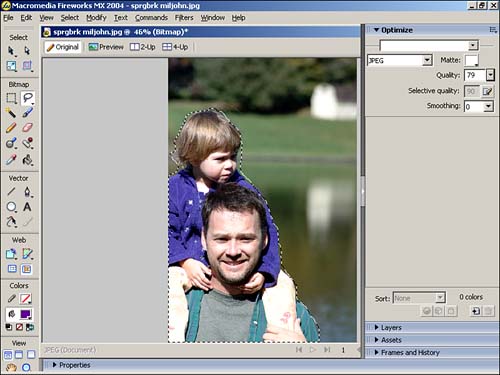
While the marquee area is selected, choose Modify, Selective JPEG, Save Selection as JPEG Mask. A translucent pink mask appears over the selected region. In the Optimize panel, double-check that JPEG is the selected file type and use the Quality slider to affect everything outside the mask. In Figure 27.10, the background would be affected. Figure 27.10. Use one of the Preview buttons to see how the Quality setting affects the area outside the selected region of the image. 
When you have made your adjustments, look at your handiwork by selecting one of the Preview buttons. Smoothing blurs the transitions between sharp edges in an image. Smoothing makes it easier for an image to be compressed, but also degrades the quality. Smoothing settings below 3 seem to strike the best balance between image quality and file size. Sharpen Edges (located in the Options menu) has the opposite effect of Smoothing. Edges are sharpened, often resulting in an improved image quality. File size, however, is increased. You cannot control the degree of sharpness. It is either on or off. The Progressive setting (located in the Options menu)affects only display, not image quality. There is typically a slight increase in file size, however. When the image is downloaded to the Web browser, a low-resolution version appears first. The details are then gradually filled in. The faster the Internet connection, the more seamless this progression appears. Manually Optimizing GIFs The GIF format uses 8-bit or lower indexed color, which means that it uses 256 or fewer colors and tracks each color separately. Accordingly, the trick to getting the best optimization with the GIF format lies with the color palette. To modify that palette, choose the palette type and the number of colors in that palette. Other choices include dithering and whether or not to apply lossy compression. To choose a palette, use the Indexed Palette drop-down menu in the Optimize panel (or the Export Preview dialog box) (Figure 27.11). Select one of the following choices: -
Adaptive ” Derived from the actual colors in the document and often produce the highest quality image. -
Web Adaptive ” Converts colors that are close to the Web Safe palette colors to the appropriate Web Safe color. -
Web 216 ” A palette of the 216 colors common to both Windows and Macintosh computers. -
Exact ” Contains only the colors used in the original image. If the image contains more than 256 colors, the palette automatically switches to Adaptive. -
Macintosh ” Contains the 256 colors defined by Macintosh platform standards. -
Windows ” Contains the 256 colors defined by the Windows platform standards. -
Grayscale ” Contains a palette of 256 or fewer shades of gray. -
Black and White ” Converts all pixels to either black or white. -
Uniform ” Selects colors mathematically, based on RGB pixel values. -
Custom ” Palettes are loaded from an external palette (ACT file) that you have previously created. Figure 27.11. Select one of the eight GIF color palettes from the drop-down menu in the Optimize panel. 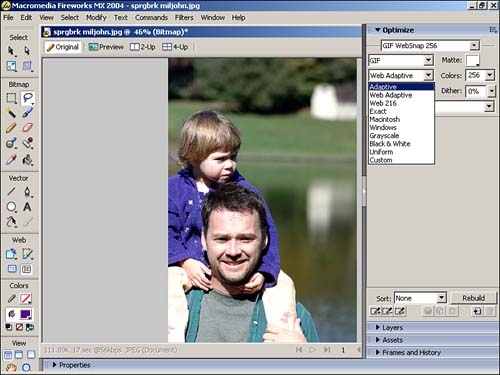
To choose the number of colors, or color depth, select a number from the Maximum number of colors drop-down menu. Select a color depth that best represents the color integrity of the original image (Figure 27.12) Figure 27.12. Varying the color depth affects file size and image quality. 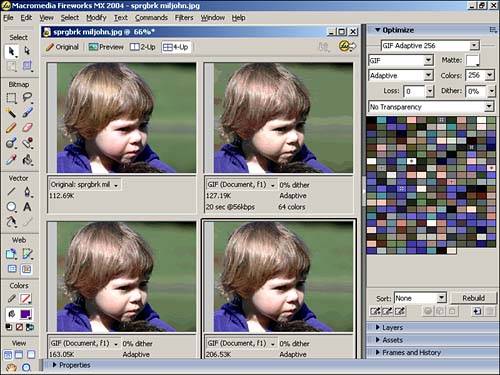
Although the GIF format uses lossless compression, you can still apply lossy compression by using the Lossy GIF Compression slider. To apply lossy compression to the GIF, drag the slider or enter a number in the field. The higher the number, the higher the compression and the lower the image quality. Interlacing is similar to the Progressive setting for JPEG. When the image is downloaded to the Web browser, a low-resolution version appears first. The details are then gradually filled in. If there will be a lot of graphics on the Web page, interlacing allows the images to appear onscreen faster, even though they are not the final image. Turn on interlacing by selecting Interlaced from the Options menu. |