| Flash offers a unique fusion of graphics, animation, and interactivity. Not only can you use Flash to create intricate graphics and animated content, but you can also use ActionScript, Flash's scripting language, to enable the users to control the delivery of that content. Introduction to Flash Interactivity You can script Flash movies to respond to a variety of user behaviors, from mouse clicks to typed input in text fields. Interactivity can be as simple as a button click shifting the playback to a different frame or as complex as dynamically loaded menus . Easy ActionScripting with Behaviors  | Behaviors make creating interactivity easier than ever in Flash MX 2004 by completely automating the process of adding ActionScript to objects such as buttons , movie clips, text fields, and video and sound files. |
Only a limited set of behaviors ships with Flash MX 2004. These are handy for the scripter and a godsend for the non-scripter. In addition, programmers can create behaviors, using XML with embedded ActionScript, via Macromedia's new XML-to-UI application programming interface (API). Thus, new behaviors will be available, like other Flash extensions, through Macromedia Exchange. The basic procedure for applying a behavior is as follows : - Select the object to which you want to apply the behavior.
- On the Behaviors panel, click the blue plus sign and roll down through the various categories.
As you roll over each category, the behaviors in that category display in a pop-up menu. The behaviors that appear may change depending on various factors. For instance, if you have a movie clip selected on the Stage, the Movie clip category will have a dozen options. If you don't have a movie clip selected, eight of these dozen options (Bring Forward, Bring to Front, Duplicate Movie clip, Send Backward, Send to Back, Start Dragging Movie clip, Stop Dragging Movie clip, and Unload Movie clip) are not present, because they don't make any sense.
- Highlight and click on the behavior you want to apply.
You may get a warning if the behavior is about to do something you may not expect. For example, if you select the "Go to Web Page" behavior in the Web category with no button or movie clip selected, the behavior creates a new empty movie clip and attaches the ActionScript to it. However, before doing that, it warns you, giving you a chance to cancel.
You also get a dialog that typically allows some configuration. For instance, for the Go to Web Page behavior, you enter the URL of the Web page and select an Open In option to open the Web page in the same browser page that is already open , the parent of that page, a new page, or the top-level parent of the current page.
Data Behaviors There is just one Data behavior, Trigger Data Source, available in Flash MX 2004 Professional. It causes a data component, such as the WebServiceConnector or the XMLConnector, to retrieve data.  For an example of using the Trigger Data Source behavior with the WebServiceConnector, see "Web Services," page 672 , in Chapter 23, "Using Flash for Dynamic Data." For an example of using the Trigger Data Source behavior with the WebServiceConnector, see "Web Services," page 672 , in Chapter 23, "Using Flash for Dynamic Data."
Embedded Video Behaviors Embedded Video Behaviors include three standard VCR-type controls: Pause, Play, and Stop. In addition, there are two commands to hide the video and make it visible again: Hide and Show. Media Behaviors Four behaviors work with the Flash Professional Media Components. The four functions are as follows: -
Associate a MediaController component with a MediaDisplay component. -
Associate a MediaDisplay component with a MediaController component. -
Implement cue-point navigation based on frame labels. -
Implement cue-point navigation for slides. Cue points are a great new feature : They enable video playback to trigger events. For example, you could have sounds, images, and text change based on what is happening in the video. To create a cue point, select the component and click the + (plus) sign in the cue point panel at the bottom of the Component Inspector. Enter the name of a slide or frame label ( Name ) and a time ( Position ). Then, using the Behavior panel, create a Media behavior implementing cue point navigation for either frame labels or slides. The named label or slide is displayed when the video reaches the specified time. You can also use ActionScript to listen for cue-point events. Each cue point is a property of a MediaDisplay component or a MediaController component. A cue point is an object with two properties: a time and a name. When the playhead reaches a cue point time, the cue point object broadcasts a cuePoint event. Listeners for this type of event receive the name, which can be used to go to a frame or a slide of the same name, or to perform any other desired action. Projector Behavior There is just one Projector behavior, Toggle Full Screen Mode, available only when a movieclip or button is selected. When you publish as a projector, as opposed to an SWF, it is often desirable to operate in full-screen mode, so that there is no other distracting content on the screen. This behavior does that for you. Movieclip Behaviors When a clip is selected, available Movieclip behaviors are Bring Forward, Bring to Front, Duplicate Movieclip, Goto and Play at Frame or Label, Goto and Stop at Frame or Label, Load External Movieclip, Load Graphic, Send Backward, Send to Back, Start Dragging Movieclip, Stop Dragging Movieclip, and Unload Movieclip. Typically, a movie clip behavior occurs only when the user clicks the movie clip to which the behavior is applied. For example, if a "Bring" or "Send" behavior is applied, then when the movie clip is clicked, it changes its depth in the indicated way. For example, "Bring to Front" makes it appear in front of all other clips. For more information on depth management, see "Visual Stacking for Siblings: Depth Numbers," page 526 , in Chapter 20.
Behaviors that can be applied to the Main Timeline, such as the "Goto and Play at Frame or Label" behavior, do not require a click when applied to the Main Timeline. Sound Behaviors There are five Sound behaviors. Table 18.5 shows the behaviors and their ActionScript equivalent. Table 18.5. Sound Behaviors | Behavior | ActionScript | | Load Sound from Library | Sound.attachSound() | | Load Streaming MP3 File | Sound.loadSound() | | Play Sound | Sound.start() | | Stop All Sounds | StopAllSounds() | | Stop Sound | Sound.stop() |
For step-by-step instructions for using the StopAllSounds() global function, see "Turning Off Sound," page 417 , earlier in this chapter.
Web Behavior There is just one Web behavior: "Go to Web Page." See details on the "Go to Web Page" behavior at the beginning of this "Behaviors" section, page 418 .
Buttons Buttons are interactive, four-frame movie clips. They provide feedback to users by changing in reaction to the users' actions, alerting the users that they can perform some new action. They are used much less now than in previous years , having been to a great extent replaced by button movie clips and the Button component. However, the traditional button is still a useful and usable tool. The process for creating a button movie clip is described in "Movie Clip Events," page 513 , Chapter 20.
When you create a button symbol, Flash automatically opens a four-frame button timeline. The four frames represent the button's Up, Over, Down, and Hit states. These frames can contain simple graphics, animated movie clips, or sounds. Although you can use different graphics for the different button states, it is important to maintain some sort of consistent button appearance. If a button changes dramatically in response to users' mouse movements, users may not experience the button as a single, unified object. Simple Buttons Simple buttons employ graphic variation, such as changes in color , to create the visual button states ”Up, Over, and Down ”and provide visual cues to the users that they can perform an action and exercise some control over the movie's playback. To create a simple button containing static graphics, follow these steps: - Choose Insert, New Symbol or press Cmd-F8 (Mac) or Ctrl+F8 (Windows). The Create New Symbol dialog box launches.
- Type a name for your button in the Name field and select Button for the behavior.
- Click OK. A four-layer button timeline is created with a keyframe in the first frame, the Up state.
- Use the drawing tools to create a visual form for your button in the Up frame. Button symbols can have multiple layers, so you can separate button graphics onto separate layers , as shown in Figure 18.34.
Figure 18.34. Use any of the drawing tools to create a graphic form for your button in the Up frame. 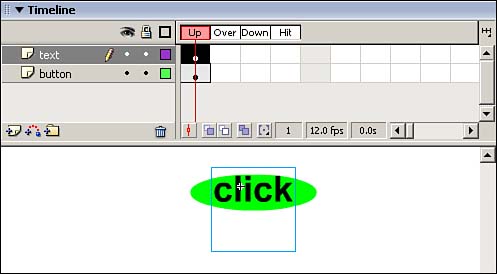
- The Over state enables you to create rollovers. Click to select the frame beneath the Over label. If you want to change graphics in multiple layers to create your rollover effect, Shift+click to select frames in more than one layer. Choose Insert, Keyframe or press F6 (to add keyframes to those layers. Your button graphics from the first frame appear on the Stage.
- Select the button graphics on the Stage and make changes to create a rollover state.
- To create a click state for your button, select the frame(s) beneath the Down label; then repeat steps 5 and 6. Try offsetting your graphics by moving them down and to the right by a few pixels in the Down frame. This movement creates the illusion that a button is being depressed.
- The Hit state defines the clickable area of your button. Add a keyframe beneath the Hit label in the layer that contains your button shape. Be sure that your shape covers the entire area that should register a button click. You might need to draw a separate shape in the Hit frame to cover the entire button area.
Hit Me Hit states must be well defined for your button to be usable. Often a button graphic defines the area you want to be clickable, such as a rectangular box behind your button text. Then it's easy to use the same graphic in the Hit frame. However, if a button consists solely of text, it's vital to draw a generous shape in the Hit frame that encompasses the text. Otherwise , users must click exactly within the letterforms for a click to register. |
- Click the Back arrow beneath the folder icons or choose Edit, Edit Document to exit symbol-editing mode and return to the Main Timeline.
- Choose Window, Library or press Cmd-L (Mac) or Ctrl+L (Windows) to open the Library panel.
- Locate your button in the Library and drag an instance onto the Stage.
- Choose Control, Enable Simple Buttons to preview your button on the Stage. Move your mouse cursor over the button and click to see the Over and Down states. The Hit state is not visible during playback, but it defines the area of your button graphic that responds to the mouse and triggers the Over and Down states.
Your simple button graphics are complete, but your button doesn't actually do anything at this point. You need to add ActionScript so that your button does more than change appearance in response to the user's mouse. The easiest way to assign a simple action to a button is to use Behaviors. Any behavior can be applied to a button. For more on Behaviors, see "Easy ActionScripting with Behaviors," page 418 , earlier in this section.
Advanced Buttons Buttons can react to user interaction in myriad ways. Advanced buttons go beyond simple graphics and use sound or animated movie clips to denote button states. You can add sound to any of the button frames in place of or in addition to simple graphics. Sound is typically added to the Over or Down frames. Follow these steps to add sound to a button: - Insert a new layer in your button symbol. Name it sound . It's best to place a sound on its own layer.
- Within the sound layer, insert a keyframe under the button state to which you want to add your sound.
- With the keyframe selected, drag an instance of a sound from the Library to the Stage. The sound is added to the button frame.
- In the Property inspector, set the sound synchronization to Event.
You can also create animated buttons by placing movie clips in button frames. It's best to use short animations and to limit your animations to a single button state; otherwise, the animations can become distracting and make it difficult to differentiate the different button states. To add an animation to a button state, follow these steps: - Create a movie clip for a button state.
- Create a button and add a keyframe to the frame where you want to create an animated state.
- Drag an instance of your movie clip from the Library to the Stage. Be sure to align your movie clip with graphics in other button frames so that the button appears in a consistent form. Use guides to mark the placement of your button across frames, to avoid unintended movement of your button when it is clicked or rolled over.
NOTE Alignment of elements, particularly text, across button frames is crucial. If elements are not aligned, they appear to jump between button states. For more information about using guides and alignment, see "Grids, Guides, and Guide Layers", page 354 , in Chapter 16, "Working with Vector Graphics and Bitmaps."
- After you finish making other button frames, return to the Main Timeline and drag an instance of your button onto the Stage.
- Test your movie by choosing Control, Test Movie.
CAUTION You cannot preview embedded movie clips in the Flash editor, which displays a single timeline at a time. Only the first frame of an embedded movie clip is visible within the Main Timeline.
You can also create invisible buttons ”buttons that consist of a Hit state only. Why would you use an invisible button? Invisible buttons have been used to create hotspots, or clickable areas of graphics or movie clips. As you can do with imagemaps in HTML, you can place a series of invisible buttons over a graphic that you want to use for navigation. By using invisible buttons, you avoid having to create individual buttons containing slices of the graphic. However, the improved MX object model allows you to assign button interactivity directly to movie clips. Then you can use ActionScript to check for the mouse location. Also, using invisible buttons to create imagemaps is a disaster in terms of accessibility, because invisible buttons do not contain any text for screen readers and other assistive technologies to read. For more information about Flash accessibility, see Appendix B, "Making Flash Accessible," page 977 .
Menus Menus enable users to navigate through your movies and to choose when and in what order content is delivered. Menu-based navigation is vital to much Web-delivered content. There is no single standard for navigating Web content, such as turning pages in a book, or for neatly chunking Web content into easily indexed sections, such as individual pages within a book. Flash's capacity for nested timelines means that there can be multiple paths through movies, and Web conventions such as breadcrumbs , which detail a user's path to a particular Web page, are not standard in Flash. Flash content can also be separated into individual SWFs, which can be loaded on demand to conserve bandwidth. For example, an online clothing retailer would be wise to separate different clothing lines into separate movies so that users looking for women's clothing need only wait for the desired Women's line to download, not the entire line from Men's to Children's. It's important to plan your movies well, with navigation that allows users to maneuver both within and between SWFs. Using the Timeline to Structure Documents A simple way to structure interactions within your movie, requiring minimal scripting, is to place movie clips containing sections of your Flash content at keyframes on the timeline. These keyframes can be given corresponding frame labels, which can then be accessed using ActionScript. Content sections of your movie can be placed into separate movie clips. For example, you could have Home, Services, Portfolio, About, and Profiles movie clips to correspond with menu items for a Flash site. You can then assemble the sections of your site on separate layers on the Main Timeline, as shown in Figure 18.35. Figure 18.35. Sections of your movie can be assembled on separate layers on the Main Timeline. 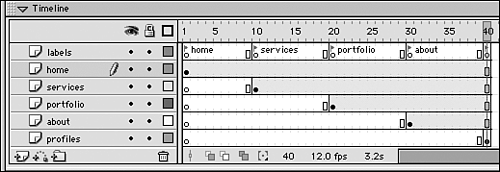
Each section needs its own layer, keyframe, and frame label. So, create a layer for each section. It's important to isolate each section on a different frame number so that you can write a script instructing the playhead to stop on a particular frame to access that section's content. Doing so requires staggering keyframes for the sections so that each occurs on a different frame number. Create a new layer for your labels, and add keyframes with labels corresponding to each of your section keyframes. You could simply assign your scripts according to frame number, but should you need to add new sections to your site, you'll have to change your scripts. Using labels allows you to easily add new content without having to update your existing scripts. You can stagger the content keyframes so that the sections are placed on consecutive keyframes, but if you do, you won't be able to read the corresponding frame labels on the timeline. However, you can space out the keyframes so that your labels are legible within the timeline for quick reference. Then, when you create your navigation system, you can assign button actions to access the different sections of your site by moving the playhead to the different section frame labels. Track as Button and Track as Menu Item Two important criteria for creating a Flash menu are available space and type of menu data. How much physical space does your layout allow for menu items? Will menu items change? If so, how often? Will menu data need to be dynamically loaded from external sources? A simple series of menu buttons ”the classic Web menu, shown in Figure 18.36 ”can be used if your site is small, with few menu items that should not require frequent updates. Figure 18.36. Simple, static menus can consist of a series of buttons. 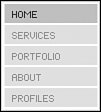
When you create a button instance, you can set its properties in the Property inspector to Track as Button or Track as Menu Item. Track as Button, the default, defines a button's events independently of any other buttons. If a user clicks and drags from one button to another, the rollover is triggered only on the original button; the second button is independent of the first and does not track mouse events that occur on other buttons. Track as Menu Item, however, allows button events to be triggered by mouse events that may have started on other buttons. If a user clicks and drags from one button to another, releasing the mouse over the second button, the second button's rollover and click states are triggered. Buttons that are menu items should be set to Track as Menu Item. Menus can also be extremely complex, triggering advanced scripts, even involving the loading of external data and XML. Dynamic menus can be completely generated on demand. To learn more details about integrating XML data into Flash movies, see "XML Data," page 634 , in Chapter 22.
|