| Sound adds depth and resonance to your Flash movies. Even before it was possible to incorporate sound tracks with movies, live music was used as accompaniment to accent action and stir emotion during silent movies. To appreciate all that sound adds to visual experiences, try to imagine Jaws without the menacing sound track. Understanding Sound  | There are two important audio- related enhancements in Flash MX 2004: the ability to retrieve ID3 metadata from MP3 files and the ability to load .flv files, which may contain only audio. Both are covered in other chapters. |
 For more on .flv loading, see "NetConnection, NetStream, and the Rich Media Classes," page 647 , and "Working with .flv Files and the NetStream Object," page 649 , in Chapter 22, "External Communications." For ID3 metadata, see "Sound Events," page 515 under " Sound.ID3 Attributes." For more on .flv loading, see "NetConnection, NetStream, and the Rich Media Classes," page 647 , and "Working with .flv Files and the NetStream Object," page 649 , in Chapter 22, "External Communications." For ID3 metadata, see "Sound Events," page 515 under " Sound.ID3 Attributes."
There are some critical differences in the way you perceive visual information and the way you perceive sound. Because you blink somewhere in the neighborhood of 20 times per minute, with each blink lasting approximately a quarter of a second, your brain is accustomed to interruptions in the flow of visual data and is extremely adept at filling in gaps in visual information. This ability to connect the visual dots is what allows you to perceive film as continuous motion, when it is actually a series of static images shown in quick succession. Your brain is not nearly so forgiving of or able to compensate for gaps in audio information. On the contrary, you are especially sensitive to variations in sound. Whereas film visuals are delivered in static frames , film sound is delivered in a continuous stream or sound track. Content delivery over the Web, however, makes it difficult to emulate a continuous sound track. Sound is produced when objects vibrate. These vibrations displace the molecules of a gas, liquid, or solid, and travel through these substances as sound waves. When these waves hit your eardrums, the brain perceives the vibrations as sound. As shown in Figure 18.27, you differentiate between sounds according to variations in two characteristics of the sound wave: Figure 18.27. The anatomy of a sound wave: Frequency determines pitch and amplitude determines loudness. 
Flash must reproduce these characteristics of sound waves to be able to deliver sound. Preparing Sounds for Flash To reproduce sound digitally, sound waves are sampled . Sampling is the process of measuring and recording the characteristics of a sound at fixed time intervals. Each measurement produces one sample. For digital reproduction, the characteristics of the sample are used as the characteristics of the entire time interval. This is always a simplification of reality, because the digital reproduction goes by discrete steps, rather than changing smoothly, as shown in Figure 18.28. The more samples you take, the more closely the digital reproduction approximates the real sound wave. The number of samples captured per second, known as the sampling rate and measured in hertz (Hz), is one of the primary factors in determining digital audio quality. Figure 18.28. Sound sampling: The gray bars represent samples of a sound wave. 
The sampling process should sound familiar because it echoes the process of creating animation using frames. The sampling rate is similar to the frame rate of a movie, in frames per second. It is also similar to pixel resolution. Table 18.2 shows standard sampling rates and the associated fidelity, or sound quality. Table 18.2. Sound Sampling Rates | Sampling Rate | Sound Quality | | 44.1kHz | CD quality | | 22.05kHz | FM radio quality; popular Web playback choice | | 11.025kHz | Lowest recommended quality for short music clips; high quality for speech | | 5kHz | Minimum quality for speech |
Sampling precision, or bit depth , determines how many discrete amplitude levels are possible when sampling a sound. This is analogous to the bit depth of bitmap images. The higher the bit depth, the more accurate the representation of the amplitude. Table 18.3 shows standard sound bit depths and the comparable sound quality. Table 18.3. Sound Bit Depth and Associated Quality | Bit Depth | Sound Quality | | 16 | CD | | 12 | Near CD | | 8 | FM radio | | 4 | Lowest acceptable for music |
As you might expect, higher sampling rates and bit depths result in larger sound file sizes. However, these two components of reproduced sound can be independently manipulated to create smaller files. Compared to music, speech has fewer variations in pitch, but may have greater fluctuation in amplitude or volume because of pauses between words and sentences. Unwanted hissing or noise can occur during these pauses. Therefore, speech requires a lower sampling rate with a higher bit depth to reduce the occurrence of noise or hissing during pauses. Conversely, music has a greater range in pitch, or frequency, requiring a higher sampling rate to reproduce the pitch variation. Music typically has a narrower range of volume than speech does, so the bit depth can be lower. Similarly, the choice between stereo and mono sound has a large impact on file size. Naturally, two audio channels make for twice the file size . Stream Versus Event, External Versus Embedded There are two different ways of classifying sounds in Flash. One has to do with how sounds are synchronized within the Flash movie. The other has to do with how they are loaded into the Flash movie in the first place. However, these two classifications are not entirely independent of one another, which creates room for confusion. Let's start with how sound files are loaded. There are two possibilities here: embedded and external . Embedded sound files are imported into the FLA and reside in the Library and perhaps also on the Timeline at authoring time; they are contained in the SWF at runtime. External files are not imported and continue to reside outside both the FLA and the SWF. Embedded files can come in a wide variety of formats. External sound files must be either MP3 or FLV. This chapter focuses on embedded sound files. To learn more about externally loaded sounds, which are loaded and controlled with ActionScript, see "Sound Events," page 515 , in Chapter 20, and "The Sound Class," page 651 , in Chapter 22.
Moving on to synchronization within the Flash movie, embedded sounds are divided into two types: event sounds and stream sounds. Event sounds are triggered by events such as the mouse rolling over a button, or the playhead entering a particular frame. After that, they are not synchronized with the Timeline. They simply continue playing, independently of whatever else happens in the movie. In fact, they keep playing even if the movie stops. (Like all other sounds, you can stop event sounds with an ActionScript stopAllSounds() command.) A minute-long event sound can play within a one-frame movie. An event sound is stored in its entirety in the first frame in which it appears. Only changes, such as fade-ins and fade-outs, are stored in subsequent keyframes. With a stream sound, in contrast, a small, precisely-measured piece of the sound is stored in each frame where it is supposed to play. Thus, stream sounds are tightly synchronized with the Timeline. If the movie stops, the stream sounds stops, too. If the movie jumps to a different frame, the stream sound at that frame plays. The movie has to have enough frames to accommodate all the stream sound that you want to play. External sound files always behave like event sounds in terms of synchronization within Flash. They have no relationship with the Timeline, do not care which frame is currently playing, and continue to play even if the movie stops. What can be confusing is that when you load an external MP3 (using the loadSound() method of the Sound class), you can choose to load it as an event sound or as a streaming sound. This does not affect synchronization in any way! What does it affect, then? With external MP3s, the event versus streaming distinction determines whether the whole sound file has to download before it can start to play. If you download as an event file, the whole file must download before it can start to play. Playback has to be explicitly initiated; it's not automatic. If you download as a streaming file, there is just a short wait while the streaming buffer fills, and then the file starts to play. Playback begins automatically. (Audio-only FLV files are always loaded as streaming files in this sense.) Event- and stream-embedded sounds follow the same rule about starting to play, with one slight complication. The basic idea is that embedded event sounds download completely before you can start to play them, and require a trigger to start. The user experiences a wait in the frame where the sound first appears. Embedded-stream sounds start immediately and automatically, after a short pause to fill the streaming buffer; they don't have to download completely to start playing, and they don't require any event to start playing. The complication is that you can configure embedded sounds to export in the first frame of the movie. If you do that, both embedded-event sounds and embedded-stream sounds must load completely before they can start playing. The user experiences a wait before the movie starts. Event sounds still have to be triggered by an event, and stream sounds still don't require an event. How event sounds are triggered differs for embedded and external files. An embedded-event sound typically starts when the playhead enters the frame that the sound is in. For external MP3s loaded as event sounds, you initiate playback by scripting, using the start() method of the Sound class. With both embedded and external sound files, if you set things up so that the entire file loads before starting to play, there is a reward: The quality of the sound is likely to be optimal. If, on the other hand, the file is continuing to download while it plays, a slow Internet connection can degrade the quality of the sound. (The likelihood of this occurring can be greatly reduced for FLVs if you configure a large streaming buffer.) Another area of similarity between embedded and externally loaded sounds is how they behave if playback is re-initiated while the sound is already playing: With embedded or external streaming, the first instance stops when the second instance starts playing. With event sounds, whether embedded or external MP3, that's not necessarily true: The first instance of the sound may continue while the second instance plays simultaneously . I say "not necessarily" because, once again, there is a wrinkle for embedded files: As discussed in the following section, you can use the Sync field in the Property inspector to configure an embedded event sound so that the first instance stops playing when the second instance starts. Table 18.4 summarizes some of the important differences between embedded event sounds and embedded stream sounds. One other characteristic shown in this table is whether the global sound settings configured via File, Publish Settings override similar settings that can be applied to individual sounds in the Sound Properties dialog. For event sounds, the override behavior is configured using the Override Sound Settings check box on the Flash tab in Publish Settings. With stream sounds, the situation is more complex. If the stream sound is not exported in the first frame, Publish Settings always overrides settings in the Sound Properties dialog. If the stream sound is exported in the first frame, behavior is inconsistent, and you should make sure that both the global and the individual settings are the same, so that you know what you're going to get. Sound settings and the Sound Properties dialog are discussed later in this chapter, under "Optimizing Sounds," page 415 .
Table 18.4. Embedded Sounds: Event Versus Stream | | | Exported in First Frame | Not Exported in First Frame | | Event | Publish Settings Override Sound Properties | Configured in Publish Settings | Configured in Publish Settings | | | Download fully before starting to play | Yes | Yes | | | Synced to timeline | No | No | | | Automatic start | No | No | | | Assured quality | Yes | Yes | | Stream | Publish Settings Override Sound Properties | Inconsistent | Publish Settings always override | | | Download fully before starting to play | Yes | No | | | Synced to timeline | Yes | Yes | | | Automatic start | Yes | Yes | | | Assured quality | Yes | No |
From here on, this chapter discusses only embedded sounds. Synchronization Options When you place a sound on the Stage, you can select a synchronization option in the Property inspector. The synchronization options are Event, Start, Stop, and Stream. Event makes the sound an event sound. Start prevents an event sound from overlapping if the triggering event is repeated. Start sounds play only one at a time. Stop silences the sound to which it's applied and any event sounds. Stream synchronizes the sound to the animation. When you place a sound on an empty Timeline, it occupies just a single frame. That's all an event sound requires to play in its entirety. Stream sounds, however, play only during frames that contain the sound. If you are using stream sound, you need to add frames to your sound layer to display and play the sound fully. Select the last frame in the sound layer that you want to contain the sound, and press F5 to insert frames. The waveform of your sound will appear across the frames it occupies, as shown in Figure 18.29. For long and/or low-amplitude sounds, you may need to increase the height of the layer to see the waveform. Right-click (Windows) or Ctrl-click (Mac) on the layer name or icon, select Properties from the context menu, and select 200% to 300% from the Layer Height drop-down menu. Figure 18.29. A sound waveform in the Timeline. 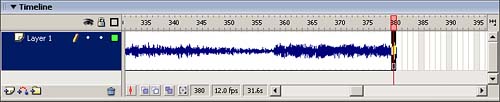
Importing Sounds Flash allows you to import assets that cannot be created within Flash, such as sounds or bitmaps, and use them in your movies. Sounds that are imported into Flash are placed in the Library. The following sound file formats can be imported into Flash MX 2004: -
WAV (Windows only) ” The Waveform Audio File Format was developed for the Windows platform and is the standard sound file format for Windows. -
AIFF (Macintosh only) ” The Audio Interchange File Format developed by Apple is the standard sound file format used on the Macintosh. -
MP3 (Macintosh and Windows) ” (MPEG-1 Audio Layer-3) offers tremendous compression of sound data without sacrificing sound quality. Original CD data can be compressed by a factor of 12 using MP3 compression. If you have QuickTime 4 or higher installed, you can also import the following formats: -
Sound Designer II (Macintosh only) -
Sound Only QuickTime Movies (Windows or Macintosh) -
Sun AU (Windows or Macintosh) -
System 7 Sounds (Macintosh only) MP3 is the only sound format you can import that is precompressed. Therefore, MP3 file sizes are smaller than WAV or AIFF files. To import a sound, choose File, Import, Import to Library. (If you choose Import to Stage, Flash still imports only to the Library!) Select a sound and click Open . The sound is added to the Library. To preview a sound, select it in the Library and click the black arrow that appears over the sound waveform in the window. The best approach is to place a sound on its own layer. With an empty layer selected, drag a sound from the Library onto the Stage. The sound is placed on the selected layer. Sound properties are shown in the Property inspector, as shown in Figure 18.30. Notice that the sound sampling rate, number of sound channels, bit depth, length in seconds, and file size are displayed in the bottom right of the Property inspector (22kHz Stereo 16 Bit 232.2 seconds 1858KB, in this case). Figure 18.30. Sound attributes can be accessed and edited in the Property inspector. 
"Editing" Sounds Flash does not allow true sound editing ”changing the sound wave itself. However, you can change the way Flash plays a sound. The Effect pop-up menu in the Property inspector (refer to Figure 18.30) allows you to manipulate volume effects such as fading in and out, and offers some control over stereo channels. None, the default option, applies no effects or removes previously set effects. Left Channel/Right Channel allows you to play only one of the sound channels. Fade Left to Right/Fade Right to Left shifts the sound from one channel to the other, creating a pan effect. Fade In gradually increases the volume (amplitude) of a sound over its duration. Fade Out gradually decreases the volume of a sound. Selecting Custom or clicking the Edit button brings up the Edit Envelope dialog box, shown in Figure 18.31, for more flexible volume control. Figure 18.31. The Edit Envelope dialog box allows you to control sound effects. 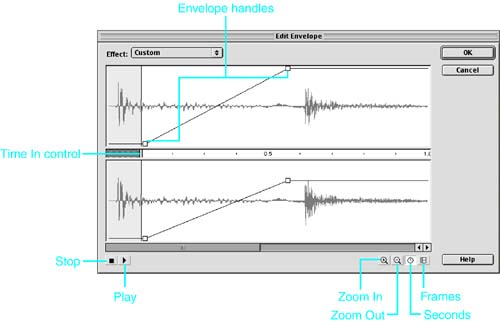
To "cut" a section at the beginning of the sound, drag the Time In control toward the middle of the Edit Envelope dialog box. You'll find a corresponding Time End control at the end of the sound. The sound starts immediately at the new start point, and ends at the new end point. If there is silence, for instance, at the beginning or end of an audio clip, use this feature to eliminate the silence and reduce the size of the SWF. Envelope handles, draggable square icons that appear on a sound channel, allow you to control the volume in a given channel. Each channel has a single envelope handle when the Edit Envelope dialog box is launched. Click and drag the Envelope handle up or down to change the overall volume of the sound. To create a fade in or fade out, click on the envelope lines to create additional envelope handles, up to a maximum of eight total handles. These additional handles allow you to independently drag and control the volume for portions of your sound. Use the Zoom buttons to zoom in on portions of your sound or zoom out to view a sound in its entirety. Click the Seconds or Frames buttons to view your sound in seconds or according to the number of frames. Use the Play and Stop buttons to preview your edits. When you're satisfied with your edits, click OK. Sounds can also loop (repeat indefinitely) or else repeat a designated number of times. With a sound selected, select Repeat or Loop from the Loop Sound drop-down menu in the Property inspector. If you select Repeat, you can also designate a number of times to repeat. Loop repeats indefinitely. CAUTION If you loop a streamed sound, frames are added to the end of your movie to accommodate the looping, increasing the size of the SWF.
Controlling Sound You can control when a sound plays and ends by using keyframes in the timeline or by using ActionScript to access the Sound object. Although sound is time-based, you can force it to begin and end in relation to content in other frames by utilizing keyframes. In this way, you can synchronize sound to animation. The Sound object allows you to extend some control of sound playback to the user. Keyframes You use keyframes to start and stop sounds in sync with animation. To add a sound to an animation, follow these steps: - Create a new layer for the sound and then insert a keyframe in the sound layer to correspond with the place where you want your sound to begin.
- With the keyframe on the sound layer selected, drag your sound from the Library to the Stage to add the sound to the Timeline.
- Insert a keyframe at a later frame in your sound layer where you want the sound to end.
- Click on a frame within the sound, and select a synchronization setting in the Property inspector.
It is especially important to preview your sound if you're truncating it ”stopping it before the sound is over ”to be sure it does not seem to end prematurely or abruptly (unless, of course, that is the desired effect). Linkage and the Sound Object It is possible to control embedded sounds by using the Sound object in ActionScript. Using the Sound object, you can allow your users to control the delivery of sound in your movies. The Sound object allows you to turn sounds on and off, change the volume or the panning of sounds, or start a sound after another sound ends. To use the Sound object to access an embedded sound, you must assign a Linkage identifier to your sound in the Library. Open the Library panel and select your sound. To access the Linkage Properties dialog box, Ctrl-click (Mac) or right-click (Windows) the symbol name and choose Linkage from the pop-up menu, or choose Linkage from the Library options pop-up menu at the upper-right corner of the Library panel. Click in the Export for ActionScript check box. Selecting this option places the symbol name for your sound in the Identifier field and also automatically selects the Export in first frame check box, as shown in Figure 18.32. Figure 18.32. Select Export for ActionScript to enter a Linkage identifier in the Linkage Properties dialog box. 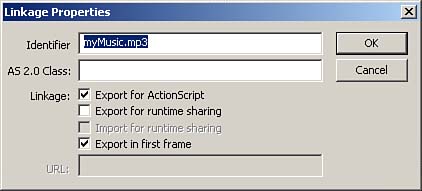
You may prefer to edit the Identifier string that is automatically filled in with your symbol name. Keep your Identifier name simple and descriptive. Don't use spaces. When you're finished, click OK to close the Linkage Properties dialog box. You use the Linkage identifier with the Sound.attachSound() method to instantiate the sound on the Stage. Sounds loaded in this fashion are always event sounds. Optimizing Sounds Because sounds can add significantly to the SWF file size, it is important to optimize them. Ideally, optimization begins before you import your sounds. Flash provides only modest sound-editing capabilities, so take advantage of sound-editing programs if you have access to them. Embedded sounds, whether event or stream, can be compressed individually. To create individual compression settings, double-click a sound symbol's icon in the Library, or Ctrl-click (Mac) or right-click (Windows) and select Properties from the context menu to launch the Sound Properties dialog box, as shown in Figure 18.33. Figure 18.33. By selecting settings in the Sound Properties dialog box, you can compress sounds individually. 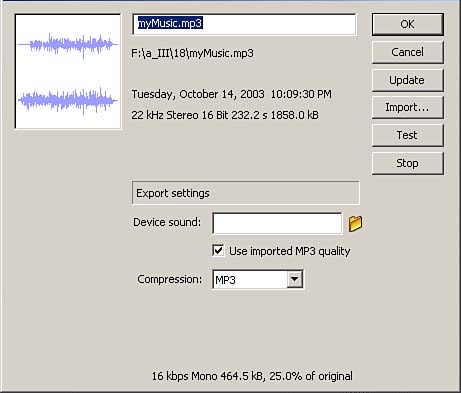
You can choose from several compression options. The first, Default, uses the global compression settings selected in File, Publish Settings (MP3 16-bit mono by default). ADPCM ADPCM, or Adaptive Differential Pulse Code Modulation, compresses 8-bit or 16-bit sound data. It gives you some control over sample rate and a bit depth, and it sounds good with most sounds. However, it can sound very gritty and harsh . For this reason, it is often reserved for short, non-musical, non-speech event sounds, such as button clicks. Selecting Convert Stereo to Mono compresses two mixed sound channels into one. Mono sounds are unaffected by this setting. A sample rate of 22kHz is standard for the Web and is half the standard CD rate of 44kHz. You cannot increase a sound's original kHz rate. You can decrease the bit depth, reducing the range of amplitude variation within sound samples. Lower bit depths and sample rates reduce file size and also decrease sound quality. Be sure to click the Test button to preview your sound at different settings. MP3 Compression MP3 usually offers the best compromise between audio quality and file size, so it is the setting you will choose most often. It is the best option for longer sounds. Choose MP3 from the Compression menu. You can either use the original MP3 compression settings of your imported sound (check Use Imported MP3 Quality) or refine those settings. To edit the settings, be sure that Use Imported MP3 Quality is not checked; then select a bit rate to determine the bits per second for your exported sound. Choose 16Kbps or higher to maintain sound quality. You can also use MP3 to compress stereo tracks into mono. MP3 compression does not allow stereo output at 16Kbps or lower. To get stereo MP3 output, choose a bit rate of 20Kbps or higher and uncheck the Convert Stereo to Mono check box. Finally, you can choose from three quality settings: Fast, Medium, and Best. Test your sound at various quality settings to find the best compression. NOTE Even though you can set individual compression for stream sounds, all stream sounds within a movie are exported together in a single stream, which uses one setting.
Other Compression Options The Raw option exports with no compression. This is the best quality, but the file size is usually unacceptable for the Web. Speech compression uses a specially licensed algorithm for speech from Nellymoser Inc. (www.nellymoser.com). Turning Off Sound You may want to allow the user to turn off sounds. The last thing you want is to drive visitors away from your Flash sites because they dislike your music. To provide this option, follow these steps: - Drag a button component to the Stage (from the UI Components category of the Components panel).
- With the button selected, open the Property inspector and click on the word "Button" in the label field and type in a new label, like "Stop Sounds".
- With the button selected, open the Behaviors panel, click the blue plus sign, go to the Sound category, and click on Stop All Sounds. You'll get a prompt describing the purpose of this behavior (as if it's not obvious from the name).
- Click OK. With the button selected, check in the Actions panel, and you should see the following code:
on (click) { //stopAllSounds Behavior stopAllSounds(); }
- Test your movie by pressing Cmd-Return (Mac) or Ctrl+Enter (Windows). Press your button, and all sounds should stop.
|