| There are two basic ways to use Flash: through visual tools (the "designer" approach) and through ActionScript (the "developer" approach). The Timeline is Flash's main visual organizing tool, allowing you to arrange your content in both time ( frames ) and space ( layers ). It contains the playhead, which indicates the current frame (see Figure 15.1). Figure 15.1. The Timeline controls and organizes frame-based animation. 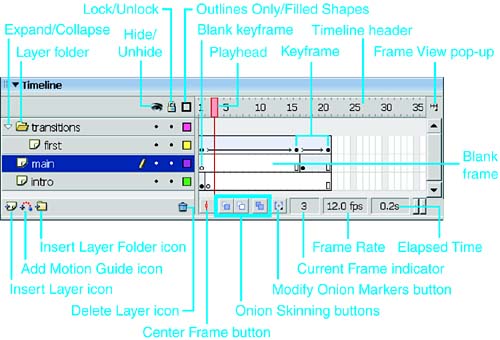
Both approaches can be used together, but frequently one is emphasized over the other. In particular, application-oriented developers frequently use Timeline layers for organizing content, but timing of events is more often determined by scripting than by frames. Frames A frame is the smallest discrete visual time element of the movie. (ActionScript can use sub-frame time intervals.) The simplest form of animation (conceptually, at least), frame-to-frame animation, works like flip-book animation. Each page is a static drawing, but flipping through them quickly in a series creates the illusion of movement. Frames allow you to control the sequencing and pace of your movie, and define the overall length. As with film, animations that take place over fewer frames (at a given frame rate) will appear faster in the final movie than those that occur over many frames. To insert frames, choose Insert, Frame, or press the keyboard shortcut F5. Keyframes Keyframes indicate changes in an animation. Frames display the content of the keyframe that precedes them. It is only when a new keyframe is encountered that the contents of the Stage within a particular layer will change. To insert a keyframe, choose Insert, Timeline, Keyframe, or press keyboard shortcut F6. When you insert a keyframe after an existing keyframe, the new keyframe initially displays the content of the preceding keyframe; you can then make changes to that original content in the new keyframe. To add a keyframe that provides you with a blank slate, you must choose Insert, Timeline, Blank Keyframe, or press F7. Create new content in the blank keyframe, and the movie will suddenly "cut" to that content when it reaches that frame. Keyframes are indicated by filled dots on the Timeline, whereas blank keyframes appear as empty dots.  The Timeline, frames, and keyframes are covered in greater depth in Chapter 18, "Animation, Interactivity, and Rich Media, " page 379 . The Timeline, frames, and keyframes are covered in greater depth in Chapter 18, "Animation, Interactivity, and Rich Media, " page 379 .
Layers and Layer Folders Layers enable you to stack content. Think of each layer as a piece of clear acetate. Anywhere there is no content within a layer, you can see through that layer to the ones below it. Where there is content, it obscures the layers below it. Layers allow you to organize and separate content. Layers also provide the organizing framework for a number of important features, such as applying animation visually (tweening), aligning objects or animating motion along a path (guide layers), and using one object to create a "window" to another object (mask layers). A quirk of Flash is that it merges simple, nongrouped shapes (but not symbols) that coexist on a single layer if they intersect. For example, if two red balls on the same layer touch, they become a single object, as shown in Figure 15.2. Figure 15.2. Simple, nongrouped shapes on the same layer merge, forming a single shape, if they intersect. This is not true of symbols. 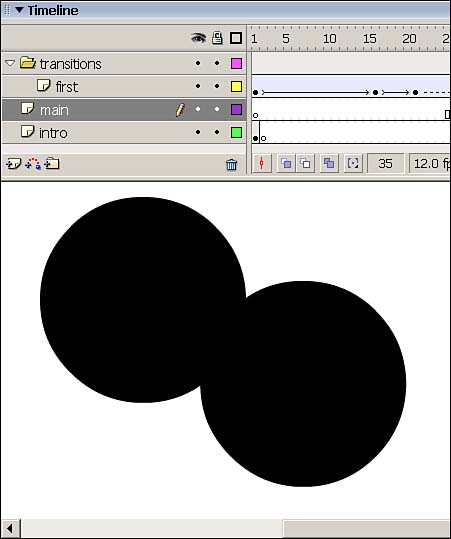
For more on symbols, see "Symbols, Instances, and Library Assets," page 380 , in Chapter 18.
For more on merging objects, see "Strokes and Fills," in Chapter 3, page 33 .
For more on tweening, see "Animating in Flash," page 390 , in Chapter 18.
For more on guide layers, see "Using Layout Aids," page 353 , in Chapter 16, "Working with Vector Graphics and Bitmaps," and "Motion Guides," page 395 , in Chapter 18.
For more on mask layers, see "Creating a Mask," page 356 , in Chapter 16.
Adding layers does not increase the file size for your published movie, so you can use them as needed to organize your content. Flash automatically names layers as they are created and numbers them according to the order in which they are created. Double-click on a layer name, such as Layer 1, on the left side of the Timeline to rename it. Take the time to name your layers well, keeping the names short and descriptive. Well-named layers are signposts directing you to your objects. Large projects can quickly turn into bad road trips as layers multiply, but if you name your layers well, you need never get lost. The icons to the right of each layer allow you to hide, lock, and show layers as outlines, as shown in Figure 15.3. It's a good idea to lock any layer you aren't currently working with so that you don't inadvertently move content. Option-click (Mac) or Alt+click (Windows) the dot on your layer that's under the lock icon to lock all other layers, or individually click the dots in the lock column to lock and unlock layers. Locked layers display the lock icon. You can also hide layers, using the dots under the eye icon, to see content that is obscured by upper layers. Again, Option-click or Alt+click the visibility dot on any layer to hide all other layers. Hidden layers are represented by red Xs in the left column under the eye icon. You can also display layer content as outlines, which can be helpful when you have many overlapping elements on different layers. The solid square in the right column changes to a square with no fill when a layer is displayed as outlines. Figure 15.3. Layer icons enable you to hide, lock, or show layers as outlines. 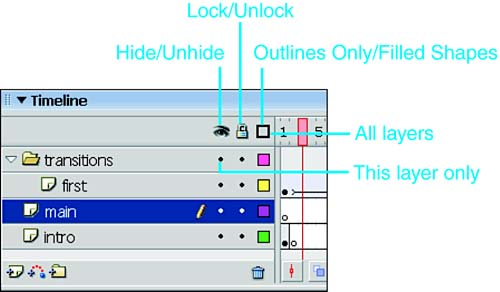
A pencil icon between the layer name and Hide/Unhide column indicates which layer is currently selected and being edited. Keep in mind that you cannot edit a layer that has been hidden. If you select a hidden layer, the pencil icon appears crossed out, as shown in Figure 15.4. Figure 15.4. You cannot edit a hidden layer, as shown by the crossed-out current layer icon. 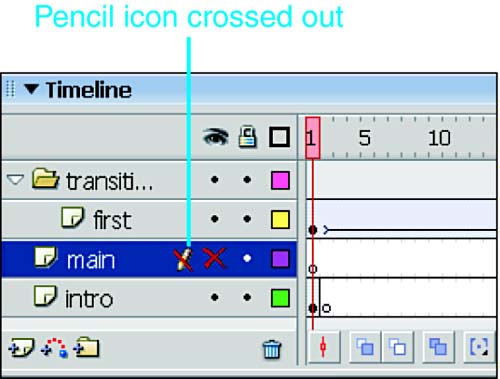
To rearrange layers, click and drag on a layer name and release it into a new position. You can also Shift+click layers to select more than one layer at a time. The icons at the bottom of the Layers area of the Timeline window enable you to add a new layer, add a guide layer, or insert a layer folder. Guide layers help you to align objects. They can be used for static alignment of elements, such as for aligning objects on other layers to objects or custom grids created on guide layers, or can be used as motion guides to keep animated objects on a path as they move. You can turn any layer into a guide layer by clicking the Motion Guide Layer icon. Guide layers do not appear in published Flash movies. Layer folders group and organize layers into folders. Not only can you more easily find elements in your movies, but you also can save a lot of screen real estate by expanding just the folders containing layers you're currently working with. To place layers in folders, simply drag layers onto folder layers. Click the arrow to the left of the folder names to expand and contract layer folders. Onion Skinning and Multiple Frame Editing Flash shows only one frame at a time on the Stage. To facilitate alignment in frame-by-frame animation, you can use onion skinning to display a series of frames simultaneously . The onion-skinning buttons , which allow you to configure onion-skinning, are located at the bottom of the Stage and appear as three sets of overlapping squares. The Onion Skin button, as shown in Figure 15.5, displays frames concurrently. The current frame ( beneath the playhead) appears in full color , while the surrounding frames are dimmed and cannot be edited. You can change the number of frames that are visible by dragging the Start Onion Skin and End Onion Skin markers, which are in the Timeline header (with the playhead). Moving the playhead changes the current frame and the place where the range of onion- skinned frames begins and ends. Figure 15.5. Drag the onion skin markers to display several frames simultaneously. 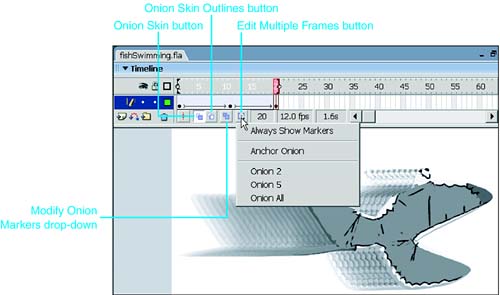
The Onion Skin Outlines button displays the onion-skinned objects as outlines. To edit all the frames that are onion skinned, select the Edit Multiple Frames button. Finally, there is a Modify Onion Markers button. It is a drop-down with options to anchor markers so that they don't move as the current frame changes. You can also specify a range of frames to onion skin: Onion 2 (two frames), Onion 5 (five frames), or Onion All (all frames). |