Enabling Security Features on a Linksys WRT54G 802.11bg Access PointRouter
|
| < Day Day Up > |
|
Enabling Security Features on a Linksys WRT54G 802.11b/g Access Point/Router
The most popular 802.11g device is the Linksys WRT54G 802.11b/g Access Point/Router. The WRT54G gained popularity in 2003 as 802.11g devices became more common and affordable. 802.11g devices operate on the 2.4 GHz band, like 802.11b, but offer speeds up to 54 megabits per second (Mbps). Additionally, 802.11g devices are compatible with 802.11b cards. This section details the minimum steps you should take to configure the WRT54G securely. All of the steps outlined in this section should be done from a computer that is connected to your wired network.
Setting a Unique SSID
The first security measure you should enable on the Linksys WRT54G is setting a Unique SSID. When you log in to the WRT54G, by default, there is no username required and the password is admin. This brings up the initial setup screen (see Figure 10.22).
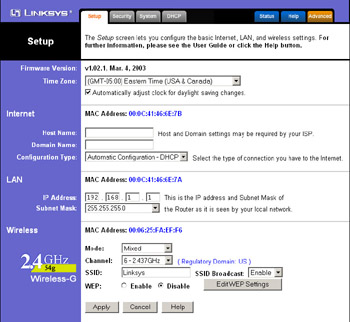
Figure 10.22: The Linksys WRT54G Initial Setup Screen
In the SSID textbox, enter a unique SSID, as shown in Figure 10.23.
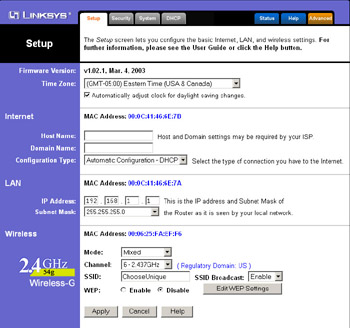
Figure 10.23: Setting a Unique SSID on the WRT54G
Then, click the Apply button to save your settings.
Disabling SSID Broadcast
After you have set a unique SSID, disable the SSID broadcast. From the initial setup screen, select Disable from the SSID Broadcast drop-down box, as shown in Figure 10.24.

Figure 10.24: Disable SSID Broadcast
Then, click the Apply button to save your settings and disable SSID broadcast.
Enabling WEP
Once you have set a unique SSID and disabled SSID broadcast, you need to require the use of 128-bit WEP encryption. From the initial setup screen, choose the Enable radio button next to WEP to require WEP encryption, as shown in Figure 10.25.
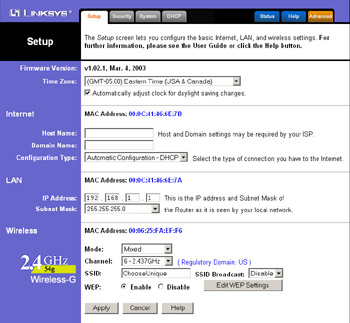
Figure 10.25: Enable WEP on the WRT54G
Next, click the Edit WEP Settings button, opening the WEP Keys window. Select 128 bits 26 hex digits from the WEP Encryption drop-down box to require 128-bit WEP. Type a strong passphrase in the Passphrase textbox. This is the passphrase that will be used as the basis for generating WEP keys. Click the Generate button to generate four WEP keys, as shown in Figure 10.26.
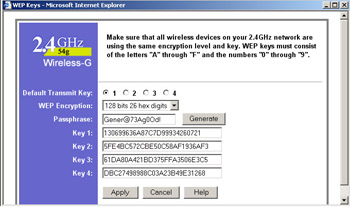
Figure 10.26: The WEP Keys Window
Next, select the key (1–4) that you will initially use by choosing the appropriate radio button next to Default Transmit Key. Finally, click Apply on both the WEP Keys window and the initial setup screen to save your settings.
Filtering by Media Access Control (MAC) Address
After you have set a unique SSID, disabled SSID broadcast, and enabled WEP encryption, you need to filter access to the WRT54G by MAC address.
First, from the initial setup screen click the Advanced tab to display the Advanced Wireless screen (see Figure 10.27).
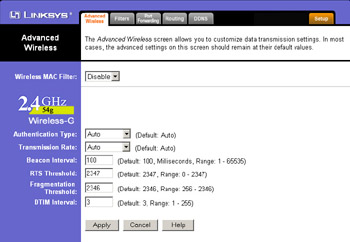
Figure 10.27: The Advanced Wireless Screen
Next, select Enable from the Wireless MAC Filter drop-down box. This will reveal the MAC filter options, as shown in Figure 10.28.
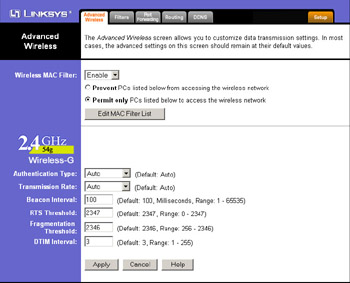
Figure 10.28: The Wireless MAC Filter Options
Choose the Permit Only PCs Listed Below To Access The Wireless Network radio button, and click the Edit MAC Filter List button to display the MAC Address Filter List window (see Figure 10.29).

Figure 10.29: The MAC Address Filter List Window
Enter the MAC addresses of wireless clients that are allowed to access your wireless network in the provided textboxes and then click Apply, as shown in Figure 10.30.
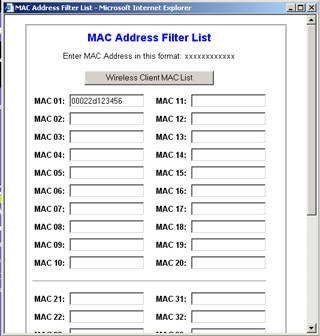
Figure 10.30: Enter Allowed MAC Addresses
Finally, click Apply in the Advanced Wireless window to save your settings and enable filtering by MAC address.
|
| < Day Day Up > |
|
EAN: 2147483647
Pages: 125