| After the designs are approved, the really hard work startsactually creating the assets and designing the dynamic pages. This section focuses on that task. The site is designed to be easily manageable. This means there will be extensive use of the Cascading Style Sheets (CSS) Chris mentioned earlier and the development of the templates that reflect Chris's design vision and accommodate the needs of the technical crew. It is a balancing act. You got a hint of that when Chris mentioned the use of square boxes as opposed to the use of rounded corners. Square boxes can be created using code. Rounded boxes are a lot more difficult. Thus, there are tradeoffs between the design aesthetic and the harsh reality of code. Constructing the Templates In Chapter 7, "The Elements of the Dynamic Page," we covered the basics of building templates and the use of CSS in Dreamweaver MX 2004. In approaching the design of the templates for the Oakbridge Community Center site, we decided to focus on a design that takes full advantage of CSS. The thing about CSS is that it isn't just for formatting the text on a page. You got a hint of that when you did the "pseudo-classes" in Chapter 7. In this design, the placement and function of each element on the page is managed through Cascading Style Sheets. To do this, you must first concentrate on the layout of the page. If you haven't already done so, download the Chapter 10 exercise files from the book's web site to your desktop. -
Open the Community_Ctr_Comp.png file found in the Ch10Ex folder. When Fireworks MX 2004 opens, the first thing you will notice about the image is that we have sliced the banner at the top of the page and the side menu on the left side of the page. If you open your Web Layer, you will see these two slices. -
The first thing to do is to Optimize the image for fast web download. There are two ways of doing this: Use the Optimize panel. This is done by opening the Optimize panel. If the Optimize panel is not included in your panel grouping, select Window, Optimize or press the F6 key to open the Optimize Panel. For this exercise, we will use the Property Inspector to set the optimization. -
Set the optimization value in the Property Inspector to JPGBetter Quality. Tip You can only use the Property Inspector to optimize sliced images. If you need to optimize an unsliced image, use the Optimize panel. -
Hide the side menu text and other non-essential elements in the side menu that will get in our way. Do this by clicking the visibility icon (it looks like an eyeball) beside the object's name in the Background layer. We will bring them back later when we use this file to trace our layout. When finished, your page should resemble that shown in Figure 10.5. Figure 10.5. The page has been optimized, "non-essential" items have been hidden, and slices have been added. 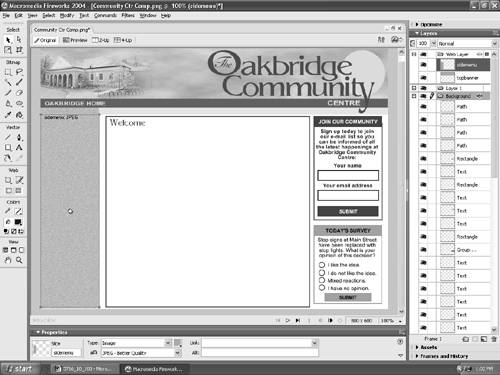 -
With the two slices selected, select File, Export (Control-Shift-R for PC users or Command-Shift-R for Mac users). This will open the Export dialog box. Using the Export dialog box, navigate to the site's graphics folder and open it. Name the file and select Images Only from the Save As Type pop-down menu. Select Export Slices from the Slices pop-down menu and deselect Include Areas Without Slices. You only want the two slices, which is why you deselected Include Areas Without Slices. Click Save. The reason for the banner and the blank slice on the left is the Top banner will be used in the template and the Side menu background will go down the length of a web page and be used as a background pattern using CSS. -
Turn on the visibility of the elements hidden in Step 4. They will be used as a tracing image later on in the Exercise. Save your graphic and exit Fireworks. Assembling the Template in Dreamweaver MX 2004 This section of the exercise uses several advanced features of CSS to drive the page including tracing images and the new Page Properties dialog. To get started, launch Dreamweaver MX 2004 and ensure you are working on your site. To assemble the Oakbridge Community Center template, follow these steps: -
Open the Assets panel and click the Assets tab. To create the template, click the Templates button. The Assets panel will change to show Templates. Obviously, this area is blank. -
Click the New Template icon button at the bottom of the Assets panel. A template named Untitled will appear in the Assets panel. Select the template name in the Assets panel and change its name to main . Double-click the template icon in the Assets panel to open the template. -
Press Command-J (Mac) or Control-J (PC) to open the Page Properties dialog box. You can also access the Page properties by selecting Modify, Page Properties. There is a list of properties on the left side of the dialog box. Select Appearance. Note If you are a regular user of Page Properties, this release of Dreamweaver features a seriously improved Page Properties dialog box. This dialog box has been expanded to include extra features such as the capability to change the fonts used for links and headings. Also, by breaking the Page Properties into sectionsGeneral, Appearance, Links, Headings, and Tracing Imagethis dialog box has become less intimidating and cumbersome. -
By selecting Appearance, the Page Properties change to the Appearance properties. We won't be changing much here. In the margins sections at the bottom of the dialog box, enter in the left and top values and leave the default measurement in the pop-up menu as pixels (leave the bottom and right entries blank). This sets the body margins of the page in such a way that we can position the tracing image at the very top-left corner. -
Click on the Tracing Image property. When the Tracing Image Properties appear, click the Browse button to open the Select Image Source dialog box button to bring up File Selector box. Navigate to the Community_Ctr_Comp.png image in your Chapter 10 Exercise folder and select the image. A thumbnail of the selected image will appear in the right side of the dialog box. Click Choose. The dialog box will close, and you will be returned to the Tracing Image properties. -
Set the Opacity slider to a value of your choosing. Our preference is around 50%, as shown in Figure 10.6. The image is just faint enough that we can see it without it obscuring our design efforts. Click OK to close the dialog box. Figure 10.6. The tracing image and its opacity are determined in the Tracing Image area of the Page Properties dialog box. 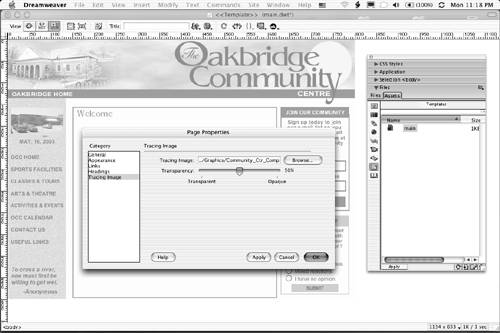 Tracing Paper for the Web It isn't only Freehand MX that enables you to "trace" a drawing. As you saw in this section of the exercise, Dreamweaver MX 2004 offers you the opportunity to build your pages in Fireworks or even draw and scan the linears and then build the page right over the drawing. The formats that are allowed for a tracing image are the standard bitmaps acceptable to Dreamweaver: GIF, JPG, or PNG. The whole idea of tracing is to place the image behind the page and use the image as a guide for the placement of content, tables, or layers . The opacity setting makes the underlying image less obtrusive. The lower the opacity, the more the page looks like you have placed a piece of tracing paper over it. |
With the tracing image in place, you can start placing the content. This process starts at the top of the page with the banner. -
Click on the image icon in the Common toolbar. When the Select Image Source dialog box appears, locate the topbanner.jpg file in your images folder and double-click it. The image should appear at the top-left corner as expected. Tip There is a faster way of placing the topbanner image. Click the Assets tab in the Assets panel and click on the image icon to open your list of images. Locate the topbanner.jpg file and drag it onto the template or select it and click the Insert button at the bottom of the Assets panel. -
Click on the layout tools icon in the Insert panel to get the drop-down menu. Select Draw Layer. When the cursor changes to a crosshair, draw a layer over the text area of the left panel menu area (this is the menu's location). Name the layer leftSide in the Property Inspector (see Figure 10.7). Figure 10.7. Draw Layers are added through the Insert panel and named in the Dreamweaver MX 2004 Property Inspector. 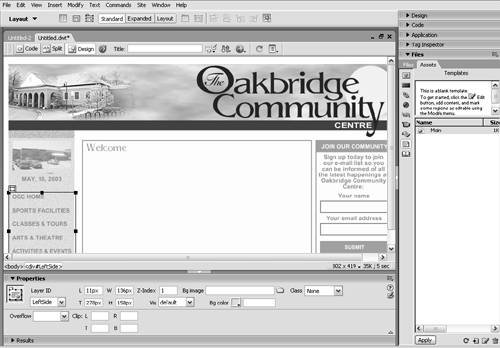 -
Draw another layer over the content area in the middle. Name it contentArea . Draw a layer over the right side survey area. Name it rightSide. Don't worry about size; we will tweak these layers using CSS. -
Select the leftSide layer. Start typing in the text in the Tracing image. Leave the font as Default font in the Property Inspector. This will be changed using CSS. -
Select the contentArea layer and select Insert, Template objects, Editable Region to create an editable region in our contentArea layer. When the New Editable Region dialog box opens, enter content in the Name area. Click OK. -
Select the rightSide layer. If you examine the Tracing Image, you see that area of the page contains two formsone for the email subscription and the other for the survey. For now, we will not have any URLs for them to link to. They are there, for the moment, as placeholders. Select Forms from the Insert panel's pop-down menu and click the Form button. The form will appear on the page as a thin red box. Select the form and name it subscribe in the Property Inspector. This will provide it with a name and an ID named "subscribe." Note To easily "tweak" the form using CSS, we need to make sure the form tag also has an ID. With the form still selected, look at the bottom-left corner of your document window; you should see, in the chain of tags, the following tag: <form#subscribe> . This will indicate that the form has an ID. If it simply says <form>, you will have to go into Code & Design view (View, Code and Design) and enter ID="subscribe" by hand. -
Type in the text and add the appropriate form elements within the form. Don't worry about formatting, and don't worry if it doesn't line up. CSS will take care of all of this. Add another form within the layer and name it survey . Type in the text and add the appropriate form elements within the form. For accessibility access, we have included <LABEL> tags around the radio button form elements. It will also make it easier to format with CSS. Note Accessibility is the major issue in web site design. When you add the radio buttons in the last step, you should see the dialog box shown in Figure 10.8. If it does not appear, delete the button, open the Dreamweaver MX 2004 preferences, and select Accessibility in the Category list. When the accessibility options open, select all of them and close the Preferences window. Figure 10.8. If the Accessibility options are selected in the Dreamweaver Preferences, any time a button is added to a form, you will see the Image Tag Accessibility Attributes dialog box open. 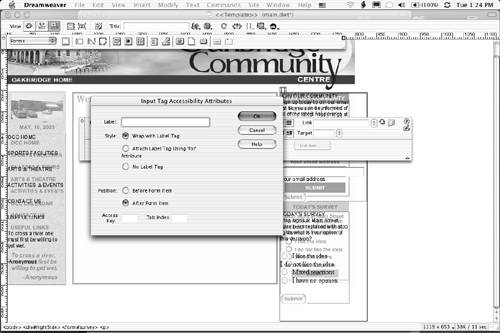 Choosing Label in the preferences and putting the Label tag into the template's HTML adds a visual label to the button.
Building CSS in Dreamweaver MX 2004 In Chapter 7, we quickly reviewed the use of CSS in Dreamweaver MX 2004 and some of the new features introduced to Dreamweaver's capability to create Cascading Style Sheets. This exercise really digs into CSS in Dreamweaver and shows you how CSS can be used to format a page, not just text. It also shows you how a CSS style sheet can be applied to a dynamic page. -
If it isn't already open, open the Dreamweaver template created in the previous exercise. When it opens, select the CSS Styles panel. If the CSS Styles panel isn't visible, press Shift-F11. -
Click the New CSS Style button at the bottom of the panel to open the New CSS Style dialog box. When it opens, enter P in the tag area, select Redefine HTML tag, and select New Style Sheet to create a new external style sheet. Click OK. When the Save Style Sheet File As: dialog box appears, name the file styles.css and click Save. -
The next dialog box to open is the Styles Definition dialog box. Click on Font and select Arial, Helvetica, sans-serif with a pixel size of 11px. Click OK to close the dialog box and save the changes. Save your template. -
You are now going to make some changes directly to the style sheet just created. The neat thing about CSS in Dreamweaver MX 2004 is how quickly you can access a CSS sheet and make changes directly to it. Select File, Open and locate the styles.css file and click Open. Tip An even quicker way of opening a CSS document is to double-click on the document in the CSS Styles panel. -
Open the template and switch to View, Code & Design view. If there is any CSS code that may have been generated by Dreamweaver Page Properties (body and so on), cut it from the document and paste it into the styles.css style sheet. Tip It is best for all styles applied to a page to be in one location for easy manageability. All styles in the layers should be copied over to the style sheet so that you can work with it further. -
Return to the styles.css document. In the style sheet, enter: #leftSide { } -
As we point out in the tip, it is best to have all styles in one place. In the case of this project, the styles will be located in the styles.css document. To move a style from the template to the style sheet, return to your template and click on the leftSide layer. If you are in Design and Code view, you will automatically be taken to the code for the selected Draw Layer. To the right of the div tag is a style tag. Select the style right to the z-index value and select Edit, Cut. -
Open the styles.css document. Click once after the first curly brace { and press the Return/Enter key. Your cursor will now be on an empty code line. Paste the text on the Clipboard into that empty line. -
Click once after the semicolon for each style and press the Return/Enter key. This puts each style entry on its own line for easier reading. The value for the z-index should end with a semicolon. -
Repeat steps 6 to 9 for the contentArea Draw Layer and the rightSide Draw Layer. When finished, the code in the styles.css document should resemble that shown in Figure 10.9. Figure 10.9. The CSS code uses the styles of each of the Draw Layers. 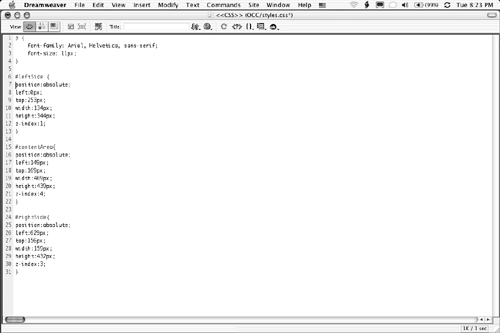 -
Open the CSS panel and create a new style by clicking the new style icon. Select Make Custom Style and select styles.css as the style sheet. Enter .formElement for the class name and click OK. -
In the Styles Definition dialog box, select Box from the category list. When the Box area opens, click once inside the width text input box and enter 95 . Select % from the measurement pop-down. -
Select the Type category. When it opens, use these values: Click OK to close the CSS Styles dialog box. -
Open the template and select the first textbox form element. In the Property Inspector, click on the class pop-up menu and select formElement. Apply this step to the other text input box. -
In the rightSide layer, find the lines that say "JOIN OUR COMMUNITY" and "TODAY'S SURVEY," and in the Property Inspector, select Heading 1 from the Format pop-down. Obviously, the text is too large. -
Create a new style in styles.css. Select Use CSS Selector and name the new style #subscribe h1 . -
When the CSS Styles dialog box opens, use these settings: -
Type Category: -
Background Category: -
Box category: -
Block Category: Click OK. -
Create a new style in styles.css. Select Use CSS Selector and name the new style #survey h1 . -
When the CSS Styles dialog box opens, use these settings: -
Type Category: -
Background Category: -
Box Category: -
Block Category: Click OK. -
Create a new style in styles.css. Select Use CSS Selector and name the new style #subscribe p . -
When the CSS Styles dialog box opens, use these settings: -
Type Category: -
Background Category: -
Box Category: -
Deselect "For All" -
Left: 8 pixels -
Right: 8 pixels -
Block Category: Click OK. -
Create a new style in styles.css. Select Use CSS Selector and name the new style #survey p . -
When the CSS Styles dialog box opens, use these settings: -
Box Category: -
Left: 8 pixels -
Right: 8 pixels Click OK. -
Create a new style in styles.css. Select Use CSS Selector and name the new style #survey . -
When the CSS Styles dialog box opens, use these settings: -
Border Category: -
Style: Solid -
Width: 1 pixel -
Color: #7EAAFF Click OK. -
Create a new style in styles.css. Select Use CSS Selector and name the new style #subscribe . -
When the CSS Styles dialog box opens, use these settings: -
Border Category: -
Style: Solid -
Width: 1 pixel -
Color: #006666 Click OK. -
New to Dreamweaver MX 2004 is the Tag Inspector, which allows you to edit CSS Styles without navigating to the CSS Editor or to the Style Sheet itself. Open the Tag Inspector by opening the Code panel and selecting the Tag tab. If it isn't there, press the F9 key or select Window, Tag Inspector. Click the CSS Properties tab. The window that opens (see Figure 10.10) will show you all of the properties associated with the selected CSS Style. The two buttons under the tab will show the properties either grouped by Category or in a list. Click the list button; it looks like a fraction (  ) with an arrow beside it. Select the #contentArea style in the CSS Styles panel, and the list view will change to show you all of the properties associated with the selected Style. Click once in the border text area of the list and enter 1px . Add a black border to the tag by selecting the color chips beside the border entries and selecting Black from the Color Chips. You can also ignore the Color Chips and enter #000000 into the text entry area of the style to be changed. ) with an arrow beside it. Select the #contentArea style in the CSS Styles panel, and the list view will change to show you all of the properties associated with the selected Style. Click once in the border text area of the list and enter 1px . Add a black border to the tag by selecting the color chips beside the border entries and selecting Black from the Color Chips. You can also ignore the Color Chips and enter #000000 into the text entry area of the style to be changed. Figure 10.10. CSS Properties can also be set or changed using the Selection panel. 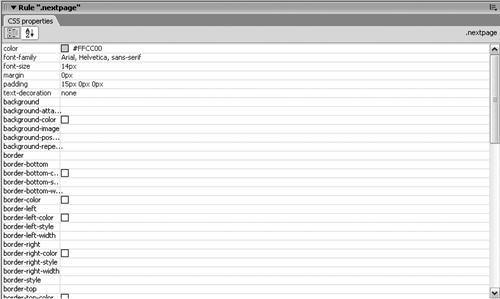 -
If you have a body style definition, select it in the CSS panel. Click on the Edit Style button in CSS panel; otherwise , create a new body style. When the CSS Style Definitions panel opens, select the background Category. Click the Browse button beside background Image and locate and select sidemenu.jpg. Select repeat-y from the Repeat pop-down menu (Figure 10.11). Click OK. Figure 10.11. Even a background image and its placement can be controlled through CSS. 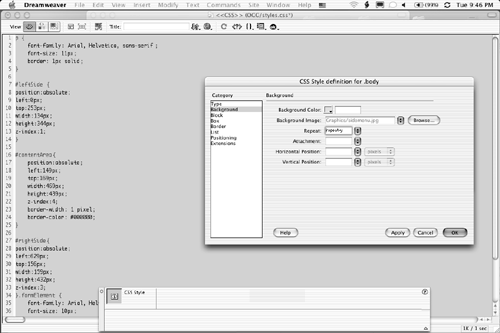 We're done for now. Notice the page looks rather similar to the template. You may want to tweak a few values here and there. Preview in browser for final checks. Next up is adding the areas for dynamic content. Preparing a Template for Dynamic Content With the template created and driven by CSS, it is now time to turn our attention to linking it to the database and getting the pictures to appear on the page. This way, we only need one page, according to the "Pancake Principle," which dictates that we should access the database and display our results as if there were many pages on the site. By using a server-side template, we keep the main design down to one page. By modifying the look of our template, we will also modify the server-side template. To start this process, we are going to add a Template object to the page that is currently open. A Template object is nothing more than a chunk of code that inserts one of the following into a template: -
An Editable Region: This is the area within the editable region that can be changed. -
An Optional Region: Content in an optional region may or may not be displayed, depending upon the conditions determined by the individual who designed the template. -
A Repeating Region: This is an area where the content in a locked area can be repeated as many times as you want. These areas are great for tables. -
An Editable Optional Region: This is an area of optional content that may or may not be modified in pages based upon this template. -
Repeating Table: Insert this, and you add a table with repeating editable rows into the template. These objects can be inserted from the Templates button on the Insert bar (see Figure 10.12). They also can be inserted directly into the code. -
With the Main.dwt document open, switch to the Code and Design view (View, Code and Design). -
We are going to add the Template object in a specific place in the code. Rather than hunt through the code looking for a particular tag, we are going to let the software do the work. Select the text in the left menu box that reads Classes and Tours . Notice how, when you select it, the text on the page is also selected in the code view. Click the mouse once after the </p> tag for the selected menu item. We have to do this using code view because the region will be placed between the two paragraphs. -
Select Insert, Template Objects, Editable Optional Region. The New Optional Region dialog box will appear. Note You are inserting an Optional Editable Region here because this area is going to be used as a submenu for the tours section. Because it is only needed on the tours page, there is no sense in adding this region to every page we generate from our template. Optional editable regions provide added flexibility to templates. -
Click the Advanced tab of the dialog box. Select the Enter Expression radio button and enter the following text in the box: pagename=='Tour' Click OK to close the dialog box. Some code is added to the code view, and the Editable Region is added to the left menu. -
You will notice there is a new expression above the Optional Region in the menu box. It is if pagename== 'Tour' . This is actually the text you entered into the Expression area of the New Optional region dialog box. Because this is an optional region, you can now state what happens to the region named "Tour." To do that, you have set the parameters. Unfortunately, there are no automatic ways of doing this. In the code view, scroll to the end of the new line of code and click once. Press the Return/Enter key and enter the following line of code: <!-- TemplateParam name="pagename" type="text" value="index" --> This line of code sets up a template variable that can be used across many pages derived from the templates. This will enable you to set up different regions in various areas of the template that can be called according to the template variable "pagename" . -
Having identified the template parameter name, we are going to have it actually display on the template page and create a rule for the Optional Region. In the code view, scroll to the bottom of the code and locate the </Body> tag. If it isn't on a separate line, click once in front of the tag and press the Return/Enter key twice. -
Click once in the empty line above the tag and enter the following code: <div id="pageName">@@(pagename)@@</div> @@(pagename)@@ is a template variable between the div's. This is known as template programming. This way, you can assign the page name to a template programmatically. Figure 10.12. Template objects can be added to a template through the Template pop-down in the Insert bar. 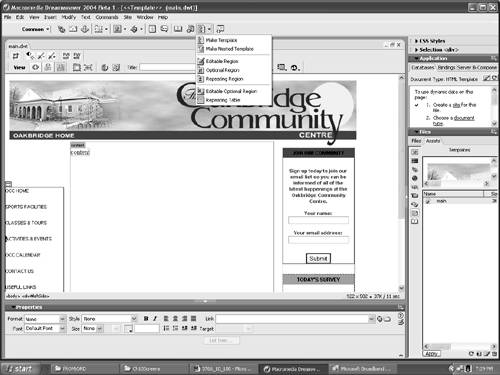 Setting the Style for the Content in the Optional Region Having defined a new Editable Region, there will be text flowing into it from the database. At the moment, no CSS style is attached to it. This could be a problem because the last thing you need is to have the text default to whatever style the user has in his or her browser or font menu. This can easily be accommodated through an addition to the CSS style sheet created earlier. To set the CSS style for the new editable region, follow these steps: -
With the main.dwt document open, open the CSS Styles panel and click the New CSS Style button to open the New CSS Style dialog box. Use these settings and values: -
Name: #pageName -
Type: Use CSS Selector -
Define In: styles.css Click OK to open the CSS Style Definition dialog box. -
Select the Type Category and use these settings and values: -
Select the Positioning Category and use these settings and values: -
Type: Absolute -
Left: 4 pixels -
Top: 120 pixels Click OK to close the CSS Style Definition dialog box. -
Save and close the main.dwt template. Connecting to the Database Through the Applications Panel Having created the template, you can now start to consider how it will be used. In this case, we are going to use the template to create a tour of the Oakbridge facilities based upon interest. Follow these steps to create the page and set it up to manage dynamic data: -
Open a new ColdFusion page. Name it Tour.cfm and save the file to the root of the site. -
With the blank Tour.cfm page open, open the Assets panel, select the main.dwt template, and click the Apply button at the bottom of the panel. The template is now linked to the page. -
There is still a bit of a problem. The Optional Editable Region created earlier isn't visible on the page. The parameters applied earlier to the template <!-- TemplateParam name="pagename" type="text" value="index" --> refer to the index page of the site. These will have to be changed to refer to the tour page. Select Modify, Template Properties to open the Template Properties dialog box. Select the word "index" in the pagename area and change it to Tour (see Figure 10.13). Click OK. Figure 10.13. A template's properties can be changed to link directly to the page to which they are being applied. 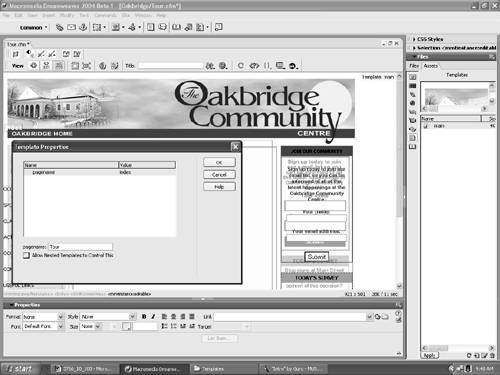 Note Before you connect to the ColdFusion server and the MySQL database, now would be a good time to stop and make sure that all the files are where they are supposed to be and are named properly. You also are not going to be able to proceed if the site you are working on isn't located in the wwwroot folder of ColdFusion. On our machine, the path is C:\CFusionMX\ wwwroot \Oakbridge.
Getting Dynamic with the Oakbridge Community Center Now that everything is in place, you can start linking the various Editable Regions of the template to the database and creating the submenu that will be generated from the database. This submenu is going to be located in the Optional Editable region of the page. -
Click the Bindings tab of the Application panel and select RecordSet (Query) from the pop-down menu. The Recordset will be used for the submenu. When the Recordset dialog box opens, enter the following information or values: Click OK. -
Having identified the fields to be used in the submenu, another Recordset has to be created to display the selected facility on the page. Select Recordset (Query) from the Server Behaviors pop-down menu. When the Recordset dialog box opens, enter the following information or values: Click OK to close the Recordset dialog box shown in Figure 10.14. Figure 10.14. The Recordset that shows a selected facility on the page is created. 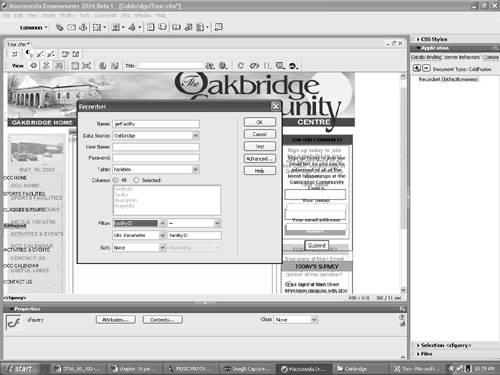 -
Now that the records to be used in the submenu are established, you have to "link" the Editable region to a specific record. Click the Bindings tab of the Application panel. The Recordsets just created will be listed. Click the + sign beside the listfacilitynames Recordset to open a list of the records. Select "facility" and drag it from the panel to the editable region in side menu under CLASSES & TOURS. When the cursor changes to a page icon with a + sign, release the mouse. -
To add bullets to the menu items, select the Recordset in the editable region and click the <mminstance: editable> tag in the Tag selector at the bottom of the Document window. With the text selected, select Text, List, Unordered List. A bullet will appear beside the name of the Recordset. -
Having identified the Recordset and formatted the information, we now have to link the Tour file to the Facility ID area of the database. Select the entire line in the Editable Area and click on browse folder in Property Inspector to open the Select File dialog box. Navigate to the site's root folder and select Tour.cfm. Click the Parameter button at the bottom of the Select File dialog box. -
When the Parameters dialog box opens, click the + sign to add a new parameter. Enter facilityID in the name area and click the lightning bolt to open the Dynamic Data dialog box (see Figure 10.15). Figure 10.15. The path to the information to be placed in the submenu is determined. 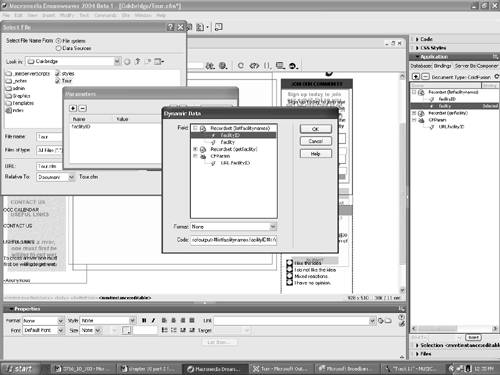 -
This menu is going to be composed of more than one line. This means it must become a Repeating Region. Select the Server Behaviors tab in the Application panel and add a Repeating Region behavior. When the Repeat Region dialog box opens, the name is already entered for you in the Recordset input box. Click All records and click OK to close the dialog box. Adding the Images to the Content Area When the user clicks a facility, a series of images that illustrates the various features of the selection will appear in the Content area of the page. Follow these steps to add the images: -
Select the editable region named "content," delete the word "content" from under the name of the region, and press the Return/Enter key to add a line to the Region. -
Select the Bindings tab, open the getfacility Recordset by clicking the + sign beside "getfacility," and drag the "facility" Recordset into Content region. -
Select the text {getfacility.facility} in the region and select Heading 1 in the Property Inspector. This will "super size" the selection. Deselect the text and click once under it to go to the next line of the region. -
Click the image button on the Insert panel to open the Select Image Source dialog box. Instead of adding an image, you are going to tell ColdFusion MX where to look for the images. Click the Data Sources radio button to open a dialog box that shows you the sources of dynamic data. -
Open Recordset (getfacility) and select imageURL in the getfacility records. Click once at the front of the entry in the URL input box and enter images/tour/ . The URL should read images/tour<cfoutput>#getfacility.imageURL#</cfoutput> . If the dialog box resembles the one shown in Figure 10.16, click OK. The dialog box will close, and an icon image will appear in the Editable area. Figure 10.16. The path to the images folder is set. 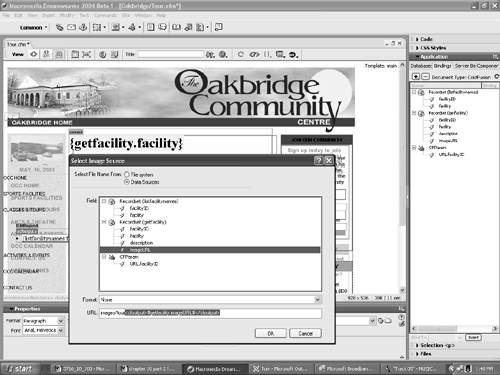 -
Click the image icon in the editable area and name it imagelarge in the Property Inspector. You might also want to check the code in the Code & Design view to ensure the image has an ID. Select the image, select View, Code and Design. The code is selected and should read: [View full width] [View full width] <img src="images/tour<cfoutput>#getfacility.imageURL#</cfoutput>" name="imagelarge"  id="imagelarge"> id="imagelarge"> If an ID was not put in the image, select the image tag code and enter id="imagelarge" as indicated in the above code. -
Next up is to bind the image description text to the Content area. Select the Bindings tab in the Application panel. Open the getfacility Recordset and drag the "description" into the Content panel beside the image icon. -
The text flowing into the Content area will need to be formatted. Select the text just added to the Content area and select Paragraph from the Format pop-down list on the Property Inspector. -
On the left side of the template is a small thumbnail image. We are going to add that image to the page by pulling it from a list of thumbnails in the database. Select the edit region over thumbnail picture and click the Insert Image button on the Insert panel to open the Select Image Source dialog box. -
Instead of adding an image, you are going to tell ColdFusion MX where to look for the images. Click the Data Sources radio button to open a dialog box that shows you the sources of dynamic data. -
Open Recordset (getfacility) and select imageURL in the getfacility records. Click once at the front of the entry in the URL input box and enter images/thumbnail/ . Click OK. The dialog box will close, and an icon image will appear in the Editable area. -
Click the image icon in the editable area and name it imagethumb in the Property Inspector. You might also want to check the code in the Code & Design view to ensure the image has an ID. Select the image, select View, Code and Design. The code is selected and should read: [View full width] [View full width] <img src="images/thumbnail/<cfoutput>#getfacility.imageURL#</cfoutput>" name="imagethumb" id="imagethumb"> If an ID was not put in the image, select the image tag code and enter id="imagethumb" as indicated in the above code. Check the code in the Code & Design view. If an ID was not put in the image, select the image tag code and enter id="imagethumb" . Using CSS to Style the Editable Areas The images are going to be positioned on the page according to the rules determined by a CSS style. In addition, you will need to style the headline and the description that accompanies the images as well as the text used in the submenu created in EditRegion 4. This way, you can control precise positioning of the images on the page and the look of the text. To use CSS to style the headline in the Content region, follow these steps: -
We want to format the h1 tag only within our contentArea. Otherwise, we would change the formatting of all the h1 tags. Open the CSS Styles panel and click the New CSS Style button at the bottom of the panel. When the New CSS Style dialog box opens, enter the following information or values: -
Name: #contentArea h1 -
Type: Use CSS Selector -
Define In: styles.css Click OK to open the CSS Styles Definition dialog box. Enter the following values and information in the Styles Definition dialog box: -
Category: Type -
Font: Georgia, Times New Roman, Times, Serif -
Size: 28px -
Weight: bold -
Color: #FFFFFF -
Category: Background -
Background Color: #006633 Click OK to close the dialog box. -
Next up is the style that controls the placement and look of the large image in the Content area. Open the CSS Styles panel and click the New CSS Style button at the bottom of the panel. When the New CSS Style dialog box opens, enter the following information or values: -
Name: #imagelarge -
Type: Use CSS Selector -
Define In: styles.css Click OK to open the CSS Styles Definition dialog box. Enter the following values and information in the Styles Definition dialog box: -
Category: Box -
Float: left Click OK to close the dialog box. -
With the placement of the large image determined, the placement of the thumbnails is our next concern. Open the CSS Styles panel and click the New CSS Style button at the bottom of the panel. When the New CSS Style dialog box opens, enter the following information or values: -
Name: #imagethumb -
Type: Use CSS Selector -
Define In: styles.css Click OK to open the CSS Styles Definition dialog box. Enter following values and information in the Styles Definition dialog box (see Figure 10.17). -
Category: Positioning -
Position: Absolute -
Left: 0 pixels -
Top: 152 pixels Figure 10.17. Using CSS to position the thumbnail images that will be added dynamically to the page. 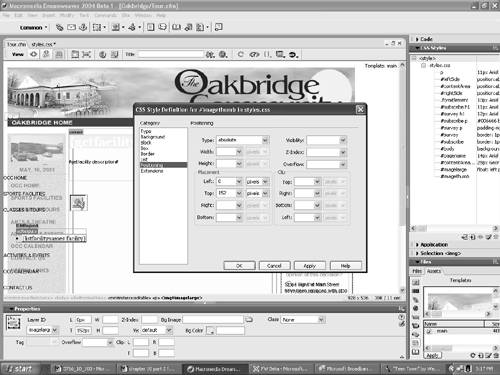 Click OK to close the dialog box. -
Now we turn our attention to the dynamic submenu created earlier in EditRegion. Open the CSS Styles panel and click the New CSS Style button at the bottom of the panel. When the New CSS Style dialog box opens, enter the following information or values: -
Name: #leftside li -
Type: Use CSS Selector -
Define In: styles.css Click OK to open the CSS Styles Definition dialog box. Enter following values and information in the Styles Definition dialog box: Click OK to close the dialog box. -
Now that we know what it looks like, it would make sense to put the text in a box. Open the CSS Styles panel and click the New CSS Style button at the bottom of the panel. When the New CSS Style dialog box opens, enter the following information or values: -
Name: #leftside ul -
Type: Use CSS Selector -
Define In: styles.css Click OK to open the CSS Styles Definition dialog box. Enter following values and information in the Styles Definition dialog box: -
Category: Box -
Padding: 0 pixels -
Margin: 0 pixels Do not deselect Same for All. Click OK to close the dialog box. -
The final style will differentiate the anchor from a regular line in a paragraph. Open the CSS Styles panel and click the New CSS Style button at the bottom of the panel. When the New CSS Style dialog box opens, enter the following information or values: -
Name: #leftside a -
Type: Use CSS Selector -
Define In: styles.css Click OK to open the CSS Styles Definition dialog box. Enter following values and information in the Styles Definition dialog box: -
Category: Type -
Weight: bold -
Decoration: Select None -
Color: #000000 (Black) Click OK to close the dialog box. -
Save the changes and leave the document open for live data preview. Testing the Page Having completed the tour, it is time to start testing the page. At this point, much work has been done, and a ton of code has been written. The question is: Does it all work? Before you start, make sure that you have a folder in the site's root named images and that the site's root is located in the CFusion MX wwwroot folder. The images folder contains the thumbnails and the tour photos mentioned earlier. You can find it in the chapter files you downloaded at the beginning of this exercise. Also, make sure you have all the files created in Chapter 8, "Building the Data," located in an Admin folder on your site root. For this page to work, you will use the back-end created earlier. You will add a facility name, some descriptive text, and the image associated with that text. As you remember, this information is sent to the MySQL database. It is then accessed by the Tour page, and the information is displayed. -
Open the addFacility.cfm page in Dreamweaver MX 2004 and then select File, Preview in Browser, or press F12. -
The page will open and the three input boxes Facility, Description, and Image will appear. Here is what they do: -
The word you enter in Facility will appear in both the pop-down menu and the Content area of the Tour page. It will also be sent to the Facility field of the database. -
The description can be as long or as short as you want. It will appear in the Content area. It will also be sent to the content field of the database. -
The Image is the image name in either the Thumbnail or the Tour folder located in the Images folder. This picture will appear under the word Tour and in the Content area. It will also be sent to the imageURL area of the database. -
Enter the data for as many facilities as you want. After you have completed all of the fields, click the Submit button (see Figure 10.18). Figure 10.18. The data for an arena is added to the addfacility page of the back-end. 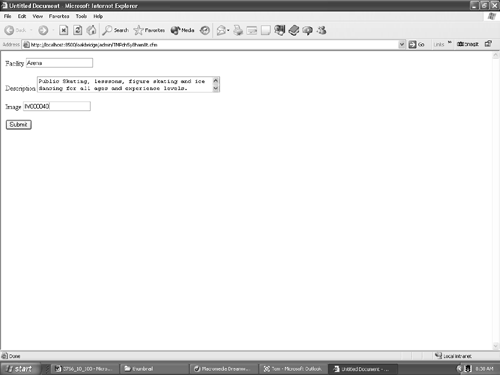 -
Clicking Submit will take you to the listfacilities page (see Figure 10.19), where you can change the wording or data by clicking on the facility's name (this takes you to the editfacility page) or even remove a facility or record by clicking delete. This is a great chance to simply review the data and ensure it is correct. Figure 10.19. The listfacilities page shows you the name of the facility and its description. This information is pulled out of the MySQL database. 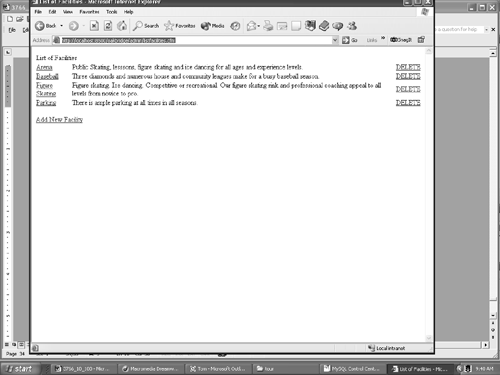 Note Clicking delete in the listfacilities page does not remove the record. It simply takes you to the deletefacility page. Clicking the Submit button on the deletefacility page removes the record from the database. -
Open the tour page in Dreamweaver MX 2004 and click on the Live Data View button, the page icon with a lightning bolt through it at the top of the Document window. The page will come to life. Live Data View, in very simple terms, enables Dreamweaver to send an HTTP request to the server and display the page with "live" data. -
To cycle through your various records, click the settings button, and when the Live Data Preview dialog box appears, select the 2 in the value area and change it to 4. Click OK. -
To preview the page in a browser, click the Preview/Debug in a browser button (it looks like a globe on the View panel). When the page opens (see Figure 10.20), test your links. Figure 10.20. The tour in the browser. Note the images, text, and submenu. 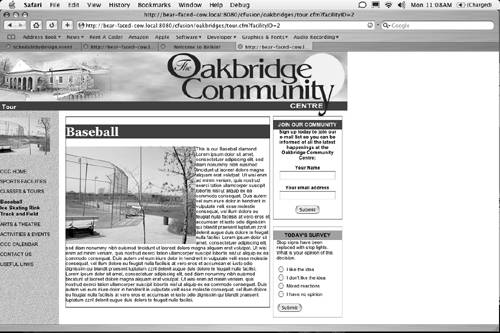 If, in the browser view, you notice the content is overrunning the Content box, you can go into the CSS and remove the height parameter to make it more flexible with your content.  |