| The key to building a dynamic site follows the first rule of digital media creation and how one deals with complexity: "Let the software do the work." When software gets involved, things happen much more quickly and efficiently than if you do it yourself. Four examples of letting the software do the work are symbols, Flash MX 2004 Components , Dreamweaver MX 2004 Snippets, and the Dreamweaver MX 2004 Application Panel. Symbols in Freehand MX, Flash MX 2004, and Fireworks MX 2004 Symbols are nothing more than a blueprint of the original artwork. They reside in Libraries, and when the artwork is needed, instances of that artwork can be dragged into the document from the Library. How many instances? An infinite number because they are simply proxies or "instances" of the original work. Instances are extremely small because they are nothing more than pointers to the original symbol, which resides in the application's Library. The great thing about symbols and their instances is the capability to change an instance's size or color without affecting any other copies of that instance on the page. However, if you change a symbol, all instances will instantly reflect that change. Follow these steps to discover how symbols created in Freehand smoothly move to Fireworks and Flash: -
Download the Chapter_02Exercise folder from the book's web site. -
Open the Apple.fh10 file, located in the SymbolsEx folder, to launch Freehand MX. When the file opens, open the Layers panel. You will notice the image is composed of a number of named layers. Those layers are going to be converted to symbols. Close the Layers panel. -
Open the Library by doing one of the following: -
Pressing the F11 key, -
Selecting Window, Library, or, -
Opening the Assets panel and clicking once on the Library tab. -
Select the Pointer tool and click once on the apple. With the apple selected, press the F8 key or select Modify, Symbol, Convert to Symbol. A file named Graphic-01 will appear in the Library, as shown in Figure 2.1. Figure 2.1. After a symbol is created, it immediately appears in the Freehand MX Library. 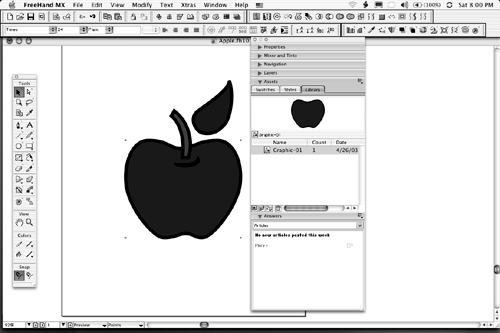 -
Click once on the name of the symbol in the Library to select the name. Change the name of the symbol to Apple . -
Create symbols for the stem, the leaf, and the dimple in the apple. Moving Symbols Between the Applications The Freehand drawing is composed of four layers and four symbols. Those layers and symbols are easily moved to Fireworks for rasterization, slicing, or any other Fireworks operation. Follow these steps to move symbols and layers from Freehand to Fireworks: -
Open Fireworks MX 2004. When the application launches, open a new document with a canvas that is 10 inches by 10 inches with a white background. Don't maximize the window on a PC. -
Navigate back to the open Freehand MX page, make sure it isn't maximized, and select all the objects on the page. -
Drag the selected objects from the Freehand page to the Fireworks canvas. When you see a hollow square appear over the Fireworks canvas, release the mouse. The Apple will appear on the Fireworks canvas. Tip Alternatively, you can copy and paste without changing the program windows , even if both program windows are maximized. The Library items will retain their names. If you want to retain layer names , then you need to import the Freehand file into a pre-existing file in Fireworks. The art would not, however, be contained in their original layers. -
Open the Fireworks Library by selecting Window, Library, pressing the F11 key, or by clicking the Library tab in the Assets panel. You will see all the Freehand symbols are now residing in the Fireworks library. -
Open the Fireworks Layers panel by selecting Window, Layers, pressing the F2 key, or selecting Layers in the Panels grouping. When the Layers panel opens, you will first notice the object on the canvas is grouped. Select the object and then select Modify, Ungroup, or press Control-Shift-G (PC) or Command-Shift-G (Mac) to ungroup the symbols. Your Fireworks panels should resemble those shown in Figure 2.2. The little arrows in the bottom-left corner of each object on the canvas indicate the object on the canvas is an instance of a symbol. Figure 2.2. Freehand symbols and layers move smoothly into Fireworks. Note the arrow in the bottom-left corner of each object on the Fireworks canvas denoting the object is an instance of the symbol in the Library. 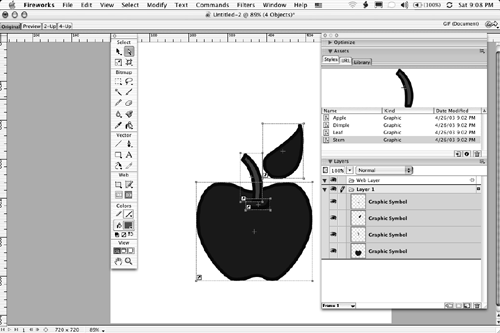 -
Close the Fireworks document and don't save the changes when prompted. Sharing Freehand MX Libraries In a collaborative production environment, making the same artwork available to everyone makes solid business sense. In the case of Freehand MX, a Library can be shared among the members of the team. This Library can be placed on a CD or other media or on a server that can be accessed by all concerned . To create a Shared Library in Freehand MX, follow these steps: -
Open the Library to be shared and select Export from the panel pop-down menu as shown in Figure 2.3. This opens the Export Symbols dialog box shown in Figure 2.4. Figure 2.3. Library items can be exported by selecting Export from the Library panel pop-down menu. 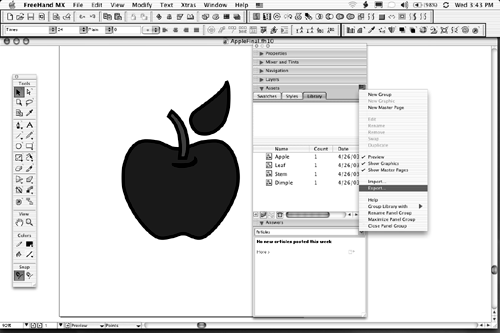 Figure 2.4. The Export Symbols dialog box allows you to export only the symbols you choose. 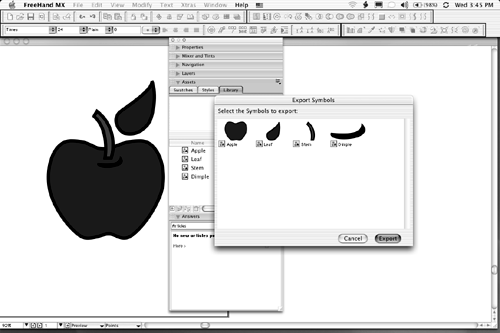 -
Select the symbols to be exported and click the Export button at the bottom of the Export Symbols Dialog Box. This will open a dialog box named Save. -
Name the file and navigate to where the file will be saved. Click OK. A Freehand file with the name you assigned to it will appear in the Save location. When you open the file, you will see two things: The advantage to you, as developer, is the capability to have all logos, drawings, and so on in one place. Move the file to a server, and that artwork becomes accessible to anyone authorized to access it. In addition, those symbols can be easily added to Fireworks or Flash documents. |
Moving Freehand MX Symbols to Flash MX 2004 Building the assets for a Flash animation is not difficult if you let the software do the work. In this case, creating the assets in Freehand will enable you to create the basis for a Flash animation in record time. Here's one way Freehand and Flash are an unbeatable combination: -
With your Apple drawing open in Freehand MX, launch Flash MX 2004 and open a new document. -
Create a new Flash movie clip by selecting Insert New Symbol, Control-F8 (PC) or Command-F8 (Mac). This opens the New Symbol dialog box. Name the symbol, select Movie Clip, and click OK to open a blank page. -
Select the entire apple in the Freehand document and drag the apple from the Freehand page to the blank Flash page. When you see the same square as you saw in the Fireworks example, release the mouse. The apple will appear on the Flash stage. Tip You may be wondering why the apple was dragged into a Flash symbol and not directly onto the Flash stage. Flash developers rarely place images on the main timeline of the Flash movie. Using symbols and instances on the main timeline actually results in more efficient construction and playback. It also enables you to apply Motion Tweens, fades, and other effects that can only be accomplished through the use of symbols. This is why it is a good habit to place any assets you may wish to add to a Flash movie into their own symbols. -
Open the Flash Library by either pressing Command-L (Mac) or Control-L (PC). Other methods are selecting Window, Library or, if the Library is visible on your panels, click the Library panel. You will note all the Freehand symbols are currently residing in the Library as shown in Figure 2.5. Figure 2.5. Freehand symbols are placed into the Flash Library when the drawing is dragged and dropped into Flash. 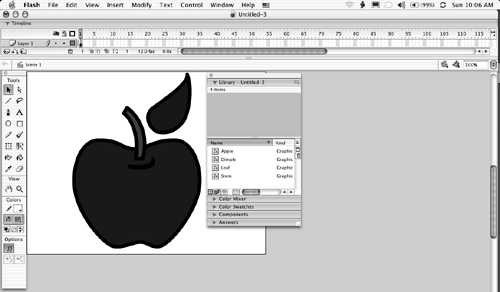 Animating Freehand MX Symbols in Flash MX 2004 When Freehand symbols are placed into a Flash Library, the symbols created in Freehand move to Flash, and another symbol with the Freehand document's name appears in the Flash Library. This is the composite containing all the symbols used in the drawing and is the symbol on the Flash stage. It also retains the relative placement of the four symbols that make up the entire apple. Animating the symbol is quite simple if you let the software do the work. Here is how: -
Select the apple on the stage and select Modify, Break Apart, or Command-B (Mac) or Control-B (PC). The image will change to four objects on the stage. An alternate method is to select the entire apple on the movie clip's stage so that you do not need to use Break Apart. Also, this method keeps the whole animated sequence inside a movie clip of its own, which makes things easier if you decide to change the position of the animation. -
Select Modify, Distribute to Layers, or Command-Shift-D (Mac) or Control-Shift-D (PC). The result is that each symbol has its own layer, named for the symbol it contains. -
Delete the layer named Layer 1. As you can see in Figure 2.6, each symbol now has its own layer and can be animated. Figure 2.6. Objects containing symbols created in Freehand MX are animated by breaking the symbol apart and distributing the symbols to layers. 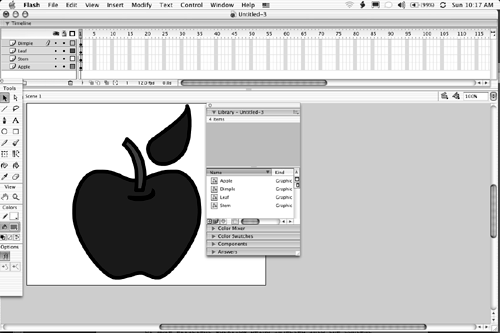 |
Using Flash MX 2004 Components Another prime example of letting the software do the work is utilizing the components in Flash MX 2004. The components feature of Flash MX 2004 injects a more efficient workflow into the content creation process. Components are drag-and-drop, fully coded Flash movies that perform a specific function. These functions range from adding scroll bars and text boxes to providing live video feeds through the Flash Communication Server MX. The beauty of components is that they are easily reusable pieces of code that don't require the average user to have an intimate understanding of ActionScript. The TextArea component is relatively simple to utilize when you need scrolling text on your Flash site. Follow these steps to use the TextArea component: -
Create a new Flash movie and use the Flash MX 2004 defaults. -
Open the Components panel. If it isn't open on your machine, select Window, Development panels, Components, or press Control-F7 (PC) or Command-F7 (Mac). -
Open the UI Components and drag a copy of the TextArea component to the stage. -
With the TextArea component selected on the stage, click once in the Instance name area of the property Inspector and name the instance Component_txt . When you finish, your Property Inspector should resemble Figure 2.7. -
Click once on Frame one of the timeline and press the F9 key to open the ActionScript editor. When the editor opens, click once inside the text input window and enter the following: [View full width] [View full width] Component_txt.text = "The components feature of Flash MX injects a more efficient workflow  into the content creation process. Components are drag-and-drop, fully coded Flash movies into the content creation process. Components are drag-and-drop, fully coded Flash movies  that perform a specific function. These functions range from adding scroll bars to text that perform a specific function. These functions range from adding scroll bars to text  boxes to providing live video feeds through the Flash Communication server. The beauty of boxes to providing live video feeds through the Flash Communication server. The beauty of  components is they are simply reusable pieces of code, which don't require the average components is they are simply reusable pieces of code, which don't require the average  user to have an intimate understanding of Actionscript." user to have an intimate understanding of Actionscript." -
Close the Editor to return to the Main Timeline. Save the movie and test the movie by pressing Command-Return (Mac) or Control-Enter (PC). The movie opens and you should be scrolling the text as shown in Figure 2.8. Figure 2.8. The TextArea component automatically adds scroll bars to text boxes in Flash. 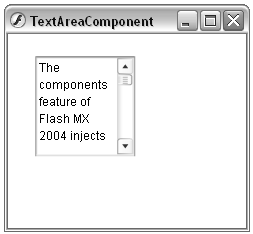 Figure 2.7. A text area is prepared for scrolling text in Flash. 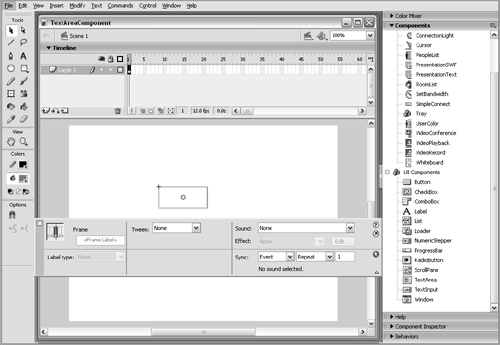 Using Snippets in Dreamweaver MX 2004 It is not unheard of for developers to visit sites offering free JavaScript scripts and so on for use in web pages. Some bits and pieces of code are also proprietary and are used repeatedly in a number of pages or sites. Managing these blocks of code for easy access and insertion into a page is a breeze if you use the Snippets panel in Dreamweaver MX 2004. Here's how to use the Snippets: -
Open Dreamweaver MX 2004 and select Window, Snippets, or press Shift-F9 (Mac and PC). The Snippets panel shown in Figure 2.9 opens. Figure 2.9. The "Different Color Link" Snippet is placed in the code view. 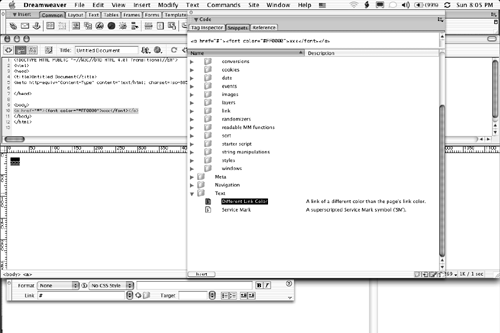 -
The Snippets panel contains quite a few Snippets, ranging from JavaScript for breadcrumbs to code that changes the color of a link. If you click on one of the Snippets in the panel, the code will appear at the top of the panel, and the snippet will be selected. -
To add a Snippet as a block of code to your page, select View, Code to open the Dreamweaver Code View or View, Code and Design and: -
Click once in the Code where you want the Snippet placed and double-click the Snippet; or, -
Click once where the code is to be placed, select the Snippet and click the Insert button located at the bottom-left corner of the Snippet panel; or, -
Drag the Snippet from the Snippet panel into the Code View. Adding a Snippet to the panel is just as easy as adding a Snippet to your code. To add a Snippet: -
Click the New Snippet button at the bottom of the Snippets panel to open the Snippet dialog box shown in Figure 2.10. Figure 2.10. The Snippet dialog box allows you to add Snippets to the Snippets panel. 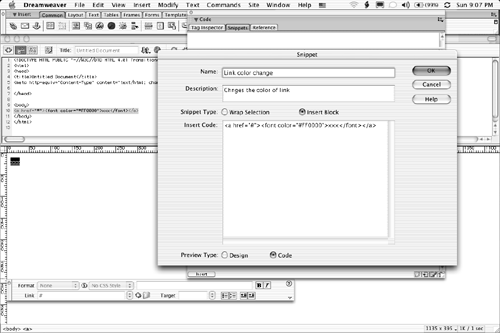 -
Enter a name for the Snippet in the Name field. -
If you wish, enter a description of the Snippet in the Description field. -
Select either Wrap Selection or Insert Block in the Snippet Type Area. -
If you choose Wrap Selection, enter the code to appear before the selection in the Insert Before field and the code to appear after in the Insert After field. -
If you choose Insert Block, the dialog box will change. An Insert Code field will replace the two shown in Wrap Selection. Enter the code or paste it into the field. -
At the bottom of the dialog box, select how you want the Snippet to appear in the preview area at the top of the Snippets panel. Selecting Design shows Design view. Selecting Code displays the code. -
Click OK to add the Snippet. Note Get used to using Snippets. They are an invaluable resource for code that is often reused. This includes ColdFusion MX code used to perform certain repetitive functions. Be aware, though, that Snippets created in Homesite and ColdFusion Studio are not compatible with Dreamweaver MX 2004. If you do need them, Massimo Foti offers a great conversion facilitySnippets Converteravailable at http://www.dwfaq.com/Snippets/. This site should be bookmarked because it contains almost 300 code Snippets in a variety of categories.
Dreamweaver and ColdFusion Markup Language The concept of letting the software do the work also applies to the construction of dynamic sites using the team of Dreamweaver MX 2004 and ColdFusion MX. ColdFusion is actually composed of two components the ColdFusion Markup Language (CFML) and the ColdFusion MX application server software. The markup language is a tag-based language that is, in many respects, similar to HTML. Though knowledge of CFML is very handy to have, Dreamweaver's function as a graphical web editor hands much of the code writing over to a point-and-click interface. For example, ColdFusion MX uses the following code to pull an individual's last name out of a database table named "members:" <cfquery name = "memberList" datasource = "jct"> SELECT LastName FROM Members </cfquery> Without Dreamweaver, you would have to write the code yourself, and writing the code requires an intimate knowledge of the language. This can all be done using a Recordset accessible through Dreamweaver's Bindings and Servers panel in the Applications panel group . Instead of writing the code, Dreamweaver, letting the software do the work, presents you with a series of menus and text boxes as shown in Figure 2.11. Figure 2.11. The Recordset dialog box creates ColdFusion queries through text boxes and menus and writes the appropriate code from the decisions and text you input. 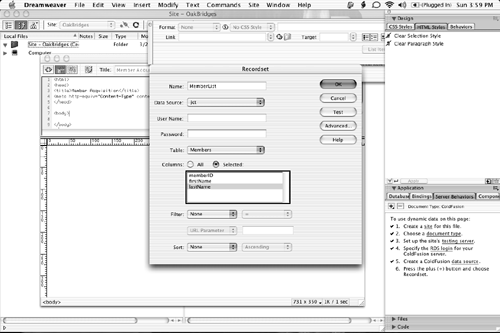 The Database/ColdFusion MX Connection Here's a request we can almost guarantee you will receive. Your client wants to create a web-based catalogue for the full product line of left-handed widgets they sell. Not only that, but they want to have the capability to present the widgets to potential clients by price, color, or feature set. In this case, word processing or even a spreadsheet won't be able to solve the problem at hand. Even though there are only three simple requirements, the request is actually too complex for either the word processor or the spreadsheet. It could be done, but a lot of manual labor is going to be involved, and there is no budget for the work. The solution is a database. A database is a place to store your information. It is also a place where the pointers to your information can be stored. In addition, the information in the database can be stored in various formats, such as text, images, sound, numbers , video, and so on. Unfortunately, you still have a problem. The design team has developed the pages for the catalogue. The client has approved the designs, and now the information contained in the database has to appear on the web. The simplest solution is to create a separate page for each widget in each category. Again, this will require a significant investment of time and budget, neither of which the client has available. The solution is ColdFusion MX. ColdFusion MX is middleware. By this, we mean it works in between the web server and the database to interpret requests for web pages and publishes the results. Any requests for pages with the .cfm extension are handed off to ColdFusion MX, which then reads the tags and functions in the file and outputs the results as HTML. This interpreted document is sent back to the web server and then to the browser where it appears on the user's screen. In the case of the left-handed widgets, ColdFusion MX pulls the information from the database and uses it to build a web page using the Dreamweaver template that was called by a user's browser. ColdFusion MX connects to your database using a channel known as a datasource connector. This can be regarded as nothing more than a hook into a database management system or a database. One of the more common connections is that of Open Database Connectivity (ODBC). ODBC can be used by databases such as MS Access or MySQL. With the growing popularity of Java and J2EE, including ColdFusion over J2EE, Java Database Connectivity (JDBC) is the ideal choice within this platform. Being able to store information is one of the main functions of a database. Their other main function is retrieval of information, or the capability to accept queries and return the results. Queries are sent from ColdFusion to the database, and all they do is tell the database what information to look for and how it should be displayed for a given set of records. The standard language used to make these queries is called Structured Query Language, or SQL. In plain English, a query could be something simple, such as, "Show me all the red left-handed widgets and sort them, in descending order, by price." When the database answers the query, it creates a Recordset containing the results and passes the result back to ColdFusion. The information is incorporated into a ColdFusion template, which builds an HTML page. This page is handed back to the server, which is fed to the client's browser for final rendering. As you can see, the SQL query can be as complex or as simple as you wish. Just remember not to use 5 lines of ColdFusion code where one line of SQL will do. Use the database for what it was meant for: the storage and retrieval of the site's content. |


