Configuring NAT Properties
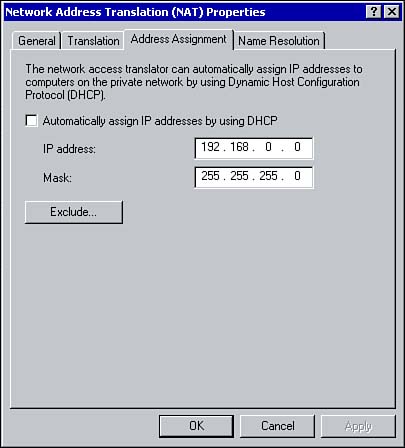
| Once NAT is installed, it can be configured within the Routing and Remote Access console. This section looks at how to configure network addressing and name resolution with NAT. Network Addressing with NATBecause clients on an IP-based network all require a unique IP address, NAT offers two ways in which NAT clients can be assigned an IP address. You can use a DHCP server on the local area network or the DHCP Allocator component of NAT. The DHCP Allocator is a simplified version of DHCP. You can use it to assign internal clients an IP address, subnet mask, and default gateway (it does not support any optional components ). Keep in mind when deciding which method to use that the DHCP Allocator supports only a single scope. So if more functionality is required, consider using DHCP server. To configure Network Addressing with NAT, right-click Network Address Translation within the RRAS console and click Properties. From the Properties window, select the Address Assignment tab (see Figure 8.11). Figure 8.11. Configuring network addressing with NAT. To enable the DHCP allocator, select the option to Automatically Assign IP Addresses by Using DHCP. Type the network address and subnet mask. Clicking the Exclude button allows you to exclude certain IP addresses within the network address range. These addresses will not be assigned to clients. If you plan to use a DHCP server on the local area network for IP address assignment, simply deselect the option to Automatically Assign IP Addresses by Using DHCP.
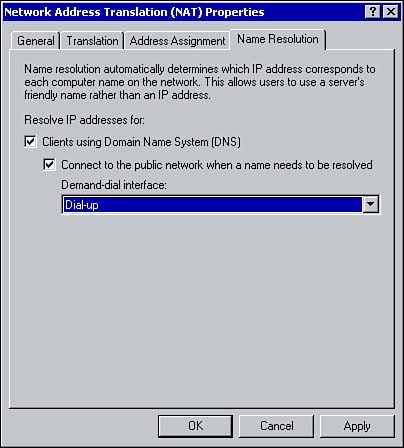
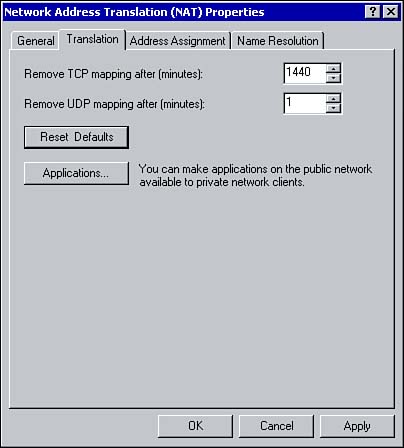
Name Resolution with NATOnce NAT is configured, that server essentially acts as a DNS Proxy for the internal clients. It receives name resolution requests, forwards the requests to an Internet based DNS server, and returns the results to the client. Using the Name Resolution tab from the Network Address Translation properties window, you can configure NAT to perform DNS queries on behalf of internal clients (see Figure 8.12). Figure 8.12. Configuring name resolution. To enable name resolution for internal clients, under Resolve IP Addresses for, select the Clients Using Domain Name System (DNS) option. If NAT uses a demand-dial connection to the Internet, select Connect to the Public Network when a name needs to be resolved. Using the drop-down arrow, select the appropriate interface. Configuring TranslationAs already mentioned, all mappings are stored within mapping tables. Using the Translation tab, you can configure how long the TCP and UDP mappings should remain in the table. The default length of time for a TCP mapping to remain in the table is 1440 minutes (24 hours) and UDP mappings are removed after 1 minute (see Figure 8.13). Figure 8.13. Configuring how long mappings remain in the mappings table. Using the Applications button, you can configure the applications available for Internet Connection Sharing. Refer to the section on ICS for configuring applications. |
EAN: 2147483647
Pages: 167