Managing DHCP
| Every device with a network interface card on an IP network requires a unique IP address and a corresponding subnet mask. The previous section outlined how to manually configure an IP address on Windows Server 2003. The process is very similar for other clients , such as Windows 2000 and Windows XP. Manual assignment is one method for assigning IP addresses, although it might not be suitable for many network environments. To illustrate how difficult it could be to manually assign IP addresses, imagine having a large network with 5,000 or more users. It is possible to visit each workstation and manually configure IP addresses, but the work does not stop there. Any changes that must be made to IP parameters, such as the addition of a DNS server, will again require you to visit a number of workstations, if not all of them, to reconfigure the parameters. The more efficient solution is to implement a DHCP server to centralize administration and automate IP address assignment. To implement this solution on Windows Server 2003 (or another platform such as Windows 2000 Server), the DHCP service must be running and configured. The service can be installed on a domain controller, a member server, or a server that is a member of a workgroup. Before a DHCP server can be fully functional on a network, the following steps must be completed:
After all of these steps have been performed, your DHCP server will be capable of leasing IP addresses to DHCP clients. The process of leasing an IP address occurs in the following four phases:
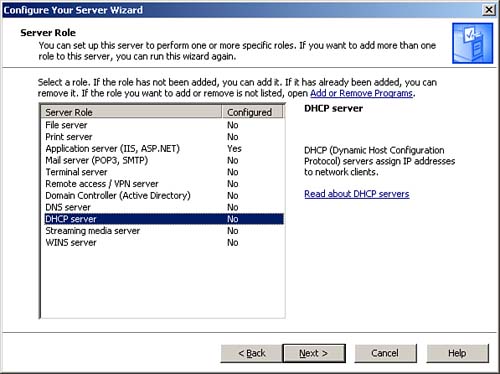
Installing DHCPTo automate the process of assigning IP addresses to network clients, the DHCP Server service must be installed on at least one server. The service can be installed in a number of ways. You can opt to install it during the installation of Windows Server 2003, or you can install it later using the Configure Your Server Wizard or through the Add or Remove Programs applet within the Control Panel. To install DHCP using the Configure Your Server Wizard, perform the following steps:
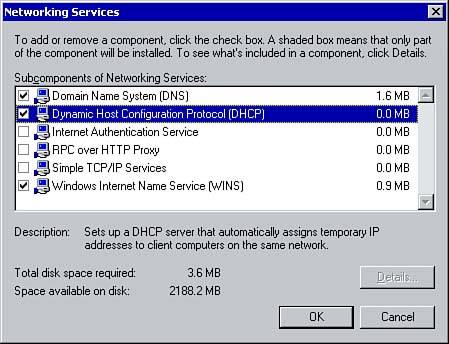
To install DHCP using the Add or Remove Programs applet, follow these steps:
Authorizing a DHCP ServerThe authorization of DHCP servers was a feature introduced in Windows 2000 and is included with Windows Server 2003. Before a DHCP server can lease IP addresses to clients on a network, it must be authorized to do so. This prevents a DHCP server with incorrect information from being introduced on the network. For example, a DHCP server with incorrect scope information can't lease providing DHCP clients with incorrect IP parameters. DHCP servers are authorized through the DHCP management console; this process must be performed by a user who is a member of the Enterprise Admins group . To authorize a DHCP in Active Directory, follow these steps:
If a DHCP server needs to be removed from the networkfor example, if it has been replaced by another oneyou will want to "unauthorize" the server so that it no longer has the capability to lease IP addresses to clients. To do so, right-click the DHCP server within the DHCP console and select the Unauthorize option. Click Yes to confirm your actions. The DHCP server then is removed from Active Directory. Creating ScopesFor a DHCP server to provide clients with IP addresses, the server must be configured with a scope. A scope is a range, or pool, of IP addresses that can be leased to DHCP clients on a given subnet. (If the DHCP server services multiple subnets, each with DHCP clients, you must create multiple scopes.) In addition to IP addresses, a scope can include optional parameters that can be assigned to DHCP clients, including the IP address of DNS servers, WINS servers, and routers. The optional parameters are discussed in the "Managing DHCP Scope Options" section later in this chapter. Before creating scopes, you should keep the following guidelines in mind:
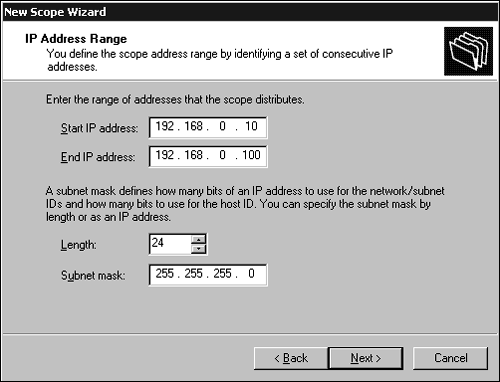
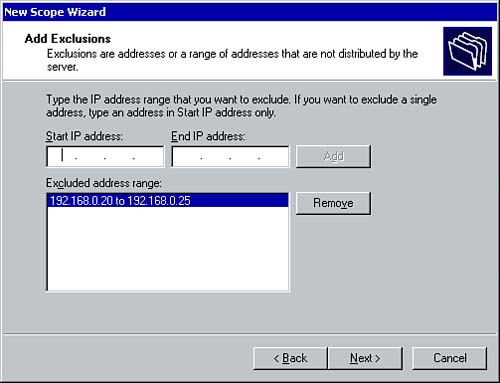
After the DHCP component has been installed, you can create scopes from within the DHCP management console. A scope can also be configured when installing DHCP using the Configure Your Server Wizard, as you saw earlier in the chapter. Each scope created consists of the following information:
To create a new scope using the DHCP management console, perform the following steps:
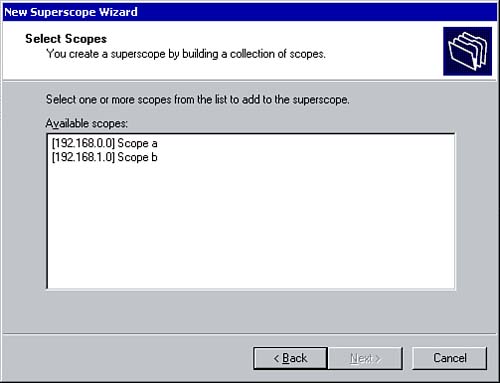
The new scope now appears under the DHCP server within the management console. Before the DHCP server can lease IP addresses from the scope, however, it must be activated. To do so, right-click the new scope and click Activate. SuperscopesAside from a regular scope, you can create a second type of scope known as a superscope . In a multinetted environment (one that has multiple logical IP subnets defined on a single physical network), superscopes allow a DHCP server to assign leases to clients on multiple subnets. For example, a physical network is divided into two subnets, Subnet A and Subnet B, connected by a router. Subnet B contains two multinets. A single DHCP server is located on Subnet A. The DHCP server contains a single scope with a range of IP addresses to lease to clients on Subnet A. To have the DHCP assign IP addresses to clients on Subnet B, you can create a superscope and add to it the IP address ranges for the multinets on Subnet B. The scope configuration on the DHCP server could be similar to the following: Subnet A:
Subnet B:
One of the biggest advantages of creating superscopes is to ease the administration in a multinetted environment. It can be difficult in terms of administration to identify which scopes go with which networks. Creating superscopes and grouping scopes in some logical manner can make them easier to administer. For example, you might group all the scopes from a single floor in a large office building into a superscope. To create a new superscope within the DHCP management console, perform the following steps:
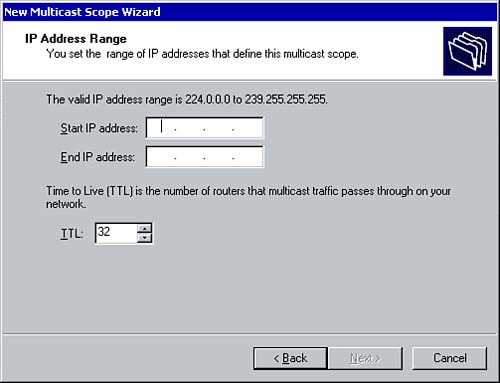
Multicast ScopesMulticasting is the process of sending a message to a group of recipients, as opposed to unicasting , in which a message is sent to a specific recipient. Normally, DHCP is used to assign each DHCP client a single unique IP address from a range of IP addresses configured in a scope. Windows Server 2003 extends the functionality to enable you to create multicast scopes so that messages destined to a multicast IP address can be sent to all clients in a multicast group. Multicast scopes are supported through a protocol known as the Multicast Address Dynamic Client Allocation Protocol (MADCAP). MADCAP controls how the DHCP servers dynamically assign IP addresses on a TCP/IP network. The multicast server (in this case, the DHCP server) is configured with a group of Class D IP addresses (in the range of 224.0.0.0 to 239.255.255.255) that can be assigned to multicast clients. The server is also responsible for maintaining the group membership list and updating the list as members join and leave a group. To create a multicast scope, perform the following steps:
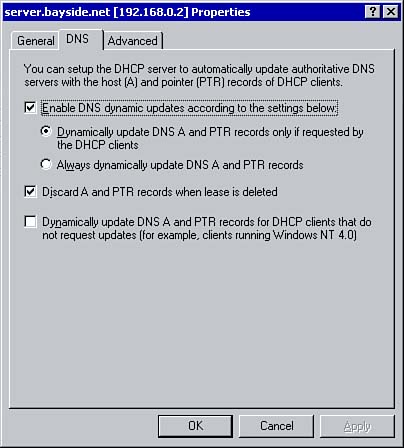
Configuring DHCP for DNS IntegrationPreWindows 2000 operating systems use NetBIOS names to identify clients and servers on the network and the different services they are running. These names can be resolved to IP addresses using a WINS server or an LMHOSTS file. Because the WINS database is dynamic, meaning that clients dynamically register their NetBIOS name and IP addresses, integrating DHCP and WINS on a network is simple. The DNS database is static on a Windows NT network, so implementing DHCP and DNS requires the use of a WINS Server. Windows 2000 and Windows Server 2003 primarily use DNS. DNS is required to locate clients, servers, and services on the network. Traditionally, administrators had to manually enter host records into the DNS database. To overcome this and allow DHCP and DNS to be integrated on a network without the use of WINS, Windows 2000, Windows XP, and Windows Server 2003 workstations configured as DHCP clients can be automatically registered in the DNS database. These clients can automatically update their own A records (the records mapping their hostnames to their IP addresses), and the DHCP server updates the PTR records (the records that map the IP address to the hostname for reverse lookups). You can change the default behavior by configuring the properties of the DHCP server (as you will see later in the chapter). DHCP ClientsThe workstation platform determines how the client interacts with the DHCP and DNS servers. Clients running Windows 2000 and later can send update requests directly to a DNS server to update their own pointer and address records, or the client can request that the DHCP server make the update on its behalf . Clients running platforms earlier than Windows 2000 do not support dynamic DNS updates and cannot interact directly with a DNS server. In this case, when a preWindows 2000 client or a non-Microsoft client receives an IP address from a DHCP server, the DHCP server can be configured to perform the DNS updates on behalf of these clients.
Configuring DHCP/DNS IntegrationTo configure DHCP for DNS integration, right-click the DHCP server within the management console and choose Properties. If you select the DNS tab, you'll see a window similar to the one shown in Figure 2.13. Figure 2.13. You configure DHCP integration with DNS via the DHCP management console. Here are the settings that can be configured for DHCP integration with DNS:
If you select the Advanced tab, you have the option of configuring the dynamic update registration credentials that can be used by the DHCP server when updating the DNS records. One of the reasons for doing this is to protect against unsecure updates to the DNS database. After you've created a dedicated user account, you can select the Credentials button and type in the username and password. These are the credentials that the DHCP server uses when registering names on behalf of DHCP clients. Dynamic update credentials must be configured in the following situations:
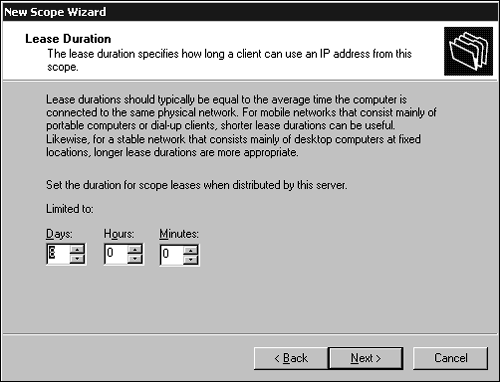
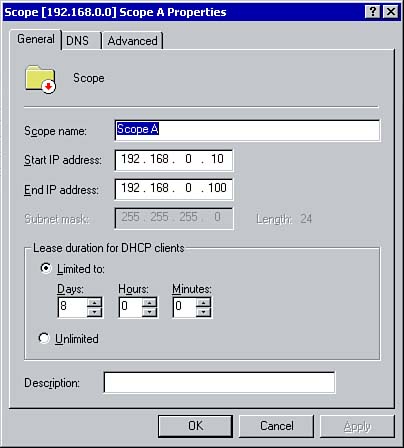
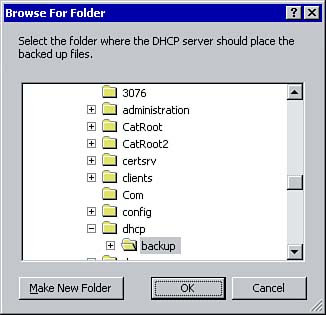
Managing DHCP Clients and LeasesEach DHCP scope is configured with a lease duration. This specifies how long a DHCP client can use an IP address before it must be renewed by a DHCP server. By default, this value is set to 8 days. However, you might want to change this depending on the number of IP addresses available as compared to the number of DHCP clients. The lease duration can be customized to meet the requirements of your network. If the number of IP addresses exceeds the number of DHCP clients on the network, you can configure a longer lease duration. However, if the number of IP addresses available in the scope is comparable to the number of DHCP-enabled clients, you should configure a shorter lease duration. Also, if your network consists of a number of mobile users who move between subnets, consider creating a shorter lease time. By shortening the lease duration, you might also see a slight increase in network traffic because IP addresses are being renewed at a more frequent interval. As you saw earlier in the chapter, the lease duration for a scope can be configured when the scope is created. You can also change the lease duration at any time afterward through the DHCP management console. Simply right-click the scope, click Properties, and edit the lease duration (see Figure 2.14). Figure 2.14. You can reconfigure the lease duration for an active scope via its Properties page. The renewal process between a DHCP client and a DHCP server begins after 50% of the configured lease duration expires. At this time, the client attempts to contact the DHCP server. A DHCPRequest message is broadcast by the client requesting to renew the IP address with which it's currently configured. If the DHCP server is available, it responds with a DHCPACK, granting the client's request to renew the IP address. If the client does not receive a response from the DHCP server, it again attempts to renew the IP address when 87.5% of the lease duration expires. Again, if the server is available, the request is granted. If not, the client continues to use the IP address until the lease duration expires. When it does, the IP address lease process described earlier in the chapter must be repeated. Viewing Lease InformationAs a DHCP server leases an IP address to DHCP clients, the management console provides administrators with an easy way of viewing lease information. The Active Leases container listed under the DHCP server lists all the IP addresses currently leased to clients. From here, you can also delete or cancel a lease, forcing a client to acquire a new IP address. To do so, right-click any of the active leases within the Active Leases container and click Delete. Verifying, Renewing, and Releasing IP AddressesThe IPCONFIG command-line utility can be used to verify IP parameters as well as release and renew an IP address that has been assigned by a DHCP server. The IPCONFIG /ALL command can be used to view detailed information about the IP parameters of a TCP/IP host. It returns information such as the IP address assigned to the client, the subnet mask, the optional parameters (including the IP address of any DNS servers), and the DHCP server from which the client is leasing the IP address. Although a client eventually releases and renews the IP address that it has been assigned from a DHCP server on its own, this can be done manually as well. Using the IPCONFIG /RELEASE command followed by the IPCONFIG /RENEW command manually releases and renews a DHCP client lease. Managing a DHCP DatabaseThe DHCP database stores information about client leases. There is no limit to the number of entries that a single database can hold. Little management is associated with maintaining the database. For example, Windows Server 2003 automatically compacts the database to reclaim unused space, although it can also be performed manually by an administrator. The following sections look at some of the management tasks that an administrator might need or want to perform manually. Backing Up and Restoring a DHCP DatabaseBackups are an integral part of most administrators' jobs. If you are using DHCP on a network, the DHCP database should also be included in the backup routine, in case the database becomes corrupt or fails. The DHCP database is automatically backed up every 60 minutes by default. You can also perform manual backups using the Backup option within the DHCP management console or by using the Windows Backup program ( NTBackup.exe ).
During an automatic or manual backup of the DHCP database, the following information is backed up:
To back up the DHCP database using the management console, perform the following steps:
If the DHCP database needs to be restored, you can do so through the management console using the Restore option. To do so, select the appropriate server within the DHCP console and choose Restore from the Action menu. Browse to the location containing the database backup. After you click OK, a message appears informing you that the service must be stopped and restarted for the operation to complete. Click Yes to restore the database. Moving the DHCP DatabaseYou can move the DHCP database from one DHCP server to another using the Backup and Restore options within the DHCP management console. To move the database, begin by performing a backup using the process outlined in the previous section. When the backup is complete, stop the DHCP service using the Services applet in the Control Panel. This ensures that the DHCP server does not continue to lease IP addresses to clients after the second server starts leasing the same addresses. The folder containing the backup of the database can then be copied to the destination DHCP server. You can use the Restore option to restore the database on the new DHCP server.
Managing DHCP Scope OptionsAfter a scope has been created, you can configure several DHCP options. The options can be configured at one of the following four levels:
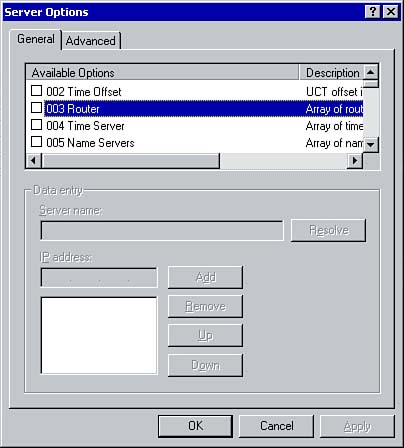
Options configured at the server level are applied to all DHCP clients, regardless of the subnet on which they reside. Any options that should be applied to all DHCP clients should be configured at this level. For example, to configure all clients on the network to use the same DNS server, you can configure the option at the server level. Keep in mind that when you are configuring scope options, any options configured at the scope or client levels override those configured at the server level. To configure server-level options, right-click the Server Options container listed under the DHCP server and select Set Predefined Options from the menu. If you want to configure DHCP options so that they apply only to DHCP clients on a specific subnet, configure the options at the scope level. For example, the IP address of the default gateway for a subnet should be configured at the scope level. Configuring scope-level options can be done by right-clicking the Scope Options container and selecting Configure Options from the menu. Finally, if you want to apply DHCP options to only a specific DHCP client, you can configure the options at the client level. You can configure options at this level only for clients that have a client reservation, meaning that they are DHCP clients but always lease the same IP address. Any option that you configure at this level overrides any configured at the server and scope levels. To configure a client-level option, right-click the client reservation and select Configure Options. Windows Server 2003 also allows DHCP options to be applied to groups of users or workstations with similar needs. User-class options can be used to assign options to DHCP clients that have common needs for similar DHCP options configurations. For example, a user class can be used to configure options for mobile users. Vendor-class options can be used to assign DHCP options on the basis of vendor information. For example, specific options can be assigned to clients running a specific version of Windows.
Now that you're familiar with how DHCP options can be applied, let's take a look the different DHCP options that can be assigned to clients. As previously mentioned, a DHCP server can assign parameters other than just an IP address and subnet mask to a DHCP client. A number of different options can be configured, some of which are shown in Figure 2.16. To access the Server Options dialog box, highlight Server Options in the left pane of the DHCP management console and select Configure Options from the Action menu. Figure 2.16. DHCP options. The following list provides a description of the commonly used DHCP options:
Most of the options outlined in the preceding list can also be configured locally on the client. By doing so, any options configured on the DHCP server will be overwritten by those configured locally. If you are using DHCP, however, it would not make sense to configure the options locally as well, especially in terms of administrative overhead. Managing Reservations and Reserved ClientsIn some instances, a workstation on the network requires a permanent IP address, but you still want that workstation to be a DHCP client. With a client reservation, the workstation can still be DHCP enabled, but the DHCP server always assigns the client the same IP address. In terms of administration, the client network configuration settings remain the same, IP addressing remains centralized, and the clients can still be assigned optional parameters through the DHCP server.
Creating a client reservation is a relatively simple process. Within the DHCP management console, right-click the Reservations container listed under your DHCP server and click the New Reservation option. In the New Reservation dialog box, type in a descriptive name, the IP address to be reserved, and the MAC address of the client that will be assigned the IP address. Then click the Add button and the Close button. The reservation appears in the Reservations container in the DHCP management console. Each client reservation that is created has a set of properties that can be used to change or configure the reservation. Any client reservations that have been configured appear under the Reservations container. To edit a client reservation, right-click the reservation and select Properties. From the properties window, you can use the General tab to change the information that was provided when the reservation was first configured. The only value that cannot be changed is the IP address. You can configure dynamic updates for the DHCP client via the DNS tab. |
EAN: 2147483647
Pages: 118