Burning CDs and DVDs in Ubuntu
| Linux in general is distributed across the Internet by using ISOs that are waiting to be written to CDs or DVDs. Therefore learning how to burn discs is pretty essential if you have to download and install a Linux distribution. Not only that, but you will want to use CDs and, more commonly, DVDs to back up your music, family pictures, or other important files. With DVD writers being so cheap, the format has really taken off and more and more people use cheap DVDs as a way of archiving simply due to the larger storage size available. Today's high resolution digital cameras can occupy upwards of 3MB per shot, and music files can be anything from 1MB to 10MB+ in size. These file sizes make DVD the obvious choice, but there are still occasions when you will need to write to a CD. You can use CDs and DVDs to
Linux audio clients and programs support the creation and use of many different types of audio formats. Later sections of this chapter discuss sound formats, sound cards, music players, and much more. Because CD burning is used for many other purposes in Ubuntu, we cover the essentials of that process first in this chapter. To record multimedia data on a CD, you must have installed a drive with CD writing capabilities on your system. Chapter 4, "Post-Installation Configuration," explains the rudiments of getting a CD writer configured and working properly. The hardware should have been set up properly during the initial Ubuntu installation. To make certain that your CD writer is working, use cdrecord-scanbus to get the information for using the CD drive under SCSI (small computer system interface) emulation: $ sudo cdrecord -scanbus Cdrecord-Clone 2.01a32-dvd (i686-pc-linux-gnu) Copyright (C) 1995-2004 Joerg Schilling Linux sg driver version: 3.5.33 Using libscg version 'schily-0.8debian2' ... scsibus1: 1,0,0 100) 'IDE-DVD ' 'ROM 6116 ' 'DD04' Removable CD-ROM 1,1,0 101) '_NEC ' 'DVD_RW ND-3500AG' '2.86' Removable CD-ROM 1,2,0 102) * 1,3,0 103) * 1,4,0 104) * 1,5,0 105) * 1,6,0 106) * 1,7,0 107) * Here, we see that the CD/DVD writer (in this example, a DVD writer) is present and is known by the system as device 1,1,0. The numbers represent the scsibus/target/lun (logical unit number) of the device. You will need to know this device number when you burn the CD or DVD, so write it down or remember it. Tip An IDE drive used to create CDs and DVDs needs to be emulated as a SCSI drive. Ubuntu does this automatically when you first install it, but in case you need to do it manually, here are the few items you need to configure (assuming that the CD drive is at /dev/hdd):
These items will load the appropriate modules and provide SCSI emulation. You would no longer refer to the CD drive as /dev/hdd, but as /dev/scd0. Check the symbolic for /dev/cdrom to make certain that it points to /dev/scd0. However, because Ubuntu uses the 2.6 kernel, SCSI emulation is not necessary, although it is useful information should something not work correctly. Creating CDs from the Command LineIn Linux, creating a CD is a two-step process. You first create the iso9660-formatted image, and you then burn or write the image onto the CD. The iso9660 is the default file system for CD-ROMs. Use the mkisofs command to create the ISO image. The mkisofs command has many options (see the man page for a full listing), but use the following for quick burns: $ mkisofs -r -v -J -l -o /tmp/our_special_cd.iso /source_directoryThe options used in this example are as follows:
Many more options are available, including options to make the CD bootable. After you have created the ISO image, you can write it to the CD with the cdrecord command: $ cdrecord -eject -v speed=12 dev=0,0,0 /tmp/our_special_cd.isoThe options used in this example are as follows:
Note You can also use the blank= option with the cdrecord command to erase CD-RW disks. The cdrecord command has fewer options than mkisofs does, but it offers the -multi option, which enables you to make multisession CDs. A multisession CD enables you to write a data track, quit, and then add more data to the CD later. A single=session CD can be written to only once; any leftover CD capacity is wasted. Read about other options in the cdrecord man page. Current capacity for CD media is 700MB of data or 80 minutes of music. (There are 800MB/90 minute CDs, but they are very rare.) Some CDs can be overburned; that is, recorded to a capacity in excess of the standard. The cdrecord command is capable of overburning if your CD-RW drive supports it. You can learn more about overburning CDs at http://www.cdmediaworld.com/hardware/cdrom/cd_oversize.shtml/. Creating DVDs from the Command LineThere are several competing formats for DVD (digital versatile disk), and with prices rapidly falling, it is more likely that DVD-writing drives will become commonplace. The formats are as follows:
Differences in the + and formats have mostly to do with how the data is modulated onto the DVD itself with the + format having an edge in buffer underrun recovery. How this is achieved impacts the playability of the newly created DVD on any DVD player. The DVD+ format also has some advantages in recording on scratched or dirty media. Most drives support the DVD+ format. As with any relatively new technology, your mileage may vary. We will focus on the DVD+RW drives because most drives sold support that standard. The software supplied with Ubuntu has support for writing to DVD-R/W (re-writable) media as well. It will be useful for you to review the DVD+RW/+R/-R[W] for Linux HOWTO at http://fy.chalmers.se/~appro/linux/DVD+RW/ before attempting to use the dvd+rw-tools that you will need to install to enable DVD creation (also known as mastering) as well as the cdrtools package. You can ignore the discussion in the HOWTO about kernel patches, compiling the tools. Tip The 4.7GB size of DVD media is measured as 1000 megabytes per gigabyte, instead of the more commonly used 1024 megabytes per gigabyte, so do not be surprised when the actual formatted capacity, about 4.4GB, is less than you anticipated. The dvd+rw-tools will not allow you to exceed the capacity of the disk. You need to have the dvd+rw-tools package installed (as well as the cdrtools package). The dvd+rw-tools package contains the growisofs application (that acts as a front end to mkisofs) as well as the DVD formatting utility. You can use DVD media to record data in two ways. The first way is much the same as that used to record CDs in a session, and the second way is to record the data as a true file system using packet writing. Session WritingTo record data in a session, you use a two-phase process:
The growisofs command simply streams the data to the disk. For subsequent sessions, use the -M argument instead of Z. The -Z argument is used only for the initial session recording; if you use the -Z argument on an already used disk, it simply erases the existing files. Caution Some DVDs come preformatted; formatting them again when you use them for the first time can make the DVD useless. Always be sure to carefully read the packaging your DVD comes in to ensure that you are not about to create another coaster! Tip Writing a first session of at least 1GB helps maintain compatibility of your recorded data with other optical drives. This is because the DVD players calibrate themselves by attempting to read from specific locations on the disk; you need data there for the drive to read it and calibrate itself. Also, because of limitations to the ISO9660 file system in Linux, do not start new sessions of a multisession DVD that would create a directory past the 4GB boundary. If you do so, it causes the offsets used to point to the files to "wrap around" and point to the wrong files. Packet WritingPacket writing treats the DVD disk like a hard drive in which you create a file system (like ext3) and format the disk, and then write to it randomly like a conventional hard drive. This method, although commonly available on MS Windows-based computers, is still experimental for Linux and is not yet covered in detail here. Tip DVD+RW media are capable of only about 1,000 writes, so it is very useful to mount them with the noatime option to eliminate any writing to update their inodes or simply mount them read-only when it's not necessary to write to them. It is possible to pipe data to the growisofs command: $ sudo your_application | growisofs -Z /dev/scd0=/dev/fd/0It is also possible to burn from an existing image (or file, named pipe, or device): $ sudo growisofs -Z /dev/scd0=imageThe dvd+rw-tools documentation, found at /usr/share/doc/dvd+rw-tools-*/index. html, is required reading before your first use of the program. We also suggest that you experiment with DVD-RW (rewritable) media first, as DVD-R (record once) media is not yet as inexpensive as CD-R media. Creating CDs and DVDs with Ubuntu's Graphical ClientsAlthough adequate for quick burns and use in shell scripting, the command-line technique for burning CDs and DVDs is an awkward choice for many people until they become proficient at it and learn all the arcane commands. Fortunately, Ubuntu provides several graphical clients. With Ubuntu, enhanced functionality has been included in the default file browser Nautilus. Under the Places menu item is a CD/DVD Creator selection. To use it, insert a blank CD or DVD into your CD-R/DVD-R drive. You will need to have two Nautilus windows open: one showing the files you want to save to the CD, and a second one that is opened to the burn:/// location. Click on the Write to Disc button as shown in Figure 10.1 to bring up the Write dialog; at the next dialog box, choose what format you want to write the disc to. Nautilus CD/DVD Creator supports writing to a disc image file, commonly known as ISO. You can also give your new disc a label and tell Nautilus what speed you want to write the disc at. Finally click the Write button to start the burning processit is that simple! Nautilus also allows you to quickly write an ISO file directly to a disc. Simply right click on the ISO file that you want to burn to a disc, and select Write to Disc. You will be asked to confirm the CD Writer to use, and all you have to do is click OK to start the writing process. Figure 10.1. Creating a CD or DVD using the Nautilus browser is made easy with the drag-and-drop features it provides.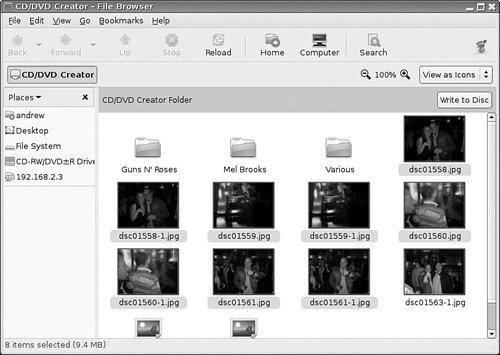 The following sections describe X-CD-Roast, an additional CD/DVD creation tool as well as a number of other graphical clients for burning audio and data CDs. Tip An excellent Internet site for CD-related information is http://www.cdmediaworld.com/. The Gracenote CDDB Music Recognition Service licenses a database service to software developers so that they can include additional functionality in their application by accessing the database and having their application display information about the music CD, including the artist and song title, the CD's track list, and so on. The database server at cddb.cddb.org will, when contacted by the appropriate software, identify the appropriate CD and send the information to be displayed locally. Many CD player applications provide this functionality. The service is interactive: If you have a CD that is not in the CDDB database, the website tells you how you can add the information to the database. Each GUI application for burning CDs has different strengths and weaknesses. You should experiment with all the different graphical tools as well as try your hand at commandline burning and you will have a significantly richer multimedia experience with Ubuntu. GnomeBakerGnomeBaker (see Figure 10.2) is a handy CD/DVD burning application that is very powerful, yet easy to use. Although not installed by default, a quick sudo apt-get install gnomebaker will ensure that the correct packages are downloaded and installed onto your system. Figure 10.2. The simple to use, yet extremely powerful, GnomeBaker.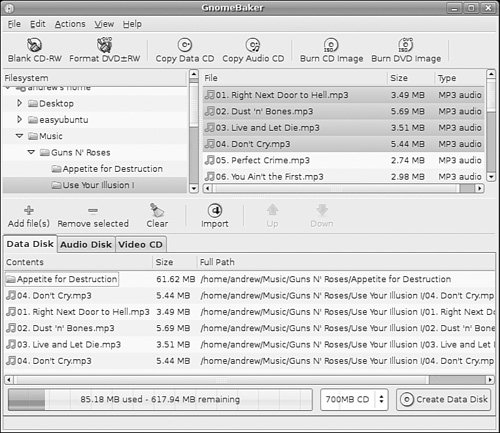 Using GnomeBaker, you can quickly create both Audio and Data CDs, as well as writing data to DVDs. It has support for many of the different formats, including smaller 200MB CDs, right up to 8.5GB DVDs. X-CD-RoastX-CD-Roast, shown in Figure 10.3, is a standalone CD and DVD creator provided with Ubuntu, but is not installed by default. When installed using synaptic, it can be found in the Sound and Video menu as X-CD-Roast, or it can be launched from the command line, like this: $ xcdroast & Figure 10.3. X-CD-Roast is a CD/DVD creation client for Ubuntu, and it must be configured from the Setup dialog.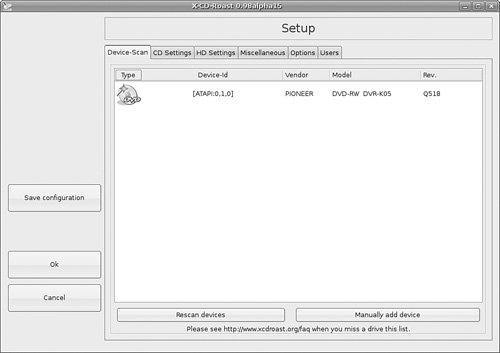 When you first start it, you will need to put sudo in front of the command so you can correctly configure X-CD-Roast. Once the first scan of the CD/DVD devices has been completed, it begins with a dialog warning you to enter the Setup dialog, which will be the only button presented to you in the next screen other than Exit. The application auto-detects your CD/DVD drive, but you must tell it which drive (if you have more than one) is the writing drive and select the users who are allowed to use the application. The dialogs for setting this information are straightforward and easy to follow. Make certain that you choose a default directory for temporary image storage that offers enough room to store several images. The main X-CD-Roast menu offers you the choice to duplicate or create CDs or DVDs. The latter operation is shown in Figure 10.4. Figure 10.4. The X-CD-Roast Create CD/DVD window allows access to the full range of options, including creating music CDs or video DVDs.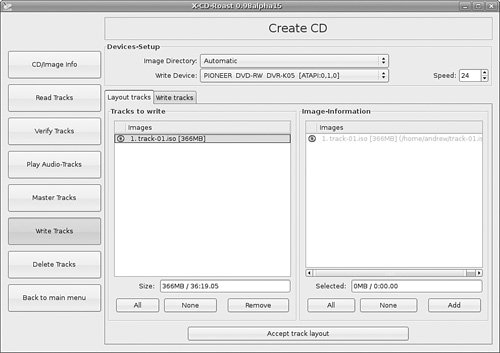 SerpentineSerpentine (see Figure 10.5) is a tool that allows you to create your own Audio discs by either selecting audio files or by using playlists that you have created in Rhythmbox. It is limited in that it only allows you to create audio discs, but it is very straightforward to use. Just make sure that you are legally entitled to write any audio files to a CD! Figure 10.5. Create your own CD compilations using Serpentine.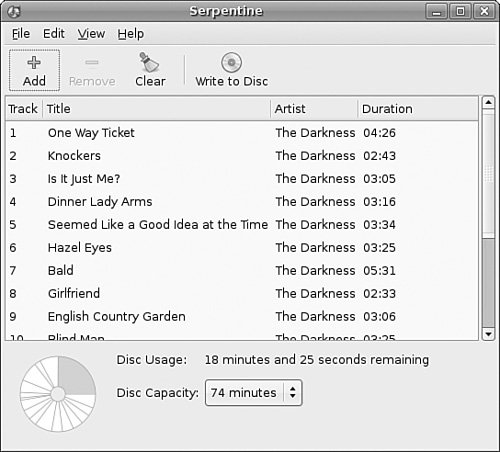 |
EAN: 2147483647
Pages: 318