| Another key interactivity feature is to give the user the opportunity to respond, in writing, to questions. This is the purpose of a text entry box. You can use text entry boxes to ask simple questions or to password-protect a presentation. For example, you may have the image of an application's toolbar with the Text tool circled visible on the screen. On the screen is a question: "Enter the name of the circled tool." Beside the question is a blank text entry box. The user enters the words "Text tool" and presses the Enter key. A dialog box with the words "That is correct." appears, and the next question appears. If the student enters a wrong answer, such as "Grabber hand," a failure message appears, and the user is prompted to try again. A password uses the same procedure. The user is presented with a screen and is prompted to enter the correct password to proceed. If the answer is wrong, the user can be given a few more attempts before being told to contact the system administrator. If the answer is correct, the user is taken to the correct screen immediately. To add a text entry box 1. | Open the slide to contain the text entry box in the Edit View panel.
| 2. | Select Insert > Text Entry Box, click the Text Entry Box button on the Object toolbar, or press Control-Shift-T.
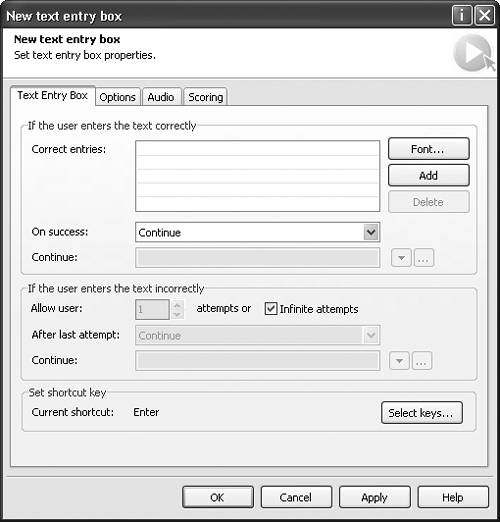
The "New text entry box" dialog box opens (Figure 7.23).
Figure 7.23. You can add text entry boxes as well as events based upon success or failure to a slide. 
| 3. | Select the Text Entry Box tab, where you'll decide how the movie will react to the user's input.
The Text Entry Box tab is not really that mysterious. It asks you to make only two decisions: "What do I do if the input text is correct?" and "What do I do if the text is incorrect?"
| 4. | Click once in the "Correct entries" area.
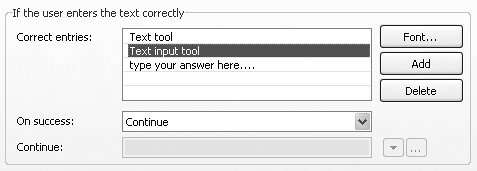
| 5. | Enter the correct response to your question in the text entry field (Figure 7.24).
Figure 7.24. Enter the correct entries into the dialog box. You are not limited to the space given. 
When entering the text, place each possible text combination into a separate text box. Note that though the text entry box looks like it requires a rather short line of text, this is not the case.
| 6. | Click the Add button to insert another text entry box, or click in the next text entry box area.
| 7. | Click the Font button.
The Font dialog box opens.
| 8. | Select the font, style, effect, and font color.
Note that these font settings apply to the text the user will enter into the text entry box. They do not apply to the text that you just entered into the Text Entry dialog box.
| 9. | Click OK.
You are returned to the Text Entry dialog box.
| 10. | In the "On success" drop-down list, select what happens when a correct answer is entered.
| 11. | Select what happens when an incorrect answer is entered.
| 12. | Select the Options tab.
The text entry box's options open.
| 13. | Decide if the box should have a frame, if the box should be treated as a password, if the text input is case sensitive, what captions (if any) will appear, and the duration of the text entry box on screen.
| 14. | Click OK.
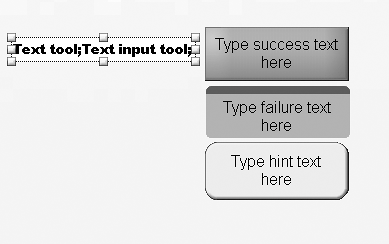
The text entry box and any success or failure captions appear in the slide (Figure 7.25).
Figure 7.25. A text entry box with captions in a Captivate slide. 
|
 Tips Tips
Use a transparent caption for the actual questions requiring text entry. Text entries that are too long are simply truncated to display in the correct entries list. When you double-click one of them to edit it again, the entire line of text is still editable and can be navigated using the arrow keys.
To create a user password 1. | Open the "New text entry box" dialog box.
| 2. | Enter the password text into the "Correct entries" text entry box.
| 3. | Choose the success and failure actions.
| 4. | Select the Options tab.
| 5. | Select Password and "Failure caption" (Figure 7.26). Also here, if a password contains upper and lowercase letters, select Case-sensitive.
Figure 7.26. You can use text entry boxes to password-protect a movie. 
| 6. | Click OK.
The Password text entry box with the password visible as a series of asterisks and the failure caption appear in the slide (Figure 7.27).
Figure 7.27. A password text entry box with failure caption on a Captivate slide. 
|
 Tip Tip
|


 Tips
Tips
