| In the previous chapter, you learned how to record a movie. Recording is an inexact process and, inevitably, there will come a time when you discover you have either omitted a step or have to insert new slides into the movie. Instead of rerecording the movie, you can record the new sequence of slides and insert them into the existing movie. The various types of slides available to you include: Image slides Composed of a BMP, GIF, or JPG image. Colored slides Contain a colored background that you create. Blank slides Empty slides to which you add content, ranging from logos to text. They are ideal for separating sections of a movie. Question slides Used to create quizzes based upon the presentation. PowerPoint slides Contain an entire PowerPoint presentation. FLA slides Designed to hold Flash content. Animation slides Contain animations such as Flash SWF files, animated GIFs, and AVI movies.
To record new slides 1. | Open a movie and, in either the Storyboard View or Edit View panel, select Insert > Record Additional Slides (Figure 3.1).
Figure 3.1. Slides are inserted using a menu. 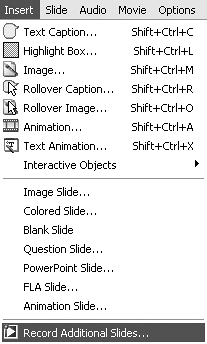
The Record Additional Slides dialog box opens.
| 2. | Choose "Record Slides at the end of this movie" to add the new slides after the last slide of the movie, or choose "Record slides and insert after the slide selected below" to select a slide from the thumbnails and have the new recoding added after the selected slide.
| 3. | Click OK.
The Recording window opens.
| 4. | Finish recording by pressing the End key.
The new slides are inserted into your movie at the location indicated in step 2 (Figure 3.2).
Figure 3.2. You choose where the additional slides will be placed after they are recorded. 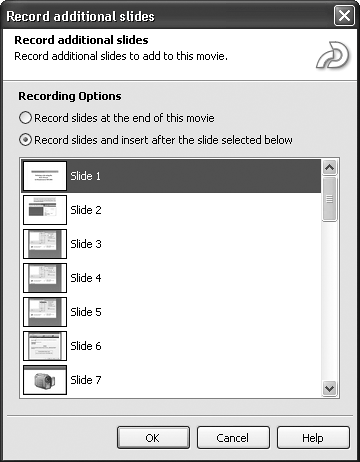
|
To import new slides from one movie to another 1. | Open the target movie into which the slides are to be imported.
| 2. | Select File > Import/Export > "Import Slides/Objects from other Captivate Projects" (Figure 3.3).
Figure 3.3. You can import slides into a movie from another Captivate movie. 
| 3. | Select the file from which the slides are to be imported and click the Open button.
You are presented with the thumbnails of all of the slides in the selected movie (Figure 3.4) as well as several options.
Figure 3.4. Select the slides and objects on the slides to be imported. 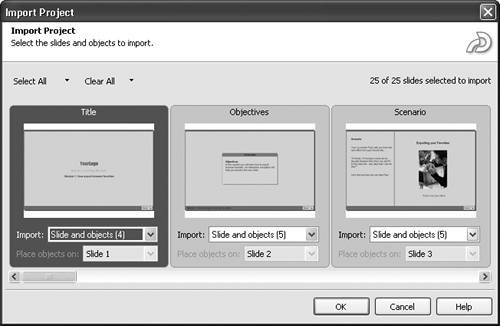
| 4. | To select an individual slide, select Slide Only or Slide and Objects from the Import drop-down below the desired slide.
To select multiple slides, navigate through the dialog box by moving the slider and selecting the slides you want to import in the Import drop-down.
To select all of the slides, click the Select All Button.
To deselect all of the slides selected, click the Clear All button.
To import just the objects in a slide, elect objects only from the Import drop-down. The Objects Destination pop-down list, which contains all of the slides in the target movie, becomes available. Select the slide in the target movie into which the objects will be loaded.
| 5. | When you have completed importing slides and/or objects into the target movie, click OK.
The imported slides appear at the end of the movie.
| 6. | Open the Slide View panel and move the imported slides to their desired locations in the target movie.
|
To use Copy and Paste to add new slides 1. | Open a movie and, in either the Storyboard View or Edit View panel, select the slide or slides to be copied.
| 2. | Press Control-C, right-click the slide, and select Copy Slide from the context menu or select Edit > Copy Slide (Figure 3.5).
Figure 3.5. Use the Slide context menu to copy and paste slides into a movie. 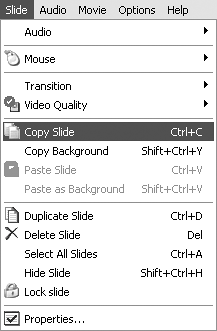
| 3. | Open the movie where the new slides will be located.
| 4. | Right-click the target slide where the copied slides are to be pasted and select Paste Slide from the context menu.
|
 Tip Tip
You can select multiple slides for copying by pressing the Shift or Control button and clicking the desired slides. If you want to copy all of the slides of a movie, press Control-A or select Edit > Select All Slides. To add blank slides to a movie 1. | In the Storyboard View or Edit View panel, select the slide before the location where the slide is to be inserted.
| 2. | Select Insert > Blank Slide (Figure 3.6).
Figure 3.6. Blank slides are ideal for adding personalization to a movie. 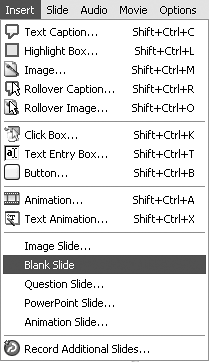
A new blank slide is inserted into the movie.
|
To insert a colored slide 1. | In the Slide View panel, select the slide before the location where the colored slide is to be inserted.
| 2. | Select Insert > Colored Slide.
The color picker opens.
| 3. | Select your color and click OK.
The new slide is inserted into the movie (Figure 3.7). If you are adding the slide in the Storyboard View panel, clicking OK opens the new slide in the Edit View panel.
Figure 3.7. A colored slide is inserted into a movie. 
|
To delete a slide from your movie 1. | Select the slide (or slides) to be deleted in either the Storyboard View or Edit View panel.
| 2. | Press the Delete key.
An alert opens asking you if you really want to do this.
| 3. | Click Yes.
|
To rearrange the slide order in a movie 1. | Open a Captivate movie in the Storyboard view.
| 2. | Select the slide or slides to be moved.
| 3. | Drag the selection to its new location and release the mouse.
|
Tip
A Word About Blank Slides At first glance it might seem a bit odd to be inserting empty slides into the movie. Yet blank slides are, in many respects, a canvas upon which you can add content. This content could be an image, a logo, a credits screen, or anything else that can be placed in a slide. Use blank slides to divide sections of your movie. For example, you may have a software demonstration that is immediately followed by a quiz or demonstration of some of the software's advanced features. A blank slide enables you to transition smoothly between the two sections and give the user a visual clue that things are about to change. A colored slide, in Captivate, is nothing more than a blank slide with a colored background. |
|