Resizing Captivate Movies


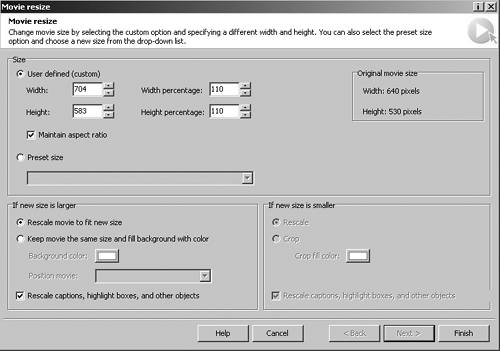
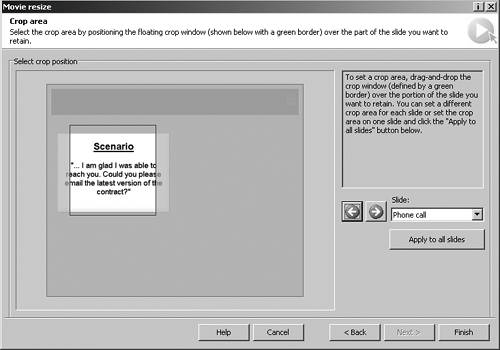
There will be occasions where you will capture a movie and then discover that its dimensions need to be changed. Luckily, you can do this without rerecording the movie.

To resize a movie

1.

Open a movie in Captivate and select Movie > Resize Movie.

The Movie Resize dialog box opens (Figure 2.21).

Figure 2.21. The Movie resize dialog box.


2.

Make your size adjustments and then click OK.

Resizing Your Movie

The Movie Resize dialog box gives you a lot of valuable information and asks some rather important questions. It is divided into four areas:

  • Size Enter the new dimensions of the movie.

  • Original movie size Displays the length and width of the movie about to be resized. You can't modify this information.

  • If new size is larger Indicate what happens if you increase the size of the movie.

  • If new size is smaller Indicate what happens if you decrease the size of the movie.

Following is the information required for each of the input areas:

  • User defined (custom) Enter a new width and height or change the percentage values. Changing the width will also change the percentage, so you need to enter either a pixel value or a percentage value, not both.

  • Maintain aspect ratio Select to maintain the relationship of the movie's dimensions to each other and to avoid distortion. For example, a digital video has a 4:3 aspect ratio. Increasing the size of a 200 x 150 video to 400 x 300 will not introduce distortion, yet increasing it to 211 x 153 will, because 211 is not divisible by four and 153 is not divisible by three. A good rule of thumb is to never deselect this when resizing a movie.

  • Preset size This pop-down menu gives you one-click access to a number of presets (Figure 2.22), which range in size from fitting on a Pocket PC screen to a full screen Breeze slide.

    Figure 2.22. You can resize movies to a number of preset sizes.


After the size is set, the movie becomes either physically larger or physically smaller. If the movie is made larger:

  • Rescale movie to fit new size Select to rescale the movie's physical dimensions. To avoid distorting the content, be sure to select Rescale captions, highlight boxes and other objects at the bottom of this area.

  • Keep movie the same size and fill background with color Select when the accrual movie has to stay the same size but the background area it sits on has to be larger. This is an odd but extremely useful option.

If the movie is made smaller:

  • Rescale Select to rescale the movie's physical dimensions. To avoid distorting the content, be sure to select Rescale captions, highlight boxes and other objects at the bottom of this area.

  • Crop Select to crop the movie to its new size. If there is any background space, you can select the color using the Crop fill color box. After selecting Crop, click the Next button to open the Crop Area dialog box. You have two choices: crop the entire movie to the new size or crop individual frames to the new size.

    • To crop the movie to a new size, click the Next button to open the Crop dialog box (Figure 2.23). Drag the Crop window to its new location and click the "Apply to all slides" button.

      Figure 2.23. You can resize movies by cropping them.


    • To crop individual slides, use either the left or right green arrow buttons to move up or down in the slide order. You can also select the slides from the pop-down list (Figure 2.24). Drag the Crop window to its new position over the area to be retained. Repeat this process for each slide to be cropped. When you're done, click the Finish button.

      Figure 2.24. You can crop individual slides.


Macromedia Captivate for Windows. Visual QuickStart Guide
ISBN: 321294173
EAN: N/A
Year: 2003
Pages: 130

flylib.com © 2008-2017.
If you may any questions please contact us: flylib@qtcs.net