13-2. IDS Embedded Sensor Configuration You can use the information presented in this section to configure a router or firewall to operate as a virtual IDS sensor. Locating the Signature Definitions For a router running a Cisco IOS software release earlier than 12.3(8)T, or for a firewall platform running any version of PIX software, the signature definitions available for IDS are built into the operating system image itself. To update the signature definitions, you must upgrade the image file and reload the device. If you are using a router running Cisco IOS software Release 12.3(8)T or later, the router supports the Dynamic Intrusion Protection System, also called IOS IPS. To update the signature definitions, you can download a signature definition file (SDF) into the router, independent of the operating system release. This means that new signatures can be added to the IPS dynamically as they become available. Use the following command to identify the signature definition file location for IOS IPS: IOS IDS | | IOS IPS | Router(config)# ip ips sdf location url | PIX | |
The signature definition file can be found at url, which can point to the local router's Flash memory, as shown in the following example: Router(config)# ip ips sdf location flash:/attack-drop.sdf
The SDF is actually loaded into the IPS memory when an IPS policy name is applied to a router interface. At that time, the router appears to pause while it parses the SDF file contents and builds the inspection engines and signatures. TIP As soon as an SDF has been loaded into the router's IPS configuration, you can apply updated signature definition files dynamically. Download the new SDF to a server or the router's Flash memory. Then, use the following command to copy its contents into the running IPS database: Router# copy [/erase] url ips-sdf
This merges new signatures defined in the SDF located at url with any existing signatures already loaded into the IPS. You can use the /erase keyword to erase all existing signatures before merging the new SDF if you need to start with a clean signature database because router memory is at a premium. As soon as the SDF merge is complete, you should write the full signature database to a new file. You can do that with the following command: Router# copy ips-sdf url
After that file is written to the router Flash memory or an external server, make sure that the router is configured to use that file when it builds the SDF database after a reload or after the IPS configuration is reinitialized. You can do so with the ip ips sdf location command, described previously.
Using a Signature Update with an IOS IPS Sensor Cisco periodically provides updated and new intrusion protection system signatures through a single signature update file. One version of the signature update applies to dedicated IDS appliances, and another version applies to IOS IPS platforms. Generally, the two versions are named consistently so that you can keep all types of sensors updated at the same level. To obtain and apply a signature update file, follow these steps: 1. | Download the signature update file.
You can download the signature update files to your local workstation by following these steps:
Point your web browser to http://www.cisco.com. Select Downloads. Select Cisco Secure Software. Under Intrusion Detection, look for the IOS IPS Update Files section. Follow the Latest Signature Update link, and then select a signature update file to download.
NOTE The signature update files are named according to the sensor platform and are numbered sequentially. Each time a new update is released, the signature file number is incremented. The most recent signature update file is comprehensiveit always has the new updates, as well as all the previously released signatures. For example, the file named IOS-S139.zip contains the newly released signatures as well as signatures from IOS-S138.zip, IOS-S135.zip, and so on. After the signature update file is downloaded to your local workstation, don't attempt to unzip it or manually upload it to the router. The entire installation is done auto-matically through a management application. | 2. | Install the signature update file on a router platform.
Currently, the only way to upload and install a signature update file is through the Security Device Manager (SDM) application. This is a Java-based management application that is installed and run on the router platform. All management functions are performed through a web browser on a workstation.
SDM is available only on select router platforms and in Cisco IOS software releases that support security functions. You can go to http://www.cisco.com/go/sdm to find out more about SDM.
Start an SDM session with the target router. Point your web browser to https://router-ip-address. When the main SDM window appears, click the Configure button. In the list of buttons on the left side, click Intrusion Prevention. Begin IPS signature management. In the Intrusion Prevention System (IPS) screen, click the Launch IPS... button. This initiates a new application window. In the main SDM Intrusion Prevention window, click the Configure button. Under Tasks, click Rules. All the router interfaces are displayed, along with the IPS status of each. Make sure IPS (inbound, outbound, or both) is enabled on the appropriate interfaces. To do this, select an interface in the table and then click the Enable button above the table. The display should update to show the new interface status. Display a listing of the signatures that are currently installed in the router. Do this by clicking the Signatures button in the Tasks list on the left. The signature list should look similar to the one shown in Figure 13-2. Figure 13-2. Generating a List of Current IPS Signatures 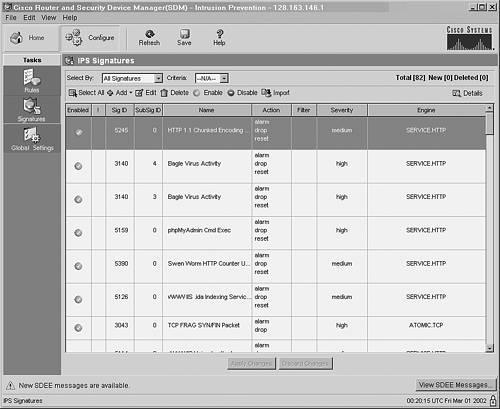
To upload and import the new signature update file, click the Import button located just above the signature table. Select the folder and filename where the signature update file is stored, and then click the Open button. The file is uploaded to the router, and SDM shows a list of its signatures in a new window. The signatures in the file are not automatically imported into the router's IPS feature. Instead, you have to manually select the signatures you want to import from this list, as shown in Figure 13-3. Figure 13-3. Displaying a List of Signatures in the Update File 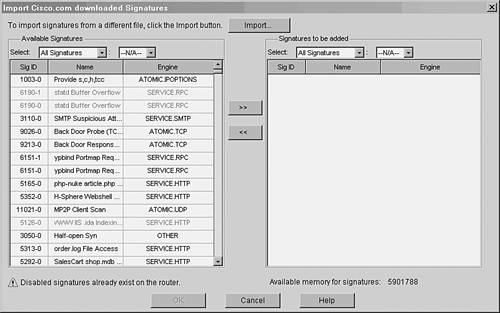
Import a signature by selecting it from the Available Signatures list on the left and clicking the >> button. The signature is shown in the Signatures to be added list on the right. After you select and copy all the desired signatures, click the OK button.
|
Configuring an Embedded IDS Sensor You can use the following steps to configure a router or firewall as an embedded sensor. In this section, IOS IDS refers to router platforms running a Cisco IOS software release earlier than 12.3(8)T. IOS IPS refers to Cisco IOS software Release 12.3(8)T or later. 1. | (Optional) Use the Post Office system for IDS alarms.
TIP When Post Office attributes are changed on a router, they take effect only after a router reloads. This includes enabling Post Office, as well as configuring or changing the IP addresses of Post Office collectors. You can use any of Steps 1a through 1g to make configuration changes at any time without affecting router operation. However, you must schedule a network downtime or outage, because the router is reloaded to implement the Post Office changes. NOTE Post Office support was removed as of Cisco IOS software Release 12.3(11)T. It was replaced by the Security Device Event Exchange (SDEE) protocol. (Optional) Send IDS alarms to an external collector (non-Syslog): IOS IDS | Router(config)# ip audit notify nr-director | IOS IPS | Router(config)# ip audit notify sdee | PIX | |
By default, an IOS IDS sensor sends its alarms using Syslog, and an IOS IPS sensor does not. If you are using VMS or Cisco Secure IDS Director, you can use this command to send alarms using the Post Office protocol instead. (Here, the nr portion of the nr-director keyword comes from the name of the legacy Cisco NetRanger product line.) For an IOS IPS sensor, you can use the sdee keyword to send alarms using SDEE. The router's internal HTTP server must also be enabled with the following command so that SDEE clients can register with the router via HTTP: Router(config)# ip http server
(Optional) Identify the IDS sensor for Post Office: IOS IDS | Router(config)# ip audit po local hostid host-id orgid org-id | IOS IPS | | PIX | |
When sending alarms to a Post Office collector, the IDS sensor must identify itself within the Post Office hierarchy. You can assign this sensor to have host ID host-id (1 to 65535; the default is 1) within the organization ID org-id (1 to 65535; the default is 1). The host-id must be unique within the org-id. (Optional) Identify a Post Office collector: IOS IDS | Router(config)# ip audit po remote hostid host-id orgid org-id rmtaddress ip-address localaddress ip-address [port port-number] [preference preference-number] [timeout seconds] [application {director | logger}] | IOS IPS | | PIX | |
The collector is identified by its host ID host-id (a unique number 1 to 65535; the default is 1), within organization ID org-id (1 to 65535; the default is 1). The sensor must also identify the collector and itself by keywords and IP addresses rmtaddress ip-address and localaddress ip-address, respectively. UDP port number port-number (1 to 65535; the default is 45000) is used for all Post Office packets. Multiple "routes" can exist for the same collector if redundant paths or interfaces are present. Each time this command is repeated for the same remote collector, you can assign a preference as preference-number (the default is 1) to the remote IP address. Lower preferences are tried first; if one collector is unresponsive, the sensor moves to the next higher-preference entry. Sensors use a heartbeat message, sent every timeout seconds (the default is 5 seconds), to determine if a remote collector is alive and responsive. A sensor can also send alarms to an application collector, such as Cisco Secure IDS Director (director, the default), or to an IDS sensor appliance, such as Cisco Secure IDS Sensors (logger). (Optional) Adjust the Post Office message queue: IOS IDS | Router(config)# ip audit po max-events number-of-events | IOS IPS | | PIX | |
The IOS IDS sensor queues number-of-events (1 to 65535; the default is 100) alarms or events to be sent to a collector. This queue buffers rapidly occurring alarms if the alarm messages can't be sent to a collector quickly enough. TIP Be careful if you decide to change the event queue limit. Each event in the queue takes up 32 KB of router memory. If the queue is allowed to grow very large, it could use up too much memory needed by other processes. (Optional) Identify Post Office protected addresses: IOS IDS | Router(config)# ip audit po protected ip-addr [to ip-addr] | IOS IPS | | PIX | |
When an IOS IDS sensor triggers a signature alarm, it also sends a flag to the collector to indicate whether the alarm involves an IP address on the "protected" side of the sensor. You can define a single IP address as ip-addr or a range of addresses as ip-addr to ip-addr. You can repeat this command to define as many protected addresses or ranges as needed. (Optional) Limit the number of SDEE clients: IOS IDS | | IOS IPS | Router(config)# ip sdee subscriptions subscriptions | PIX | |
By default, only one SDEE client is allowed to connect for IOS IPS alerts. You can adjust that limit to subscriptions (1 to 3). (Optional) Adjust the SDEE event queue size: IOS IDS | | IOS IPS | Router(config)# ip sdee events events | PIX | |
As IPS events occur, alerts are placed in a queue until the SDEE client polls for them. By default, up to 200 events can be stored in the circular event queue. You can adjust the event queue size to events (10 to 1000 events; the default is 200).
| 2. | Use Syslog for IDS alarms.
This step shows only the basic Syslog configuration steps needed for IDS logging. For more information on PIX platforms, see Chapter 9, "Firewall Logging." In Chapter 12, "Cisco IOS Firewall: Managing Activity," see section 12-2, "Configuring IOS Firewall Logging," for information on router platforms.
Enable Syslog logging: IOS IDS | Router(config)# logging on | IOS IPS | Router(config)# logging on | PIX | Firewall(config)# logging enable |
When logging is enabled, both firewalls and routers generate logging messages to any destinations that are configured. Identify a Syslog server: IOS IDS | Router(config)# logging host ip_address | IOS IPS | Router(config)# logging host ip_address | PIX | Firewall(config)# logging if_name host ip_address |
The router or firewall sends Syslog messages to the Syslog server at ip_address. On a firewall, the Syslog server can be found on the firewall interface named if_name ("outside," for example). This command can be repeated to define additional Syslog servers. Be aware that each Syslog message is replicated for each server that is configured, causing additional CPU and traffic loads. (Optional) Set the Syslog logging severity level: IOS IDS | Router(config)# logging trap level | IOS IPS | Router(config)# logging trap level | PIX | Firewall(config)# logging trap level |
Syslog messages are sent to the server only if they are equal to or lower than the severity level (0 to 7; a lower number means higher severity). By default, Cisco firewalls use severity level 3 (errors), and routers use severity level 6 (informational). Severity can be given as one of these keywords or level numbers: emergencies (0), alerts (1), critical (2), errors (3), warnings (4), notifications (5), informational (6), or debugging (7). TIP IDS sensors (both firewall and router) send alarms using Syslog severity level 4 (warnings). Therefore, make sure you set the severity level to 4 or greater. Generally, the higher the severity number, the more non-IDS firewall or router activity messages you see. All IOS router IDS sensor Syslog messages begin with %IDS-4-type: Sig: signature-ID :message_text. All PIX IDS messages begin with %PIX-4-4000nn IDS:number message_text. You can easily search the logging messages to find IDS-related alarms. As well, the signature ID number is contained in each message. (Optional) Use a specific source address: IOS IDS | Router(config)# logging source-interface mod type/num | IOS IPS | Router(config)# logging source-interface mod type/num | PIX | Firewall(config)# logging device-id ipaddress if_name |
By default, a router or firewall sends Syslog messages with a source address of the exiting interface. On a router platform, you can specify an interface to use as the source address for all Syslog messages. On a firewall, the Syslog source address cannot be configured. However, the firewall can insert a "device ID" field into the text of each Syslog message, consisting of the IP address of a specific interface. In either case, the predictable IP address serves as a way to make the IDS sensor always appear as a single address in the activity logs. Send alarms through Syslog: IOS IDS | Router(config)# ip audit notify log | IOS IPS | Router(config)# ip ips notify log | PIX | |
By default, Syslog alerts are sent by router and firewall IDS systems, but not by routers using IOS IPS. You must enable the alerts with this command. You can send IOS alarms to both external collectors and Syslog servers if needed. In this case, you must use this command to enable Syslog notifications after you use the ip audit notify command with the nr-director or sdee keyword. A PIX IDS sensor sends all its alarms using Syslog, so no additional command is needed.
| 3. | (Optional) Define default signature actions.
Define default actions for info signatures: IOS IDS | Router(config)# ip audit info action [alarm] [drop] [reset] | IOS IPS | | PIX | Firewall(config)# ip audit info action [alarm] [drop] [reset] |
By default, all "info" type signatures trigger only an IDS alarm to a Syslog server or PO collector. You can change the default behavior using any combination of the keywords alarm (sends an IDS alarm), drop (drops the detected packet), and reset (resets the detected TCP connection). TIP On an IOS IPS router platform, the action taken for "info" type signatures is predefined in the signature definition file. You can use the show ip ips signature command to see a summary of the actions. For example, the following signatures are listed with actions designated by A (alarm), D (drop), and R (reset): Router# show ip ips signature Signatures were last loaded from disk0:/attack-drop.sdf SDF release version attack-drop.sdf v2 *=Marked for Deletion Action=(A)larm,rop,(R)eset Trait=AlarmTraits MH=MinHits AI=AlarmInterval CT=ChokeThreshold TI=ThrottleInterval AT=AlarmThrottle FA=FlipAddr WF=WantFrag Ver=Signature Version Signature Micro-Engine: SERVICE.SMTP (1 sigs) SigID:SubID On Action Sev Trait MH AI CT TI AT FA WF Ver ----------- -- ------ ---- ----- ----- ----- ----- ----- -- -- -- --- 3129:0 Y ADR MED 0 0 0 0 15 FA N S59 Signature Micro-Engine: SERVICE.RPC (29 sigs) SigID:SubID On Action Sev Trait MH AI CT TI AT FA WF Ver ----------- -- ------ ---- ----- ----- ----- ----- ----- -- -- -- --- 6100:0 Y AD HIGH 0 0 0 100 30 FA N 1.0 6100:1 Y ADR HIGH 0 0 0 100 30 FA N 1.0 [output omitted]
Define default actions for attack signatures: IOS IDS | Router(config)# ip audit attack {action [alarm] [drop] [reset]} | IOS IPS | | PIX | Firewall(config)# ip audit attack {action [alarm] [drop] [reset]} |
By default, all "attack" type signatures trigger only an IDS alarm to a Syslog server or PO collector. You can change the default behavior to any combination of these keywords: alarm (sends an IDS alarm), drop (drops the detected packet), and reset (resets the detected TCP connection). The IOS IPS attack actions are also predefined and cannot be changed.
| 4. | Define signature exemptions.
NOTE You can find a complete list of signatures and signature IDs supported by firewall and router IDS sensors in section 13-4. Globally disable a signature: IOS IDS | Router(config)# ip audit signature signature_id disable | IOS IPS | Router(config)# ip ips signature signature_id[:sub-signature_id] disable | PIX | Firewall(config)# ip audit signature signature_id disable |
By default, all available signatures are enabled and used for inspection. You can disable a specific signature by giving its signature_id (900 to 50000). You can repeat this command to globally disable multiple signatures. If you repeatedly see signatures triggered for traffic that is expected or permitted, you might consider disabling those signatures. For example, if your security policies permit ICMP echo and echo reply packets to pass into and out of your network, you probably wouldn't want to see IDS signatures triggered for those packets. On a PIX platform, you could disable signature 2000 (ICMP Echo Reply) with the following command: Firewall(config)# ip audit signature 2000 disable
Exempt traffic from matching a signature. Sometimes, you may need to conditionally disable a signature so that some specific types of traffic can't trigger it. On Cisco router IDS sensors, you can define an ACL that permits traffic to be exempted from the signature. Cisco firewall IDS sensors don't offer this capability. To create an access list that denies the exemption, you would enter the following command sequence: IOS IDS | [View full width] Router(config)# access-list acl-list deny  source_addr mask Router(config)# access-list acl-list permit any source_addr mask Router(config)# access-list acl-list permit any
| IOS IPS | [View full width] Router(config)# access-list acl-list deny source_addr mask Router(config)# access-list acl-list permit any
or [View full width] Router(config)# access-list acl-list deny ip source_addr mask destination_addr mask Router(config)# access-list acl-list permit ip any any
| PIX | |
For an IOS IDS platform, a standard IP access list numbered acl-list (1 to 99) is used to identify the traffic that is exempt from a signature match. Use one or more deny statements first to define the source address(es) that bypass the inspection. Here, the source_addr can be an IP address and mask (0 bits match and 1 bits are wildcards) or the host keyword with an IP address. End the ACL with a permit any statement so that all other source addresses are subject to matching the signature. An IOS IPS platform can use a standard IP access list, an extended IP access list, or a named IP access list to trigger the exemption. Again, use a deny statement to define the exemption and end the list with a permit ip any any statement. To apply the ACL to a signature ID, you would enter the following command: IOS IDS | Router(config)# ip audit signature signature_id list acl-list | IOS IPS | Router(config)# ip ips signature signature_id[:sub-signature_id] list acl-list | PIX | |
For an IOS IDS platform, the standard IP access list acl-list (1 to 99) is used during the inspection process for signature ID signature-id (900 to 50000). If the ACL denies a source address, it is exempt from triggering the signature. In other words, the ACL permits traffic to be matched against the signature. An IOS IPS platform, however, can use a standard, extended, or named IP access list. You can repeat this command to apply the same ACL to other signatures if needed.
| 5. | Define an inspection rule:
IOS IDS | [View full width] Router(config)# ip audit name audit_name info [list standard-acl] [action [alarm] [drop] [reset]] Router(config)# ip audit name audit_name attack [list standard-acl] [action [alarm] [drop] [reset]]
| IOS IPS | Router(config)# ip ips name audit_name | PI`X | [View full width] Firewall(config)# ip audit name audit_name1 info [action [alarm] [drop] [reset]] Firewall(config)# ip audit name audit_name2 attack [action [alarm] [drop] [reset]]
|
Before IDS can be enabled on the sensor, you must define a policy that tells the sensor what action to take. The exception is an IOS IPS sensor; a policy must still be defined, but the signature actions are predefined in the SDF and cannot be altered.
The policy named audit_name (an arbitrary text string of up to 16 characters) applies to info or attack signatures. You can specify one or more of the following actions to be taken on the traffic that triggered the signatures: alarm (sends a Syslog or PO alarm), drop (drops the offending packet), and reset (resets the offending TCP connection). If you omit the action keyword, only the default alarm action is performed.
TIP You should define a policy for "info" signatures and a policy for "attack" signatures, as shown in the command syntax. On router IDS sensors, you can use the same policy name for both info and attack actions. Policies defined on IOS IPS platforms are automatically applied to all signatures for both info and attack actions. On firewall IDS sensors, however, the info and attack policies must be named differently. | 6. | (Optional) Adjust the SMTP spam attack threshold:
IOS IDS | Router(config)# ip audit smtp spam number-of-recipients | IOS IPS | | PIX | |
Signature ID 3106 detects an e-mail spam attack if a message is sent by SMTP to an excessive number of recipients. You can set the spam detection threshold to number-of-recipients (1 to 65535; the default is 250) for a single e-mail message.
| 7. | (IOS IPS only) Control IPS behavior.
(Optional) Don't load the default built-in signatures: IOS IDS | | IOS IPS | Router(config)# no ip ips sdf builtin | PIX | |
By default, if the router can't download the SDFs, it begins using the set of signatures that is built into the IOS image itself. This might happen if the SDF doesn't exist or if the router can't contact an external server where the SDF is stored. You can use this command to force the router to disable IPS completely if the SDF can't be downloaded. (Optional) Stop forwarding until the IPS is ready: IOS IDS | | IOS IPS | Router(config)# ip ips fail closed | PIX | |
By default, if there is a problem loading the SDF or signature engines, the router forwards traffic normally. You can use this command to force the router to drop all packets until the complete IPS is loaded and functional. By doing this, you can make sure that all traffic is inspected before it is forwarded.
| 8. | Enable the IDS on an interface:
IOS IDS | Router(config)# interface type mod/num Router(config-if)# ip audit audit_name {in | out}
| IOS IPS | Router(config)# interface type mod/num Router(config-if)# ip ips audit_name {in | out}
| PIX | Firewall(config)# ip audit interface if_name audit_name |
The IDS audit policy named audit_name is used to inspect traffic on a specific interface. The IDS sensor is not enabled until it is applied to at least one sensor interface.
On a router IDS sensor, you can apply an audit policy to inbound (in) and outbound (out) traffic independently. Therefore, you could define one policy for inbound traffic and a different one for outbound traffic if needed. You also could define the same policy for both inbound and outbound traffic.
A firewall IDS sensor can apply the audit policy to an interface only as a whole. This means that the same policy is applied to inbound and outbound traffic on the interface named if_name automatically.
|
IDS Sensor Examples A Cisco router is configured to act as an embedded IDS sensor for a branch office network. The sensor is also configured to send alarms back to a Syslog server and to a CiscoWorks VMS server. Info signatures trigger an alarm response only, and attack signatures trigger alarms, drops, and connection resets. Figure 13-4 provides a network diagram for this discussion. Figure 13-4. Network Diagram for the IDS Sensor Examples 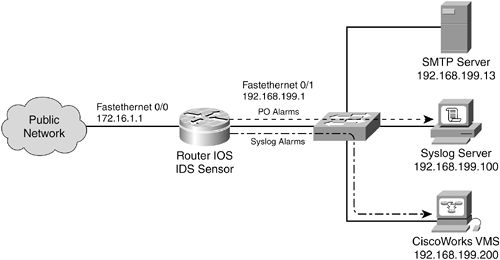
Because this is a router, both Syslog and Post Office mechanisms can be used to send alarms. In the case of an IOS IPS sensor, SDEE is used instead of Post Office. First, the Post Office portion is configured: IOS IDS | [View full width] ip audit notify nr-director ip audit po remote hostid 1 orgid 100 rmtaddress 192.168.199.200 localaddress 192.168.199.1 port 45000 preference 1 timeout 5 application director ip audit po local hostid 4 orgid 100 exit copy running-config startup-config reload
| IOS IPS | ip audit notify sdee ip http server [no reload is necessary]
|
For the IOS IDS platform, notice that the last command given is reload, because the Post Office has just been configured and enabled. This isn't necessary for the IOS IPS platform, because Post Office is not used. Now, the Syslog portion is configured: IOS IDS | logging host 192.168.199.100 logging trap warnings logging on ip audit notify log
| IOS IPS | logging host 192.168.199.100 logging trap warnings logging on ip ips notify log
|
Finally, the IDS sensor is configured with an audit policy called MyIDS: IOS IDS | ip audit name MyIDS info action alarm ip audit name MyIDS attack action alarm drop reset interface fastethernet 0/0 ip address 172.16.1.1 255.255.255.0 ip audit MyIDS in ip audit MyIDS out
| IOS IPS | ip ips name MyIDS interface fastethernet 0/0 ip address 172.16.1.1 255.255.255.0 ip ips MyIDS in ip ips MyIDS out
|
When the router begins to generate IDS alarms, someone notices that signature ID 2004 seems to be filling the logs. This is triggered by ICMP echo requests, where someone is using pings through the router. After some discussion, it is decided that the security policy will allow pings for the users' convenience. Also, the router IDS sensor is used to detect any e-mail spam activity, because this has been a problem in the past. Again, someone notices that the internal mail server at 192.168.199.13 is triggering signature ID 3106 when it sends messages to large distribution lists of more than 250 recipients. To tune the IDS sensor, silencing the false positive alarms, the following configuration changes are made: IOS IDS | ip audit signature 2004 disable access-list 9 deny host 192.168.199.13 access-list 9 permit any ip audit signature 3106 list 9
| IOS IPS | ip ips signature 2004 disable access-list 9 deny host 192.168.199.13 access-list 9 permit any ip ips signature 3106 list 9
|
Signature ID 2004 is globally disabled. Standard IP access list 9 is used to exempt SMTP traffic from the server 192.168.199.13 for the spam attack signature ID 3106. This is done by denying that traffic in the ACL, which prevents the audit signature. All other traffic is permitted or audited against the signature database. Now, consider the same example with a PIX Firewall in place of the router. The firewall is configured to act as an IDS sensor. Because of its limitations, IDS alarms can only be sent using Syslog. Notice that Syslog messages can be collected by the CiscoWorks VMS package, even if Post Office alarms aren't being used. First, logging is configured with Syslog messages going to both the Syslog server and the CiscoWorks VMS server: logging host inside 192.168.199.100 logging host inside 192.168.199.200 logging trap warnings logging enable
Next, the audit policies are configured. Notice that the firewall doesn't support both info and attack actions in the same policy, so two separate policies must be used. Both policies can be applied to the same firewall interface, however: ip audit name MyIDS-info info action alarm ip audit name MyIDS-attack attack action alarm drop reset ip audit interface outside MyIDS-info ip audit interface outside MyIDS-attack
Finally, the audit policies are adjusted to reduce false positives. Only the ICMP echo request signature can be globally disabled. Unfortunately, the firewall IDS sensors don't support signature exemptions through access lists: ip audit signature 2004 disable
|