9-2. Generating Logging Messages The firewall uses logging to send system messages to one or more logging destinations, where they can be collected, archived, and reviewed. Messages are generated according to a severity level, specified by a number (0 through 7) or a keyword, as shown in Table 9-1. Table 9-1. System Message Severity LevelsSeverity Level | Description |
|---|
0: emergencies | The system is unusable | 1: alerts | Immediate action is required | 2: critical | A critical condition exists | 3: errors | Error message | 4: warnings | Warning message | 5: notifications | A normal but significant condition | 6: informational | Information message | 7: debugging | Debug output and very detailed logs |
Logging messages can be sent to any of the following destinations: The firewall console Telnet or SSH sessions to the firewall A temporary buffer internal to the firewall SNMP management stations Syslog servers Firewall management applications such as Cisco Adaptive Security Device Manager (ASDM 5.0) and Cisco PIX Device Manager (PDM 3.0 and 4.0) E-mail addresses (PIX 7.x only) An FTP server (PIX 7.x only) Firewall Flash (PIX 7.x only)
The logging level can be set to determine which messages should be sent to each of the destinations. When you set a severity level for a destination, all messages with a lower severity level are also sent. You should always add time stamps to Syslog messages to help in real-time debugging and management. The firewall can add time stamps as messages are generated, or a Syslog server can add time stamps as messages are received. TIP You should have all your network devices use a common time reference point so that all the time stamps on all logging messages are synchronized. You can do this by configuring firewalls, routers, and switches to use one or more authoritative NTP servers as a time source. If you have some NTP servers inside your network, each network device can synchronize time with them. However, if you intend to use NTP servers on the public Internet, you should use a hierarchical approach. Select two routers within your network to synchronize time with the Internet servers. Optimally, each router should peer with three unique time sources so that none of them are duplicated. Then point all your inside devices to synchronize time with the routers. The idea is to contain the bulk of NTP synchronizations within your network rather than have a multitude of hosts peering with the Internet servers.
You can configure a unique "device ID" so that logging messages from a firewall can be readily identified. This becomes important when one Syslog server collects messages from many different firewalls, routers, and switches. Figure 9-1 shows each of the logging severity levels, along with a general list of the types of messages generated. Each level also includes every level below it. The higher the severity level, the more types of messages that are included. Figure 9-1. Syslog Severity Levels and Their Messages 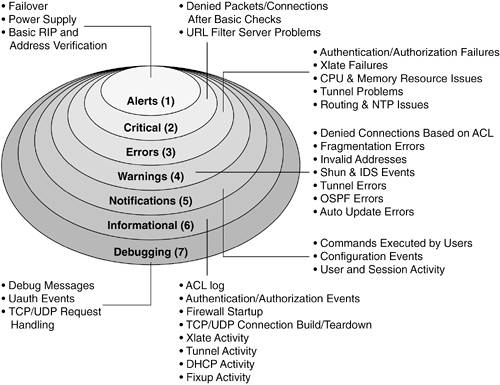
System messages are logged in either the default or EMBLEM format. Figure 9-2 shows the default message format. Each message has the following fields: Time stamp The date and time from the firewall clock. The default is no time stamp. Device ID Added to uniquely identify the firewall generating the message. Can be the firewall's host name, an interface IP address, or an arbitrary text string. The default is no device-id. Message ID Always begins with %PIX-, %ASA-, or %FWSM-, followed by the severity level and the six-digit message number. Message text A description of the event or condition that triggered the message.
Figure 9-2. Firewall Logging Message Format 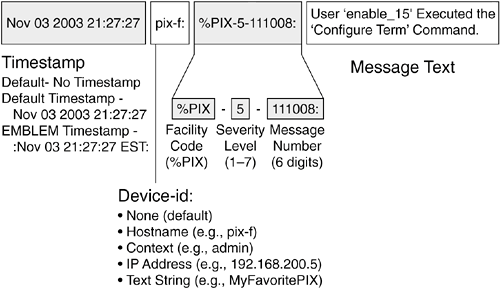
The EMBLEM format is used primarily for the CiscoWorks Resource Manager Essentials (RME) Syslog analyzer. This format matches the Cisco IOS Software Syslog format produced by routers and switches. It is available only to UDP Syslog servers. NOTE By default, logging to a Syslog server uses UDP port 514 or TCP port 1468. Sending logging messages via SNMP traps uses UDP port 162. UDP is usually used as an efficient, "best-effort" method. TCP is used when Syslog collection is a vital part of enterprise security, because its delivery is reliable. The six-digit message numbers are arbitrarily defined by Cisco and uniquely identify each logging message. You can look up message numbers and their meanings in Appendix B, "Security Appliance Logging Messages."
Syslog Server Suggestions To make full use of the logging messages generated by a firewall, you need a Syslog server application running somewhere in your network. Some recommendations for Syslog servers are as follows: Kiwi Syslog Daemon A commercial Syslog server for Windows-based platforms, available at http://www.kiwisyslog.com UNIX syslogd A Syslog daemon built into most versions of the UNIX operating system Cisco PIX Firewall Syslog Server (PFSS) A Syslog server available in the Cisco.com Software Center under PIX Firewall Software CiscoWorks 2000 A Syslog server built into the RME module of the base CiscoWorks 2000 package CiscoWorks VPN/Security Management Solution (VMS) A Syslog server available as a part of the Monitoring Center for Security component of VMS Syslog server Available as a part of the Network Security Analyzer and FirewallAnalyzer products from eIQnetworks at http://www.eiqnetworks.com Sawmill A Syslog server and analysis application that runs on a wide variety of platforms, available from FlowerFire at http://www.sawmill.net
If you have a large network with firewalls that generate a large amount of Syslog information, an average Syslog server software application might become overwhelmed with the load. The end result is that logging messages are lost or that the Syslog server runs out of storage space. In this case, you should consider moving the Syslog resources to a hardware platform. Some examples of hardware appliances are as follows: Cisco CS-MARS Appliances that offer Syslog collection and analysis, along with many other security analysis and mitigation features, at a high volume. Available from Cisco Systems at http://www.cisco.com/en/US/products/ps6241/index.html. Network Intelligence Engine Appliances that collect, analyze, and manage Syslog messages at a high volume. Available from Network Intelligence Corporation at http://www.network-intelligence.com.
TIP Alternatively, you can adjust the severity level for the logging destination so that a lower value is used. This reduces the number and type of messages produced but also reduces the amount of useful information that can be collected and analyzed.
Logging Configuration A firewall can be configured to send logging information to one or more destinations. In PIX 6.3 and FWSM 2.2, each destination can have only one severity level associated with it, so only messages at or below that severity level are actually sent. This tends to limit any customization if you need to filter or collect only specific types of information at a destination. For example, if you set a Syslog server destination to collect messages at or below the "notifications" level, you can't collect any useful information from messages that have a default severity of "informational." To get around this, you can adjust the default severity level of individual logging message IDs. Suppose your destination is configured to collect at level "notifications." There might be some useful messages that have a default level of "informational" or "debugging" that would not be sent to that destination because their default severity levels are greater than that of the destination. You can change those message IDs to have a new severity level of "notifications" so that they are sent too. PIX 7.x Logging Filters PIX 7.x includes more flexible logging functionality. As before, each logging destination can have one overall severity threshold. If any message is generated, it is sent only if its severity level is at or below this threshold. However, logging destinations can have a severity threshold that is dependent on several conditions. Think of this as defining a logging policy for a destination, where you can pick and choose messages to be collected based on certain criteria. For each destination, you can assign one of the following: The logging list is made up of one or more policy statements. When a logging message is generated, it is sent if any policy statement is matched. A logging list can be made up of any of the following: A severity level threshold for specific classes of messages An overall severity level threshold Specific logging message IDs to match against
In addition, you can configure messages from a predefined class of messages to appear at one or more destinations at configurable severity levels. Any message within the logging class is sent to a destination if it is at or below the severity level threshold configured for that destination. PIX 7.x provides these predefined classes of logging messages: auth User authentication messages bridge Transparent firewall messages ca PKI certificate authority messages config Firewall configuration and EXEC commands via the command-line interface (CLI) ha Failover messages ids Intrusion Detection System messages ip TCP/IP inspection messages np Network processor messages ospf OSPF routing messages rip RIP routing messages rm Firewall Resource Manager messages session Firewall user session messages snmp SNMP messages sys System messages vpdn PPTP and L2TP session messages vpn IKE and IPSec messages vpnc VPN client messages vpnfo VPN failover messages vpnlb VPN load-balancing messages webvpn WebVPN client messages
Logging policies and logging class definitions are configured in Steps 2 and 3, respectively. Logging Configuration Steps 1. | Enable message logging.
Begin sending logging messages to all configured destinations: FWSM 2.x | Firewall(config)# logging on | PIX 6.x | Firewall(config)# logging on | PIX 7.x | Firewall(config)# logging enable |
By default, logging is globally disabled, even if it is configured for one or more destinations. To begin logging, you must use this command. (Optional) Limit the rate at which logging messages are generated: FWSM 2.x | Firewall(config)# logging rate-limit {unlimited | number [interval]} {level level | message message_id} | PIX 6.x | | PIX 7.x | |
You can rate-limit messages being generated at a specific severity level by using the level keyword, where level is emergencies (0), alerts (1), critical (2), errors (3), warnings (4), notifications (5), informational (6), or debugging (7). Note that this affects messages only at the severity level specified. Messages at lower or higher levels are not rate-limited. You can also rate-limit specific messages being generated with the message keyword, where message_id is a six-digit number (as defined in Appendix B). Logging messages meeting these criteria are sent at a maximum of number (0 to 2147483647, where 0 is unlimited) messages per interval (0 to 2147483647) seconds. The interval defaults to 1 second if not specified. By default, rate limiting is unlimited on all platforms. For example, the following commands limit all debugging (severity level 7) messages so that up to 50 message per second are generated. In addition, message ID 106015 (deny TCP/no connection) is limited to 10 messages per second. Firewall(config)# logging rate-limit 50 1 level debugging Firewall(config)# logging rate-limit 10 1 message 106015
NOTE Rate limiting is applied to a severity level or message ID. It is not applied to a destination. Therefore, rate limiting affects the volume of messages being sent to all configured destinations. | 2. | (PIX 7.x only) Define a logging policy with an event list.
The event list is defined by its name and can consist of one or more logging list commands. Logging messages are matched against the event list as they are generated. If a match is found, the message is allowed to be sent.
Logging lists can be configured with the commands shown in this step. A logging list policy is actually applied when the severity level is configured for a specific logging destination in Steps 4 through 9 in this list.
TIP If a logging list has been configured and applied to a destination, it can't be modified until it is removed or unbound from the destination. You can unbind a logging list by reissuing the logging destination level command, omitting the logging list name. (Optional) Match against a severity level: FWSM 2.x | | PIX 6.x | | PIX 7.x | Firewall(config)# logging list event_list level level [class event_class] |
The event list named event_list matches any Syslog message at or below one of the following severity level keywords or numbers: emergencies (0), alerts (1), critical (2), errors (3), warnings (4), notifications (5), informational (6), or debugging (7). You can also narrow the matching criteria by using a predefined "class" of Syslog message types. Use the class keyword with one of the following event_class names: auth, bridge, ca, config, ha, ids, ip, np, ospf, rip, rm, session, snmp, sys, vpdn, vpn, vpnc, vpnfo, vpnlb, or webvpn. For example, the following commands can be used to match all logging messages at the notifications level and all IP-related messages (xlate and conn build/teardown and ACL activity) at the debugging level. Now the destination can collect various types of messages from multiple severity levels. Firewall(config)# logging list MyList level notifications Firewall(config)# logging list MyList level debugging class ip
(Optional) Match specific Syslog message IDs: FWSM 2.x | | PIX 6.x | | PIX 7.x | Firewall(config)# logging list event_list message start[-end] |
The event list named event_list matches any of the Syslog messages defined by the ID range start to end (100000 to 999999). If no end value is given, start defines a single message ID. For example, suppose the logging list xlate-log is used to log messages related to address translation. Message 202001 (out of translation slots) and messages 305009 through 305011 (translations built and torn down) can be used to collect an audit trail of dynamic xlate entries (using the following commands) so that inside users can be associated with PAT addresses at any given time: Firewall(config)# logging list xlate-log message 202001 Firewall(config)# logging list xlate-log message 305009-305011
| 3. | (PIX 7.x only) Define destinations for a logging class of messages:
FWSM 2.x | | PIX 6.x | | PIX 7.x | Firewall(config)# logging class event_class destination level [destination level] [destination level] ... |
You can configure a predefined class of logging messages to be sent to one or more logging destinations, each having a unique severity threshold. The class is identified by one of the following event_class names: auth, bridge, ca, config, ha, ids, ip, np, ospf, rip, rm, session, snmp, sys, vpdn, vpn, vpnc, vpnfo, vpnlb, or webvpn.
You can define one or more destinations and severity threshold pairs for the class using a single command line. Each destination must be one of the following keywords: console (firewall console), monitor (Telnet or SSH session), buffered (memory buffer), trap (Syslog servers), history (SNMP traps), mail (SMTP), pdm (PDM application for FWSM 2.x or PIX 6.x), or asdm (ASDM application for PIX 7.x).
Each severity level must be one of the following keywords or numbers: emergencies (0), alerts (1), critical (2), errors (3), warnings (4), notifications (5), informational (6), or debugging (7).
For example, in the following command, high-availability messages of severity 1 (alerts) are sent to the trap destination, and severity 7 (debugging) messages are sent to the logging buffer:
Firewall(config)# logging class ha trap alerts buffered debugging
| 4. | (Optional) Log to an interactive firewall session.
(Optional) Log to the firewall console: FWSM 2.x | Firewall(config)# logging console level | PIX 6.x | Firewall(config)# logging console level | PIX 7.x | Firewall(config)# logging console {level | event-list} |
If you have a terminal emulator connected to the firewall console, you might want to see logging messages as they are generated. Messages are displayed if they are at or below the specified severity level: emergencies (0), alerts (1), critical (2), errors (3), warnings (4), notifications (5), informational (6), or debugging (7). Beginning in PIX 7.x, you can also use a policy to select which messages are displayed. Messages that are matched by the event list named event-list (defined in Step 2) are forwarded to the logging destination. Keep in mind that PIX 7.x in multiple-context mode still has only one physical console port. Therefore, it doesn't make sense to enable console logging for a user context, because those contexts don't have a usable console. CAUTION You should send logging messages to the serial console only if the firewall is lightly loaded or in a test environment. Messages are displayed at a relatively low speed (9600 baud); if many messages are generated, the backlog of messages can cause the firewall to have slow response. As well, you lose interactive control at the console while the messages are being displayed. For these reasons, console logging is disabled by default. (Optional) Log to Telnet or SSH sessions on the firewall: FWSM 2.x | Firewall(config)# logging monitor level | PIX 6.x | Firewall(config)# logging monitor level | PIX 7.x | Firewall(config)# logging monitor {level | event-list} |
If you have a remote firewall Telnet or SSH session open, you might want to see logging messages as they are generated. Messages are displayed if they are at or below the specified severity level: emergencies (0), alerts (1), critical (2), errors (3), warnings (4), notifications (5), informational (6), or debugging (7). To see the logging messages in the current session as they are generated, use the terminal monitor EXEC command. (In PIX 6.3, you must be in configuration mode to use this command. In addition, the most recently initiated Telnet session receives the session logging output by default, because terminal monitor mode is active until it is disabled.) To stop seeing the messages, use the EXEC command terminal no monitor. With PIX 7.x, you can also use a policy to select which messages are displayed. Messages that are matched by the event list named event-list (defined in Step 2) are forwarded to the logging destination.
CAUTION You should avoid sending logging messages to Telnet and SSH sessions on a highly utilized production firewall. Although logging messages can be sent to interactive sessions more efficiently than the firewall console, the firewall can still become backlogged with messages to send. Therefore, monitor (session) logging is disabled by default. | 5. | (Optional) Log to the firewall's internal buffer.
Internal buffered logging uses a 4096-byte circular memory buffer to store the most recent messages. The actual number of logging messages stored depends on the length of each message. For example, one full buffer might contain only 32 messages if those lines of message text are very long.
TIP The logging buffer can be handy if you don't have access to a Syslog server or if the Syslog server is unavailable. The logging buffer is the most efficient way to collect some messages for troubleshooting or to inspect specific activity without having to sift through massive Syslog server logs. You might want to see only certain types of messages that are being generated, even though a wide variety of logging messages are being sent to a Syslog server. In addition, the logging buffer is much more efficient than sending logging output to the firewall console or a Telnet or SSH session. Think of the logging buffer as a small collector for occasional use. Set the buffer logging level: FWSM 2.x | Firewall(config)# logging buffered level | PIX 6.x | Firewall(config)# logging buffered level | PIX 7.x | Firewall(config)# logging buffered {level | event-list} |
The firewall keeps a circular buffer in memory that can hold the most recent logging messages. Messages are sent to the buffer if they are at or below the specified severity level: emergencies (0), alerts (1), critical (2), errors (3), warnings (4), notifications (5), informational (6), or debugging (7). Beginning in PIX 7.x, you can also use a policy to select which messages are displayed. Messages that are matched by the event list named event_list (defined in Step 2) are forwarded to the logging destination. By default, the buffer is 4096 bytes long and can hold about 100 messages. PIX 7.x allows you to adjust the size of the buffer if needed. You can use the logging buffer-size bytes command to size the buffer to 4096 to 1048576 bytes. To see the buffered messages, use the EXEC command show logging. Remember that the buffer is circular, so it never overflows and never needs clearing. However, you can clear the buffer with the clear logging buffer command if you need to see only the most recent messages collected after a certain point. (Optional) Copy the buffer via FTP if it fills and wraps: FWSM 2.x | | PIX 6.x | | PIX 7.x | [View full width] Firewall(config)# logging ftp-bufferwrap Firewall(config)# logging ftp-server ftp_server  path username password path username password
|
When the circular logging buffer is full (is getting ready to wrap around itself), the firewall can copy a snapshot of it to an FTP server at IP address ftp_server. The firewall connects to the server using username and password. The buffer contents are uploaded as a file stored at the path name path. The path name is relative to the username's directory on the server. For example, to save the log file into user hucaby's home directory, you can use the "." current directory path name. The firewall automatically names the log file in the form LOG-YYYY-MM-DD-HHMMSS.TXT (where YYYY-MM-DD represents the date and HHMMSS represents the time). The log file is always the total size of the logging buffer (4096 bytes by default). For example, you could use the following commands to force the logging buffer contents to be uploaded to an FTP server into the home directory of user pixadmin: Firewall(config)# logging ftp-bufferwrap Firewall(config)# logging ftp-server 1992.168.199.10 . pixadmin bigsecretpw
TIP If you experience problems getting the firewall to successfully upload log files to the FTP server, you might see the following error messages: pix/admin# ERROR: ftp write to server 192.168.3.14 failed: %PIX-3-414001: Failed to save logging buffer to FTP server 192.168.3.14 using filename LOG-2004-11-06-010113.TXT on interface inside:
You can use the debug ftp client command to see debugging output as the firewall attempts to upload its log files. Make sure you have a logging destination configured for the debugging severity, as well as for the debug-trace output. From this information, you should be able to see where the process fails. Consider the following example, in which the firewall successfully logs into the FTP server but the server rejects the log file path name because it isn't relative to the user's directory: Firewall# debug ftp client [time passes until buffer wraps] %PIX-7-711001: Writing /pix-log-snapshot/LOG-2004-11-06-010703.TXT %PIX-7-711001: FTP: 220 pi FTP server ready. %PIX-7-711001: FTP: ---> USER pixadmin %PIX-7-711001: FTP: 331 Password required for pixadmin. %PIX-7-711001: FTP: ---> PASS * %PIX-7-711001: FTP: 230 User pixadmin logged in. %PIX-7-711001: FTP: ---> TYPE I %PIX-7-711001: FTP: 200 Type set to I. %PIX-7-711001: FTP: ---> PORT 192,168,93,135,4,100 %PIX-7-711001: FTP: 200 PORT command successful. %PIX-7-711001: FTP: ---> STOR /pix-log-snapshot/LOG-2004-11-06-010703.TXT %PIX-7-711001: FTP: 553 /pix-log-snapshot/LOG-2004-11-06-010703.TXT: No such file or directory. %PIX-7-711001: FTP: ---> QUIT %PIX-3-414001: Failed to save logging buffer to FTP server 192.168.3.14 using filename LOG-2004-11-06-010703.TXT on interface inside: %PIX-7-711001: FTP: 221 Goodbye.
(Optional) Copy the buffer to Flash if it fills and wraps: FWSM 2.x | | PIX 6.x | | PIX 7.x | [View full width] Firewall(config)# logging flash-bufferwrap Firewall(config)# logging flash-minimum-free kbytes_free Firewall(config)# logging flash-maximum-allocation kbytes_max
|
When the circular logging buffer gets ready to wrap, the firewall can copy a snapshot of it into a file on the Flash file system. The firewall automatically names the log file in the Syslog Flash directory using a filename of the form LOG-YYYY-MM-DD-HHMMSS.TXT (where YYYY-MM-DD represents the date and HHMMSS represents the time). The log file is always the total size of the logging buffer (4096 bytes by default).
As more log files are saved, more space in the Flash file system is used up. With the flash-maximum-allocation keyword, you can limit the total space reserved for log files to kbytes_max (4 to 15750 KB). The flash-minimum-free keyword specifies how much Flash memory must be free before log files can be saved, as kbytes_free (0 to 15750 KB).
TIP Flash-related logging buffer commands are available only in PIX 7.x running in single-context mode. If multiple contexts are being used, only the system execution space has access to the Flash file system. However, its logging capability is very limited because most of the firewall activity occurs in other contexts. In single-context mode, you can manually save the current buffer contents into Flash by using the following command in privileged EXEC mode: Firewall# logging savelog [savefile]
The log file is saved in the Syslog directory of the Flash file system. You can specify a filename savefile for it. Otherwise, the default filename template LOG-YYYY-MM-DD-HHMMSS.TXT is used (where YYYY-MM-DD represents the current date and HHMMSS represents the current time). | 6. | (Optional) Log to an SNMP management station.
Configure a destination for SNMP traps: FWSM 2.x | Firewall(config)# snmp-server host [if_name] ip_addr trap | PIX 6.x | Firewall(config)# snmp-server host [if_name] ip_addr trap | PIX 7.x | Firewall(config)# snmp-server host if_name ip_addr TRap [community string] [version version] [udp-port port] |
The SNMP management station is located on the firewall interface named if_name (inside, for example) at IP address ip_addr. Enable traps to be sent by SNMP: FWSM 2.x | Firewall(config)# snmp-server enable traps {all | syslog} | PIX 6.x | Firewall(config)# snmp-server enable traps | PIX 7.x | Firewall(config)# snmp-server enable traps {all | syslog} |
By default, all trap types are sent. PIX 7.x allows specific types of traps to be sent, as described in Chapter 4, "Firewall Management," in section 4-6, "Monitoring a Firewall with SNMP." Only the all and syslog trap types are shown here, because either is sufficient for the purpose of sending Syslog messages as SNMP traps. Enable traps containing logging messages to be sent: FWSM 2.x | Firewall(config)# logging history level | PIX 6.x | Firewall(config)# logging history level | PIX 7.x | Firewall(config)# logging history {level | event-list} |
Logging messages can be sent as SNMP traps to any configured SNMP management station. Messages are sent if they are at or below the specified severity level: emergencies (0), alerts (1), critical (2), errors (3), warnings (4), notifications (5), informational (6), or debugging (7). Each message is sent in a separate SNMP trap packet. With PIX 7.x, you can also use a policy to select which messages are displayed. Messages that are matched by the event list named event-list (defined in Step 2) are forwarded to the logging destination.
| 7. | (Optional) Log to a Syslog server.
Set the logging level: FWSM 2.x | Firewall(config)# logging trap level | PIX 6.x | Firewall(config)# logging trap level | PIX 7.x | Firewall(config)# logging trap {level | event-list} |
Messages are sent to any configured Syslog servers if they are at or below the specified severity level: emergencies (0), alerts (1), critical (2), errors (3), warnings (4), notifications (5), informational (6), or debugging (7). With PIX 7.x, you can also use a policy to select which messages are displayed. Messages that are matched by the event list named event-list (defined in Step 2) are forwarded to the logging destination. NOTE You might find it confusing that logging messages sent as SNMP traps are configured using logging history and messages sent as Syslog packets are configured using logging trap. Unfortunately, the term "trap" has a different meaning here. (Optional) Identify the firewall in Syslog messages: FWSM 2.x | Firewall(config)# logging device-id {context-name | hostname | ipaddress if_name | string text} | PIX 6.x | Firewall(config)# logging device-id {hostname | ipaddress if_name | string text} | PIX 7.x | Firewall(config)# logging device-id {context-name | hostname | ipaddress if_name | string text} |
A Syslog server usually records the originating IP address along with each message received. However, you can define one unique identifier for your firewall that also appears in the text of each Syslog message. (This identifier does not appear in EMBLEM formatted messages.) The identifier can be the firewall's host name (defined with the hostname configuration command), the IP address of a specific firewall interface named if_name ("inside" or "outside," for example), or an arbitrary text string (up to 16 characters). With PIX 7.x or FWSM 2.x operating in multiple-context mode, the name of the firewall context can also be sent. For example, the following firewall is named InnerSanctum. It identifies itself using its host name: Firewall(config)# hostname InnerSanctum Firewall(config)# logging device-id hostname
Identify a Syslog server destination: FWSM 2.x | Firewall(config)# logging host [if_name] ip_address [protocol/port] [format emblem] [interface if1 [if2] ...] | PIX 6.x | Firewall(config)# logging host if_name ip_address [protocol/port] [format emblem] | PIX 7.x | Firewall(config)# logging host if_name ip_address [protocol/port] [format emblem] |
Syslog messages are sent out the firewall interface named if_name ("inside" or "outside," for example) to the Syslog server located at IP address ip_address. By default, messages are sent using UDP port 514. You can specify either UDP or TCP with protocol (udp or IP protocol 17, or tcp or IP protocol 6) and port (1025 to 65535). Obviously, the Syslog server must be configured to listen on the matching protocol and port number. You can use the format emblem keywords to send logging messages in the EMBLEM format. The firewall in the following example sends its trap logging messages to the Syslog server using the default UDP port 514: Firewall(config)# logging host inside 192.168.199.70
This command can be repeated to define multiple Syslog servers. NOTE Keep in mind that the firewall sends a copy of each Syslog message generated to each of the configured Syslog servers. If your firewall is heavily utilized and is configured to generate high-severity messages to multiple Syslog servers, its performance can be affected. Normally, Syslog messages are sent using UDP port 514. This provides an easy way to send messages in a best-effort fashion. The firewall has no idea if the messages are being received by the Syslog server, much less if there is actually a Syslog server at the address. Some environments require strict collection of security information. In this case, you should use TCP to send Syslog messages, usually over port 1470. The firewall opens a TCP connection with the Syslog server. As long as the connection is open, the firewall is certain that the messages are being reliably received. In fact, the TCP Syslog method is designed to be so reliable that the connection closes if the Syslog server becomes unavailable or if its logging storage becomes full. At this point, the firewall immediately stops forwarding traffic and generates a "201008: The PIX is disallowing new connections" message. You can also see this with the show logging command, as in the following example. Notice that TCP Syslog is still configured to use the Syslog server but is shown as disabled: Firewall# show logging Syslog logging: enabled Facility: 20 Timestamp logging: enabled Standby logging: disabled Console logging: disabled Monitor logging: disabled Buffer logging: level informational, 716 messages logged Trap logging: level informational, 162 messages logged Logging to inside 172.21.4.1 tcp/1470 disabled History logging: disabled Device ID: hostname "Firewall"
If this condition occurs, check the Syslog server and determine the source of the problem. After the Syslog service is restored, you have to reconfigure the TCP Syslog connection manually by entering the logging host if_name ip_address tcp/port configuration command. TIP With PIX 7.x, you can use the following command to allow firewall operation to continue, even if a TCP Syslog server is down: Firewall(config)# logging permit-hostdown
(Optional) Tune the Syslog transmission queue. As Syslog messages are generated, they are placed in a queue for transmission. If messages are being generated faster than they can be sent, the logging queue begins to fill. By default, a firewall queues up to 512 messages. As soon as this threshold is reached, any new messages are simply dropped and are not sent. You can see information about the logging queue with the following EXEC command: Firewall# show logging queue
The output from this command displays the size of the queue, along with the current queue depth and the high-water mark. If the msgs most on queue value is 512, the queue filled up at some point, and messages have been lost. In the following example, a high volume of logging messages is being generated, but they are being transmitted fast enough that the queue has never filled. Firewall# show logging queue Logging Queue length limit : 512 msg(s) Current 0 msg on queue, 136 msgs most on queue Firewall#
If you find that the logging queue is consistently full ("512 msgs most on queue"), you can tune the queue's size. Use the following configuration command: Firewall(config)# logging queue queue_size
The queue holds queue_size messages (0 to 8192; 0 = unlimited up to available memory). You can use the show blocks EXEC command to see how much memory is available before tuning the queue. Syslog messages use 256-byte blocks of memory. Be careful not to allocate too much of this memory to the logging queue, because the 256-byte blocks are also used for stateful failover message queuing. (Optional) Add time stamps to Syslog messages: Firewall(config)# logging timestamp
By default, Syslog messages are sent with no indication of the date or time at which they occurred. In this case, the Syslog server should add its own time stamps to the messages as they are received. Make sure the Syslog server synchronizes its clock with a known and accurate source. The logging timestamp command causes the firewall to add a time stamp to each Syslog message before it is sent. The firewall should have its clock set and time synchronized to a known and accurate sourcepreferably an NTP server that is common to all devices on your network. TIP If the logging timestamp command is used to make the firewall add time stamps, it is also possible that the Syslog server is configured to add its own time stamps. This can result in logging messages that have double time stamps in the text. Many Syslog servers can be configured to detect this and strip the extra time stamp automatically. (Optional) Set the Syslog facility: Firewall(config)# logging facility facility
Syslog servers can collect logging messages from a variety of sources. Messages are marked with a facility number (0 to 23), allowing the Syslog server to classify and store messages from similar sources. Facility numbers correspond to the UNIX-based Syslog facility names as follows: 0 (Kern), 1 (User), 2 (Mail), 3 (Daemon), 4 (Auth), 5 (Syslog), 6 (Lpr), 7 (News), 8 (UUCP), 9 (Cron), 10 to 15 (System0 to System5), 16 to 23 (Local0 to Local7). The default facility, 20, is also known as the Local4 facility. This is usually expected by most Syslog server implementations. (Optional) Generate Syslog messages from the standby failover unit: Firewall(config)# logging standby
Normally, only the active firewall unit in an active/passive failover pair generates Syslog messages. If your environment needs strict collection of logging information, you can use this command to cause the standby firewall to generate Syslog messages too. The standby firewall can generate the same Syslog messages as the active unit only because the same state information is passed from the active unit to the passive unit. This doubles the number of messages sent to the Syslog server(s), and each message is duplicated. However, if the active unit fails, any messages that were queued might be lost. The standby unit continues sending those messages as if nothing happened.
| 8. | (Optional) Log to an e-mail address.
When logging messages are generated, they can be sent to an e-mail address. Each message is sent as a single e-mail message. You can configure the "From" and "To" addresses for the resulting e-mails. The firewall always sends these with the subject line "PIX Alert (hostname)." The actual e-mail message has the following format:
Date: Tue, 3 May 2005 16:17:43 Eastern From: pix@mycompany.com To: hucaby@mycompany.com Subject: PIX Alert (Firewall-c) May 03 2005 16:17:43 admin : %PIX-2-106001: Inbound TCP connection denied from 172.16.89.4/1489 to 172.21.2.200/23 flags INVALID on interface outside
In this example, the firewall has added its own time stamp and the originating context name (admin in multiple-context mode) to the logging message text.
Set the mail logging level: FWSM 2.x | | PIX 6.x | | PIX 7.x | Firewall(config)# logging mail {level | event-list} |
Messages are sent to any configured e-mail recipient addresses if they are at or below the specified severity level: emergencies (0), alerts (1), critical (2), errors (3), warnings (4), notifications (5), informational (6), or debugging (7). PIX 7.x also lets you use a policy to select which messages are sent. Messages that are matched by the event list named event-list (defined in Step 2) are forwarded to the logging destination. Identify an SMTP server for e-mail delivery: FWSM 2.x | | PIX 6.x | | PIX 7.x | Firewall(config)# smtp-server server_primary [server_secondary] |
The firewall sends all its mail logging messages to an SMTP server, which should relay the mail to the appropriate recipients. Up to two servers can be identified, either by IP address or host name. The firewall first tries to send to server_primary. If that fails, it tries server_secondary. NOTE If you use a host name, a matching name command must already be configured so that the name can be resolved to an IP address. This is because the firewall won't resolve names through an external DNS server. Instead, resolution must happen internally. Even if you supply a host name with the smtp-server command, the IP address is substituted in the actual running-config. Assign a source address for the messages: FWSM 2.x | | PIX 6.x | | PIX 7.x | Firewall(config)# logging from-address from_email_address |
Mail messages are sent with an arbitrary e-mail source address of from_email_address. This address is not automatically verified or resolved; instead, it is just copied into the resulting message and sent to the SMTP server. The address can be fictitious, because it isn't necessary or possible to reply to that address. In the following sample command, logging messages appear to be sent from mypix@mycompany.com: Firewall(config)# logging from-address mypix@mycompany.com
Identify the e-mail recipient: FWSM 2.x | | PIX 6.x | | PIX 7.x | Firewall(config)# logging recipient-address to_email_address [level level] |
Logging messages are sent to the recipient address to_email_address. This can be an actual person's address or the address of a system that can automatically distribute the e-mail message to any number of recipients. You can repeat this command to define multiple recipient addresses. Each mail logging recipient can have a unique severity level associated with it, specified as level: emergencies (0), alerts (1), critical (2), errors (3), warnings (4), notifications (5), informational (6), or debugging (7). If a message is at or below the recipient's severity level, it is sent. However, the logging mail level command sets the highest possible severity that can be sent to any e-mail recipient.
CAUTION Be careful when you set a mail logging severity level. Remember that each relevant logging message is sent as a separate e-mail message. A highly utilized firewall or a severity level that is too great can quickly overload a recipient's mailbox. In addition, it can overload the firewall's SMTP queue to the point that new logging messages are dropped. The firewall reminds you of this potential, as the following example demonstrates: pix/admin(config)# logging recipient-address hucaby@mycompany.com level informational WARNING: SMTP logging is very inefficient. At this severity level, a large number of syslogs might overwhelm the SMTP input queue, resulting in dropped messages. pix/admin(config)#
| 9. | (Optional) Allow logging to an ASDM management application.
A firewall can feed logging messages to one or more ASDM sessions. Messages are kept in a buffer until they are requested by an ASDM session. The messages are transferred to ASDM over an SSL connection rather than as traditional Syslog packets.
(Optional) Set the buffer size for ASDM messages: FWSM 2.x | | PIX 6.x | | PIX 7.x | Firewall(config)# logging asdm-buffer-size num_of_msgs |
By default, the buffer holds 100 messages. You can adjust the buffer size to num_of_msgs (100 to 512 messages). Set the PDM logging level: FWSM 2.x | | PIX 6.x | | PIX 7.x | Firewall(config)# logging asdm {level | event-list} |
Messages are buffered for ASDM if they are at or below the specified severity level: emergencies (0), alerts (1), critical (2), errors (3), warnings (4), notifications (5), informational (6), or debugging (7). Beginning in PIX 7.x, you can also use a policy to select which messages are displayed. Messages that are matched by the event list named event-list (defined in Step 2) are buffered for ASDM use.
|
Verifying Message Logging Activity Use the show logging command to verify where logging messages are being sent. The first few lines of output display message counters for every possible logging destination. The firewall in the following example has sent 117 messages to the console, 408,218 messages to the internal buffer (only 4096 bytes of the most recent messages are kept), and 1,852,197 messages to the Syslog host at 192.168.199.200. You can also verify each destination's severity level. Firewall# show logging Syslog logging: enabled Facility: 20 Timestamp logging: enabled Standby logging: disabled Console logging: level warnings, 117 messages logged Monitor logging: level errors, 0 messages logged Buffer logging: level informational, 408218 messages logged Trap logging: level informational, 1852197 messages logged Logging to outside 192.168.199.200 History logging: disabled Device ID: hostname "Firewall"
PIX 7.x provides some additional information, along with the settings of its additional logging destinations. The show logging setting command displays the same type of information without showing the logging buffer contents, as demonstrated in the following example: Firewall/admin# show logging setting Syslog logging: enabled Facility: 20 Timestamp logging: enabled Standby logging: disabled Deny Conn when Queue Full: disabled Console logging: disabled Monitor logging: disabled Buffer logging: list MyFilter, class config ip np session sys, 6756 messages logged Trap logging: level debugging, facility 20, 259799 messages logged Logging to outside syslog.mycompany.com History logging: disabled Device ID: context name "admin" Mail logging: level critical, 166 messages logged ASDM logging: level informational, 246891 messages logged Firewall/admin#
PIX 7.x lets you add message filters and classes to any logging destination. The preceding example shows how an event list called MyFilter is being used on the logging buffer. Buffered logging also is being performed for the event classes called config, ip, np, session, and sys. Notice that the firewall is using its context name as a device ID. Settings and counters are also shown for mail logging and PDM logging. Manually Testing Logging Message Generation If it isn't apparent that the firewall is sending Syslog messages, you can use another method to force messages to be sent while watching them being received at the destination. First, make sure the logging destination has been configured for severity level 4 or greater. Then, from enable mode in a session, run the following EXEC commands with a bogus or unused IP address: Firewall# shun ip-address Firewall# no shun ip-address
This creates and deletes a temporary shun on the nonexistent address. This command is handy because it is the only one that generates simple Syslog messages at a very low severity level (level 4, warnings) without a complex scenario. You should see the following logging messages displayed at the appropriate logging destination: 401002: Shun added: 10.1.1.1 0.0.0.0 0 0 401003: Shun deleted: 10.1.1.1
TIP You can view the firewall's internal logging buffer with the show logging EXEC command. Only the most recent messages still remaining in the buffer are shown. As in the preceding shun example, notice that time stamps and the %PIX-severity-messageID prefix are not added to the buffered messages in PIX 6.3. Only the six-digit message number and the message text are kept. PIX 7.x adds both time stamps (if configured to do so) and the complete %PIX-severity-messageID prefix to each message in the buffer. To clear the internal logging buffer, you can use the clear logging (PIX 6.3) or clear logging buffer (PIX 7.x) command.
|