Interacting with the User in Shell Scripts
| In Chapter 25, "Harnessing the Power of the Shell," you learned to write shell scripts to perform sequences of commands without user intervention. Sometimes it is also helpful to be able to get user input as a shell script is runningto allow the user of the script to make choices about how tasks will be performed, for example. The xmessage command can be used in shell scripts to enable the scripts to interact easily with the user via the mouse. Using xmessage in Shell ScriptsTo use xmessage in your shell scripts, you must call it from within a script by using the -buttons option and two arguments: a comma-separated list of buttons and the message that should be displayed to the user above the buttons. The format looks like this: xmessage -buttons "button1,button2,button3" "My Message" This command causes a dialog box with buttons labeled button1, button2, and button3 to appear below the message My Message. For example, the following call to xmessage displays the dialog box shown in Figure 26.6: xmessage -buttons "Yes,No" "Would you like some ice cream?" Figure 26.6. A dialog box created by calling the xmessage command.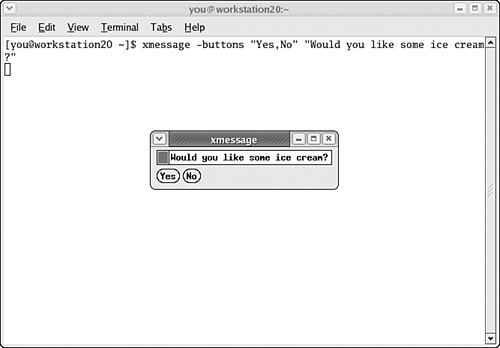 When the user clicks one of the buttons beneath the message, the dialog box disappears and returns a value to the script, which is assigned to the special shell variable $?. If the first button is clicked, the value 101 is assigned to the variable. If the second button is clicked, the value 102 is assigned to the variable, and so on. Sample xmessage ScriptTo illustrate the use of xmessage, let's study some sample scripts. These samples use techniques you learned in Chapter 25, so if you find yourself confused by the explanations, you should review Chapter 25 before continuing. Suppose you want to create your own replacement for the rm command (used to remove files) that prompts the user with a confirmation dialog box before actually deleting a file. Listing 26.1 shows what a script called myrm, which does just this, might look like. Start an editor, create a file called ~/bin/myrm, and enter the listing. Then let's go over it line by line to see how it works. Listing 26.1. Sample Script for myrm Command1: #!/bin/sh 2: 3: xmessage -buttons "Yes,No" "Remove file $1?" 4: RESULT=$? 5: 6: if [ $RESULT -eq 101 ]; then 7: rm "$1" 8: fi This short shell script performs a simple function, so dissecting it is fairly easy:
To try out this script, use the chmod command to make myrm executable: [you@workstation20 ~]$ chmod u+x ~/bin/myrm [you@workstation20 ~]$ Then try using the script to delete a file like myfile.tex. Entering the following command causes the dialog box shown in Figure 26.7 to be displayed: [you@workstation20 ~]$ myrm myfile.tex Figure 26.7. The myrm command displays a dialog box asking whether you really want to delete the file you've supplied as an argument.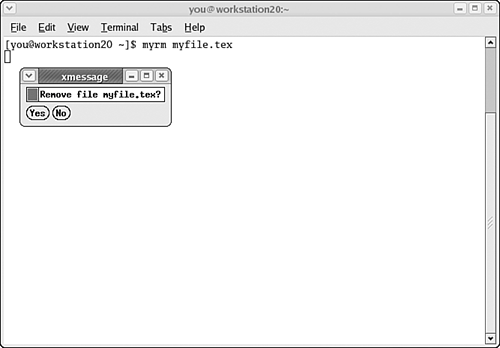 Clicking the Yes button at this point causes the file to be deleted. Clicking the No button leaves the file intact. Second Sample xmessage ScriptOne more example might help illustrate a more dynamic use of the xmessage command. Suppose you have a set of LaTeX files in your home directory. If you don't, create some empty LaTeX files now for purposes of illustration using the touch command: [you@workstation20 ~]$ touch myfile.tex yourfile.tex oldfile.tex newfile.tex [you@workstation20 ~]$ Now suppose you want to create a shell script that enables you to edit any one of your LaTeX files in an emacs window by typing texedit and selecting the name of your file using an xmessage dialog. To create this script, start a text editor window and enter Listing 26.2 as ~/bin/texedit. Then let's go over it line by line. Listing 26.2. Sample Script for texedit Command1: #!/bin/sh 2: 3: xmessage -buttons "$(ls -m *.tex)" "Which LaTeX file?" 4: RESULT=$? 5: 6: INDEX=100 7: for TEXFILE in *.tex; do 8: INDEX=$(expr $INDEX + 1) 9: if [ $RESULT = $INDEX ]; then 10: emacs $TEXFILE & 11: fi 12: done This script is also relatively short, but its operation is somewhat more complex than the script in the first sample:
Now let's look at the script in action. After you save the file ~/bin/texedit, remember to use the chmod command to mark it as executable so that you can call it at the command line: [you@workstation20 ~]$ chmod u+x ~/bin/texedit [you@workstation20 ~]$ The dialog box in Figure 26.8 appears after you enter the texedit command at the command prompt: [you@workstation20 ~]$ texedit Figure 26.8. The xmessage dialog box enables the user to choose between all the .tex files in the current working directory. Clicking one of the filename buttons causes the file in question to be loaded into a new emacs editor application window. |
EAN: 2147483647
Pages: 311