Time Hierarchy
|
| < Day Day Up > |
|
BusinessObjects allows you to build one particular hierarchy, even if the upper-level groupings do not exist in the dimension tables: Time Periods. If you have a date column in the fact table and your database lacks a Time dimension table, Designer helps you build the hierarchy. If you have a Time dimension table, skip this section; you are better off using columns from the dimension table.
In order for the Time feature to be available, the database column and universe Object must be in date format. As an example, use the Island Resorts Marketing (BEACH.UNV) universe, Reservation Date. (Note: similar time objects already exist in this universe, so the following example is for instructional purposes only and not intended to replace the existing time objects.)
-
From Designer, open the universe Beach.unv. Expand the class Reservations by clicking + next to the class name.
-
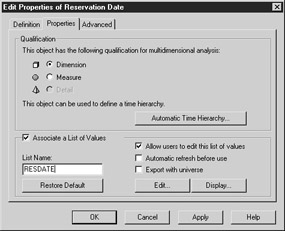
Select the object Reservation Date and double-click to bring up the Edit Properties screen.
-
On the Definition tab, ensure that the Object Type is set to Date.
-
On the Properties tab, click Automatic Time Hierarchy.
-
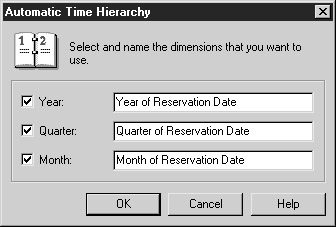
Designer presents you with an Automatic Time Hierarchy box, shown next. Click to choose which time levels you would like Designer to create. In the name box, enter a name for each level. These become the names of the individual dimension objects.
-
Click OK to close the Automatic Time Hierarchy box and OK again to save the Object changes.
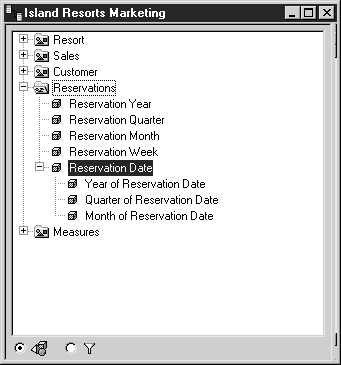
Notice that Designer has created three dimension objects under Reservation Date, shown next. Once you Save and Export the universe, users can access the objects when building a query.
Limitations with Automatic Time Hierarchy
Chapter 19 discusses multidimensional analysis from the user's viewpoint in more depth; however, it is important for you, as the designer, to understand how these new time objects work. When a user constructs a query with these objects, BusinessObjects generates the following SQL:
SELECT DatePart('YYYY', Reservations.res_date), DatePart('Q', Reservations.res_date), DatePart('M', Reservations.res_date) FROM Reservations Using an Oracle data source, the SQL appears as follows:
SELECT TO_NUMBER(TO_CHAR(RESERVATIONS.RES_DATE,'YYYY')), TO_NUMBER(TO_CHAR(RESERVATIONS.RES_DATE,'Q')), TO_NUMBER(TO_CHAR(RESERVATIONS.RES_DATE,'MM')) FROM RESERVATIONS
Notice that BusinessObjects is using the same advanced SQL that you learned about in Chapter 10. This poses two main problems: First, if a user tries to use one of the time objects as a condition, an index on RES_DATE will most likely not be used to process the query; Second, the SQL generated leaves the objects in numeric format. If a user tries to create a formula or variable using BusinessObjects' internal date functions, the user will first have to convert the object to date. Designers cannot modify the object properties for these objects.
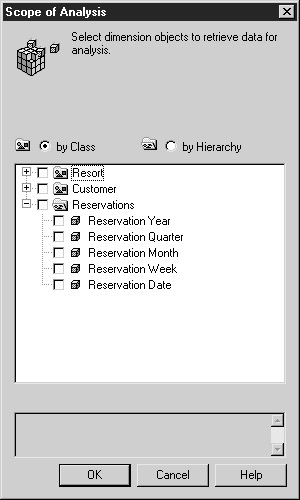
Finally, when users build a query intended for multidimensional analysis, the users can specify a scope of analysis. For example, a user may want to start by analyzing reservations by Year and potentially drill down to the individual date. In the query panel, under Scope of Analysis, users tell BusinessObjects how much detail to retrieve and seamlessly store in the micro cube. Users can specify the Scope of Analysis by Class or by Hierarchy. The Automatic Time Hierarchy objects never appear under the Class selection (nor do other detail objects or subclasses), as shown in the next screen. This is counterintuitive for users; the objects are there and are ideal for multidimensional analysis, so why do the users suddenly not see them? If users toggle to display hierarchy objects, then you, as the designer, must have included these new time objects in your custom hierarchy. The following section on hierarchies explains how to do this.
| Tip | My recommendation is to build the Year, Quarter, and Month objects yourself as regular dimension objects. |
Hierarchies
BusinessObjects has two types of hierarchies: default hierarchies that are based on the order of the objects within a class, and custom hierarchies that you, as the designer, specify. If you have ordered your objects from largest to smallest increments, as discussed in Chapter 8, 'Object Ordering,' you may not need to define a custom hierarchy. The benefit of custom hierarchies is that you explicitly control the drill path. In the following example, you will use the Test Fashion universe (TESTFASH.UNV) created in earlier chapters:
-
From Designer, open the Test Fashion universe.
-
From the pull-down menu, select Tools | Hierarchies or click the Hierarchies button on the toolbar.
-
Designer presents you with the list of classes and objects, as shown next. You will first build the drill path for Article. You can add either individual objects or entire classes. Select the Article Lookup class and click Add>>.
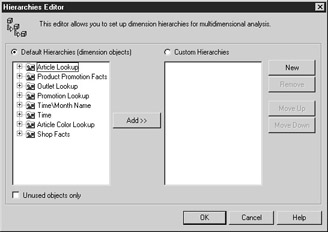
-
Under Custom Hierarchies, expand the Article Lookup class. Organize the objects so that they go from Family Name at the top to Category to Article Name. You can use drag and drop or select the objects and use the Move Up button.
-
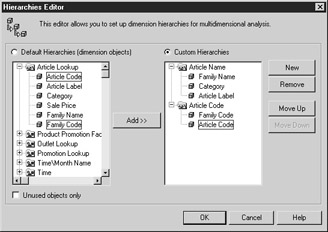
In the drill path, it does not make sense to drill down from Family Name to Family Code, as they are at the same level. Therefore, remove Family Code, Article Code, and Sales Price by selecting each object and clicking Remove. The objects are only removed from the drill path. They still exist as dimension objects for query purposes.
-
Modify the hierarchy name Article Lookup to Article Name by clicking Article Lookup and typing over the name.
-
To create a separate hierarchy for the code objects, click New. Enter a hierarchy name Article Code.
Tip So that users do not drill from a name object at one level to a code object at the same level, create two hierarchies, one for name objects and one for code objects.
-
Under Default Hierarchies, select the two objects Article Code and Family Code and click Add to add them under the new hierarchy Article Code. You may CTRL-click to select noncontiguous objects.
-
The custom hierarchies should appear as follows:
You can organize the hierarchies in any way that makes business sense. You may choose to follow agreed-upon corporate levels or incorporate groupings that are specific to various business units. For example, perhaps some business units want the drill path to be Family Þ Category Þ Color Þ Article Name Þ Article Code. It's perfectly reasonable for you, as the designer, to provide multiple drill paths. Users can also create the custom hierarchies per report. Therefore, you will want to reserve universe custom hierarchies for groupings that meet a broad set of users needs.
| Caution | Once you begin using custom hierarchies, you must continue to use them for all dimension objects by which users will want to drill. In the preceding example, a Time Hierarchy has not yet been defined. When users begin drilling with BusinessObjects Explorer (see Chapter 19), no time objects would appear in either the Drill Through or the Scope of Analysis. Even if a user elects to view dimension objects by class versus by hierarchy, only those objects that exist in a custom hierarchy appear in the class view. |
|
| < Day Day Up > |
|
EAN: 2147483647
Pages: 206