Breaks
|
| < Day Day Up > |
|
A break will break the table into multiple pieces so that you can better analyze the data within a group. A master/detail report is somewhat similar, except that a break does not create a separate master cell. Once you create a break, you then use Calculations to generate subtotals. The first break column becomes the primary sort order. Often, this is the first column in the table, but it does not have to be.
Using the same sample table from the preceding section, add a break to the Country column:
-
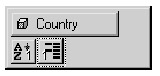
From the Slice and Dice Panel, select the Country column.
-
Click Apply Break. Just as with sorts, you can have multiple breaks. When you apply a break, the break icon indicates that this is the primary break column by preceding the break icon with a number 1. The Country column should now contain both a sort and a break, like this:
-
Click Apply to have the break applied to the data in the block.
-
Minimize the Slice and Dice Panel to see the effect of the break.
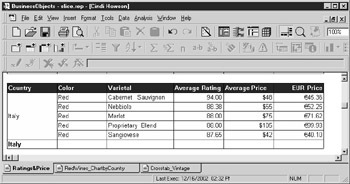
In the table in Figure 18-2, it is much easier to see that the data is sorted by country. For each country, there is now a separate mini-table. Visually, you can now more clearly see a set of wines for each country and can tell that the highest-rated wines (the second sort variable) are not necessarily the highest-priced wines.

Figure 18-2: Breaks group the data into what appears as mini-tables.
| Note | Although breaks make the data appear as if they are in separate mini-tables, in the strict sense, BusinessObjects still treats the table as one block, an important nuance when formatting the table. In Figure 18-2, the Table Format options will be the same for both the France and Italy mini-tables. |
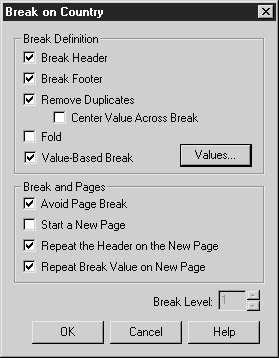
Break Options
Figure 18-2 shows the break options, break header, break footer, and remove duplicates. To modify these options, return to the Slice and Dice Panel, and double-click the break icon beneath the Country variable. Alternatively, you can use the pull-down menu Format | Breaks.
-
Break Header Repeats the column headings within each mini-table. If your table contains more than one break and you enable the Break Header for each break, certain mini-tables will contain multiple rows of column headings. To avoid this, set the Break Header on the last break only (or on the lowest level detail for which you want to create a separate mini-table).
-
Break Footer Inserts a separate row beneath each mini-table. The calculation subtotals appear in the break footer. In Figure 18-2, the break values (France, Italy) appear in the break footer, but the report does not yet contain subtotals.
-
Remove Duplicates If you want the break value repeated only once in the first row of the mini-table, use this option. As shown in Figure 18-2, the country name France appears only in the first row of the table. Without this option set, France would be repeated in each row of the mini-table.
-
Center Value Across Break Works with the Remove Duplicates option so that the break value is centered within the rows of the table. The following screen shows an example of the break value centered:
Note Do not confuse a break value with calculation values that may appear in the row of a break footer. A break value is the value from the dimension—in this example, France, Italy, and so on. A calculation value would be the subtotals.
-
Fold Hides all the detail rows within a mini-table and displays only the footer. This is a powerful feature that, after adding calculations, lets you better analyze the subtotals for the break levels. The next screen shows the effect of folding the break on Country.
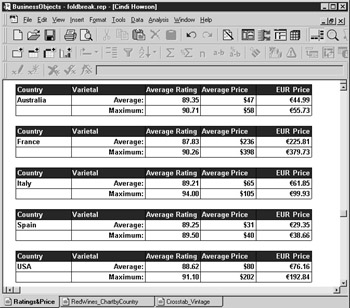
-
Value-Based Break By default, BusinessObjects creates a mini-table for each value within a dimension. By selecting a value-based break, you create a mini-table only for the individual dimension values you select. For example, if you want Italian wines in one mini-table and all other countries in a separate table, select the Value-Based Break option. The Values button then becomes enabled, through which you select the break values for which you want to create a mini-table.
Chapter 17, “Page Layout,” discusses formatting a table to improve the layout when you print a report. Breaks have similar options that affect the mini-tables when you print a report:
-
Avoid Page Break Use this option to force BusinessObjects to start the break or mini-table on a new page. For breaks that contain many rows of data, particularly long tables, it may not be possible to avoid a break in the middle of the mini-table. If the grouping of data is longer than a page and not the first grouping of data in the block, a page break will occur before the break and the mini-table will span multiple pages.
-
Start a New Page For each break level, print the mini-table on a new page. This print setting is useful when you intend to distribute each break level to a different person—for example, if you have different product managers and have a break on product.
-
Repeat the Header on the New Page For each page break, repeat the column headings.
-
Repeat Break Value on New Page For mini-tables that span multiple pages, repeat the break value in the first row of each page. If you choose to repeat the header as well, then the row with the break value is repeated beneath the column headings.
-
Break Level Within the Slice and Dice Panel, the Break Level displays a grayed-out number to indicate which break number this dimension is. You cannot modify the Break Level from this screen. To change the Break Level, you would re-sort the break icons within the Slice and Dice Panel, or use the pull-down menu Format | Breaks.
|
| < Day Day Up > |
|
EAN: 2147483647
Pages: 206