Cryptography and Certificates in Windows 2000
Now let's turn our attention to how Windows 2000 implements cryptographic technologies and how a user or administrator can use them. We'll look at the following topics: CryptoAPI, certificates in Windows 2000, and certificates in Microsoft Office 2000.
CryptoAPI
Windows 2000 has an extremely rich set of low-level cryptographic capabilities based on the Cryptographic API, or CryptoAPI for short. CryptoAPI provides services that allow developers to add certificate and cryptographic capabilities to their applications without having to understand the implementation details of cryptographic functions.
CryptoAPI implements cryptographic operations by calling CryptoAPI Service Providers (CSPs). When an application wants to perform a cryptographic operation, it asks CryptoAPI to use a specific CSP.
Windows 2000 ships with the following CSPs:
- Microsoft Base Cryptographic Provider, a general-purpose CSP that supports data encryption and digital signatures. It supports RSA, RC2, and RC4 as well as MD5 and SHA1.
- Microsoft Strong Cryptographic Provider, an extension to the Microsoft Base Cryptographic Provider CSP. It supports all the algorithms in the Microsoft Enhanced Cryptographic Provider, but the key lengths are the same as in the Microsoft Base Cryptographic Provider. It supports RSA, DES, 3DES, RC2, and RC4 as well as MD5 and SHA1.
- Microsoft Enhanced Cryptographic Provider, which supports stronger security through longer keys and additional algorithms compared to the Base provider. It supports RSA, DES, 3DES, RC2, and RC4 as well as MD5 and SHA1.
- Microsoft DSS Cryptographic Provider, which supports hashing, data signing, and signature verification using the SHA1 and Digital Signature Standard (DSS) algorithms.
- Microsoft Base DSS and Diffie-Hellman Cryptographic Provider, a superset of the Microsoft DSS Cryptographic Provider that also supports Diffie-Hellman key exchange, hashing, data signing, and signature verification using the SHA1 and DSS algorithms.
- Microsoft Base DSS and Diffie-Hellman/Schannel Cryptographic Provider, which is the same as the Microsoft Base DSS and Diffie-Hellman Cryptographic Provider but is used for SSL3 and TLS1 protocols when the application uses Diffie-Hellman key exchange.
- Microsoft RSA/Schannel Cryptographic Provider, which is similar to the Microsoft Base DSS and Diffie-Hellman/Schannel Cryptographic Provider in that it works with SSL3 and TLS1, but uses the RSA suite of algorithms rather than Diffie-Hellman.
- Schlumberger CSP and GEMPlus CSP (from the vendors Schlumberger and GEMPlus, respectively), which are used with smartcards.
CryptoAPI in Windows 2000 is actually two sets of functionality. CryptoAPI 1.0 provides the low-level cryptographic functionality, such as encrypting, decrypting, hashing data, and managing keys. CryptoAPI 2.0 isn't an upgrade to CryptoAPI 1.0—it provides additional functionality for managing certificates and manipulating PKCS #7 signed messages.
The general architecture of CryptoAPI is shown in Figure 15-13. (For more information about CryptoAPI, see the Microsoft Developer Network (MSDN) CDs or the MSDN Web site at msdn.microsoft.com.)
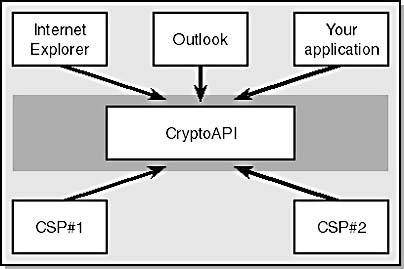
Figure 15-13. The CryptoAPI architecture.
NOTE
Windows 2000 now supports 128-bit cryptography for all countries outside North America except countries embargoed by the U.S. government. You can get the High Encryption Pack for Windows 2000 from http://windowsupdate.microsoft.com or by choosing Windows Update from the Start menu.
Certificates in Windows 2000
Windows 2000 provides excellent support for certificates at all levels of use through the following technologies: CryptoAPI 2.0, Microsoft Certificate Services, and certificate enrollment control.
Certificates and CryptoAPI 2.0
CryptoAPI 2.0 supplies services for storing certificates and their private keys as well as a user interface that makes manipulating certificates easy.
Certificate stores
Certificates and keys are stored in certificate stores. The location of a store is determined by the CSP used. In the case of the default Microsoft CSPs, they're held in a secure area of the Registry. The most commonly used stores are
- The personal store (often called the MY store), which holds a user's or a computer's certificates and private keys
- The root store, which holds self-signed root CA certificates
- The trust store, which holds certificate trust lists (CTLs), which are signed lists of root CA certificates defined by an administrator as trustworthy within an organization.
- The CA store, which holds intermediate CA certificates
Note that users, computers, and services can all have their own certificate stores.
Certificate user interfaces
The main user interface tools for manipulating certificate stores and certificates are the Certificate dialog box and the Certificates management tool. The former allows the user to view a certificate file (usually a file with a .crt or .cer extension) or a certificate in a certificate store.
If you double-click a certificate or view a certificate in a certificate store, you see the Certificate dialog box, as shown in Figure 15-14.
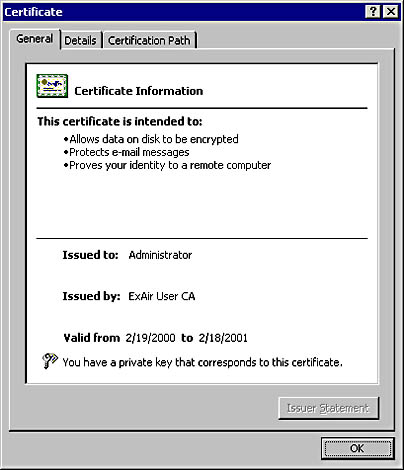
Figure 15-14. Viewing the properties of a user's certificate.
CryptoAPI's Certificate FormatThe following C/C++ structure shows how CryptoAPI 2.0 defines a certificate:
typedef struct _CERT_INFO { DWORD dwVersion; CRYPT_INTEGER_BLOB SerialNumber; CRYPT_ALGORITHM_IDENTIFIER SignatureAlgorithm; CERT_NAME_BLOB Issuer; FILETIME NotBefore; FILETIME NotAfter; CERT_NAME_BLOB Subject; CERT_PUBLIC_KEY_INFO SubjectPublicKeyInfo; CRYPT_BIT_BLOB IssuerUniqueId; CRYPT_BIT_BLOB SubjectUniqueId; DWORD cExtension; PCERT_EXTENSION rgExtension; } CERT_INFO, *PCERT_INFO;
You can also view all the certificates known to you by using the Certificates management tool. To use the tool, follow these steps:
- Choose Run from the Start menu.
- Type mmc /a and press Return.
- Choose Add/Remove Snap-in from the Console menu.
- Click Add.
- Double-click the Certificates snap-in.
- Select My User Account.
- Click Finish, click Close, and then click OK.
You'll see all certificates known to you if you open the Personal node. In the Certificates node, you'll see all the certificates assigned to you. It's these certificates to which you also have the private key. To view a certificate, double-click the file from Windows Explorer or the shell.
Importing and exporting certificates and private keys
Windows 2000 allows the user to import a certificate or import a certificate and a private key into a key store. It also allows the user to export a certificate or export a certificate and private key to a file. If the file is a .cer or .crt file, it contains only a certificate, not a certificate and a private key. A certificate and private key are stored in a PKCS #12 file, which has the .pfx extension. Figure 15-15 shows the different icons.

Figure 15-15. Certificate and certificate/private key icons.
You can import a .cer or .crt file by double-clicking it. In the Certificate Information dialog box, click Install Certificate to launch the Certificate Import wizard, which will help you install the certificate.
You can import a .pfx file by double-clicking on it. This launches the Certificate Import wizard. The Certificate Information dialog box doesn't appear because the file is encrypted and you must provide the password to successfully install the certificate and private key.
Internet Explorer 5 also has a certificate import option, which you can access as follows:
- In Internet Explorer, choose Internet Options from the Tools menu.
- On the Content tab of the Internet Options dialog box, click the Certificates button.
- Invoke the Certificate Import wizard by clicking the Import button.
Before you import a certificate, you have to make some important decisions:
- Where to store the certificate and private key. Normally, you should let the wizard select the correct store.
- Whether you want strong private key protection. This option isn't enabled by default, but it's highly recommended in secure environments. When you enable strong private key protection, you are prompted each time an application attempts to use the private key. Figure 15-16 shows the dialog box that appears when an application attempts to use a private key marked for strong private key protection.
- Whether to allow the private key to be exported. By default, this option is disabled, so the private key can never leave the store in which it's saved. Any attempt to export the certificate and private key will fail.
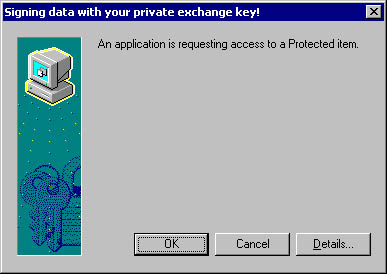
Figure 15-16. An application is attempting to use a private key. You can click Details to see which application is performing the operation.
You usually export a certificate to make a backup of the certificate and, optionally, the private key, or to copy the certificate to another computer. You export a certificate as follows:
- In the Certificates Microsoft Management Console (MMC) tool, right-click on the certificate in question.
- Select All Tasks.
- Select Export. This launches the Certificate Export wizard, which guides you through the certificate and private key exporting process.
Exporting requires you to make some decisions:
- Whether to export the private key. This option is available only if the certificate has a private key. For example, a root CA certificate can be exported from your store, but you won't have the private key—that's held securely by the CA.
- The format in which to export the certificate and private key. If you're not exporting a private key, you have the following options:
- DER encoded binary X.509, a standard binary format for a single certificate saved with a .cer extension.
- Base64-encoded X.509, which is like the DER encoded format except that the binary data is encoded as a text base64 file with a .cer extension. This option is useful for transferring a certificate via e-mail.
- Cryptographic Message Syntax Standard - PKCS #7, which is also a binary standard but has the added advantage of being able to store the entire certificate chain. The file is saved with a .p7b extension.
- If you're exporting a private key with the certificate, you export the data as a Personal Information Exchange - PKCS #12 file with a .pfx extension. You have the following options available to you:
- Including all the certificates in the path. This is similar to the PKCS #7 capability of saving the certificate chain.
- Enabling strong private key protection. This option uses PKCS #5 to make the password you enter harder to break should the encrypted exported data be stolen. Note that this is supported only by Windows NT 4 Service Pack 4 and later or Internet Explorer 5 and later. You should enable this option unless you plan to install the certificate and private key on Windows 95, Windows 98, or a Windows operating system prior to Windows NT 4 Service Pack 4 that doesn't have Internet Explorer 5 installed.
- Deleting the private key if the export succeeds. This option is disabled by default, but if you're exporting a certificate and private key for use solely on another computer, you should select this option.
You should be very careful about exporting and importing private keys between computers. You must be able to account for every copy of the private key and make sure that the keys are appropriately protected.
Let's now switch focus from the certificates themselves to the issuance and life cycle management of certificates using Microsoft Certificate Services in Windows 2000.
Microsoft Certificate Services
Certificate Services is an application for issuing and managing certificates that run on Windows 2000. It accepts PKCS #10 certificate requests and generates X.509 certificates in PKCS #7 format to be used for such diverse technologies as SSL/TLS, S/MIME, IPSec, and Code Signing, to name a few.
Certificate Services can be a root CA or a subordinate CA and can optionally integrate with Active Directory. When you use Active Directory, Certificate Services is referred to as an enterprise CA and it publishes certificates and CRLs to Active Directory, which makes managing the CA and certificates straightforward.
NOTE
Where does Certificate Services store its data? Certificate Services uses the same database technology as Active Directory and Microsoft Exchange Server to securely store certificate information.
You can access the Certificate Services administration tool as follows:
- Choose Programs from the Start menu.
- Select Administrative Tools.
- Select Certification Authority. You'll see the opening screen of the Certificate Services tool, as shown in Figure 15-17.
Does This Mean I Can Create a CA Like VeriSign or Thawte?Yes and no. Yes, the Certificate Services technology is similar to that of VeriSign or Thawte, but these companies have built their reputations on trust. They are trusted third parties. Setting up a CA is more than technology. It's about trust, legal enforcement of policy, and in some cases backing the use of a certificate and private key with insurance—real money. It's not a trivial exercise.
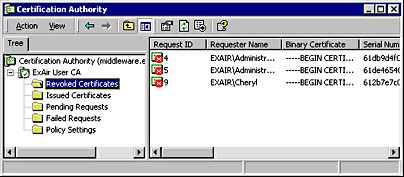
Figure 15-17. The Certification Authority Administration Tool.
From here, you can examine certificate properties by double-clicking on a certificate, back up and restore the CA database, manage the kinds of certificates you want to issue, and revoke certificates.
Certificate revocation lists
Like credit cards, all certificates have a useful lifetime. However, sometimes a certificate must be invalidated—for example, because the private key has been compromised or because the certificate owner leaves the company. Once again, the analogy to a credit card is useful—if you discover that someone has fraudulently used your credit card, you can revoke the card by contacting the issuer.
When a certificate is revoked, its serial number is added to a CRL maintained by the CA. A CRL contains the following information:
- Version number
- Issuer
- Effective date
- Next update
- Signature algorithm
- Signature
- Revocation list
The data is similar to that found in X.509 except for the effective date, next update, and revocation list. The effective date is the date and time that the list was last updated, next update is the date and time of the next update, and revocation list is the list of revoked certificate serial numbers and the date the certificate was revoked.
You can determine where to find the CRL for the CA that issued a certificate by looking at a CDP in the certificate.
Figure 15-18 shows a certificate issued by VeriSign. As you can see, VeriSign place its updated CRLs on the Web at http://crl.verisign.com. If you navigate to this URL with your browser, you'll see a number of files ending in .crl, one of which is named class1.crl. If the serial number of this certificate is in the CRL, this certificate has been revoked. (At the time of this writing, such action had not been taken on this particular certificate.)
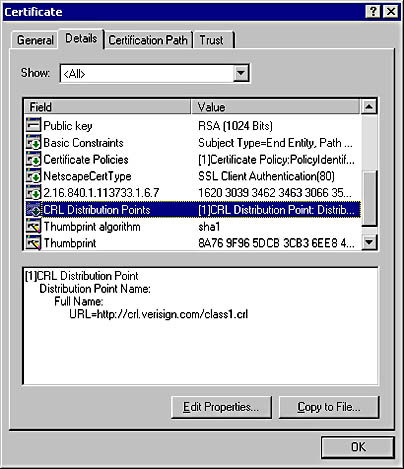
Figure 15-18. The CDPs in a VeriSign certificate.
You can copy the CRL to your computer if you want to look inside it. Once you copy it, it appears on your computer with the icon shown in Figure 15-19.
Figure 15-19. The CRL icon in Windows 2000.
You can look at a CRL by double-clicking it from the Windows 2000 shell. Figure 15-20 shows the VeriSign CRL.
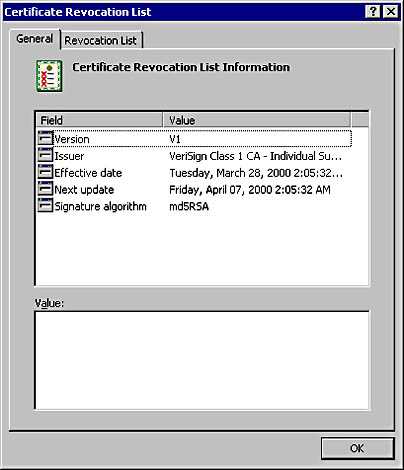
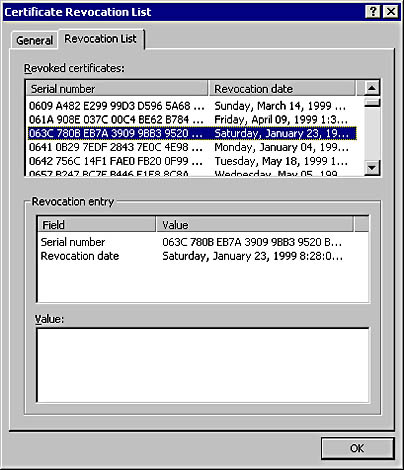
Figure 15-20. A VeriSign CRL.
Where does revocation checking occur?
Certificate revocation checking occurs at the host that requests the certificate. For example, if you have a Web browser that uses an SSL/TLS connection to a Web server, your browser will check that the Web server's certificate is valid. By default, Internet Explorer 5 doesn't perform CRL checking, but you can enable checking as follows:
- In Internet Explorer 5, choose Internet Options from the Tools menu.
- Click on the Advanced tab.
- Scroll down to the Security node, and select the Check For Publisher's Certificate Revocation option and the Check For Server Certificate Revocation option. The former performs CRL checks on signed code, and the latter performs CRL checks on the certificates issued to Web sites.
If a Web server is configured to require client authentication certificates over an SSL/TLS connection, the Web server will check that the client's certificate is valid. In the case of IIS 5, a 403.13 error ("Client Certificate Revoked") is returned if the certificate has been revoked by the CA. By default, IIS 5 performs CRL checking.
When you use secure e-mail, the e-mail program will check whether the sender's certificate has been revoked. Outlook 2000 and Outlook Express 5 do not perform CRL checking by default, but you can enable this functionality.
In Outlook 2000, you take the following steps:
- Using RegEdt32, open or create the following key: HKCU\Software\
- Microsoft\Cryptography\{7801ebd0-cf4b-11d0-851f-0060979387ea}.
- Create a REG_DWORD PolicyFlags value and set it to 0x00010000.
- Restart Outlook 2000.
In Outlook Express 5, you take these steps:
- Choose Options from the Tools menu.
- Click the Security tab.
- Click the Advanced button.
- In the Check For Revoked Digital IDs drop-down list, select Only When Online.
Revoking a certificate by using Certificate Services
Revoking a certificate is a simple process in Certificate Services:
- In the Certification Authority tool, right-click the certificate in question.
- Select All Tasks.
- Select Revoke Certificate.
- Specify the reason why the certificate is being revoked by selecting from the list of options.
It's important to realize that once you revoke a certificate, you cannot "unrevoke" it, so double-check that the certificate is the correct one.
A problem with CRLs
CRLs are updated at regular intervals called publish periods. By default, the publish period for Certificate Services is one week. What happens if a certificate is revoked within the one-week period? Clients might not pick up on the change until the next CRL update, as defined in the Next Update field in the CRL, because it's normal for client software to cache the CRL until the next update.
Because of this problem, you should set the CRL publish period to balance the cost of publishing a new CRL against the risk of a client missing a revoked certificate.
Note that you can reissue an updated CRL at any time using Certificate Services, but as we've already discussed, clients with cached CRLs might not use the updated CRL.
Does This Mean That CRLs Will Become Very Large over Time?Imagine if a CA had to add every revoked certificate to the CRL. Over time, wouldn't the CRL would grow very large? Luckily, the answer is no. Only certificates that haven't expired are added to a CRL. In fact, once a certificate expires, it can appear on the next CRL update, after which it's removed from the CRL.
To change the CRL publish period, take the following steps:
- In the Certification Authority tool, right-click on Revoked Certificates and choose Properties from the context menu.
- Enter the new publish period in the Publish Interval field.
NOTE
Microsoft Certificate Services will extend the validity period of the CRL by 10 percent (up to a maximum of 12 hours) to accommodate directory replication latency.
Certificate enrollment control
The certificate enrollment control is a COM+ component that simplifies the building of solutions that request and process certificates. Because it's a COM+ component, you can use it from virtually any programming language, such as C++, Microsoft Visual Basic, or a scripting language such as Microsoft Visual Basic, Scripting Edition (VBScript) or JScript. Certificate Services in Windows 2000 includes a set of Active Server Pages (ASP) pages that call the certificate enrollment control to generate certificate requests for users.
The ASP enrollment pages are available at http://yourserver/certsrv.
How Do the Certificate Services ASP Pages Work with Netscape Clients?Netscape browsers don't support COM+ components, but ASP pages work well with both Microsoft and Netscape browsers because they detect the browser type. If they detect Internet Explorer, they use the certificate enrollment control. If they detect a Netscape browser, they instead present Netscape-specific pages that contain a Netscape proprietary tag called <keygen>, which generates keys for the user. You can find out more about <keygen> at http://developer.netscape.com/docs/manuals/htmlguid/tags10.htm#1615505.
The control might also be called to create a PKCS #10 blob to be used with any CA, such as Thawte or VeriSign.
NOTE
If you used Certificate Server 1 in the Windows NT 4 Option Pack, you might already be familiar with the certificate enrollment control. It had a different name in the Windows NT 4 Option Pack, however: XEnroll.
Using the certificate enrollment control, you can create your own custom certificate generation tools. The control takes user input, creates private and public key pairs, generates a PKCS #10 certificate request, and accepts PKCS #7 responses from the CA. It also manages the storage of the keys and certificates.
The following pseudocode creates a simple, custom application to request a client authentication certificate and store the result:
// Define objects. oEnroll = CreateObject("CEnroll.CEnroll.1"); oRequest = New CCertRequest // Build up cert request details. // The OID represents a client authentication certificate. strUsage = "1.3.6.1.5.5.7.3.2"; strDN = "CN=Cheryl, OU=Development, O=ExAir," & _ " L=Redmond, S=WA, C=US"; // Build the cert request. strReq = oEnroll.createPKCS10(strDN, strUsage); fFlags = PKCS10 in BASE64 format; strAttributes = ""; strConfig = "EXAIR\UserCA" oRequest.Submit(fFlags, strReq, strAttributes, strConfig); // Get the cert. strCert = oRequest.GetCertificate(BASE64); oEnroll.AcceptPKCS7(strCert); |
Others ways to enroll for a certificate
The certificate enrollment control isn't the only way to enroll for a certificate. For example, IIS 5 includes a Web Server Certificate wizard that guides you through the process of building up a certificate request specifically for a Web server. The certificate can be sent directly to Certificate Services or can be saved as a PKCS #10 file to send to another CA.
You can also enroll for a client certificate using the Certificates tool:
- In the Certificates tool, right-click Personal and choose Request New Certificate from the All Tasks option.
- Follow the wizard.
This feature works only with online Certificate Services running as enterprise CAs.
The CertUtil tool
We'll close by looking at a useful tool for managing certificates called Certutil.exe. The tool can perform many tasks, including
- Displaying Certificate Services configuration information
- Displaying a file containing a request, a certificate, a PKCS #7 blob, or a CRL
- Decoding hexadecimal or base64 files
- Encoding files to base64
- Retrieving the CA signing certificate
- Revoking certificates
- Publishing or retrieving a CRL
- Verifying one or all levels of a certification path
- Verifying a public/private key set
- Determining whether a CA service is running
- Shutting down the server
- Converting a Certificate Services 1 database to a Certificate Services 2 database
- Backing up and restoring the CA keys and database
- Displaying certificates in a certificate store
- Displaying error message text for a specified error code
You should become familiar with this tool if you intend to work extensively with certificates and Certificate Services in Windows 2000.
Some of the most useful features of the tool include the ability to view the contents of a PKCS #10 certificate request file, a certificate, or a certificate chain in a PKCS #7 package or a CRL in PKCS #7 format. Figures 15-21 through 15-24 show some sample output.
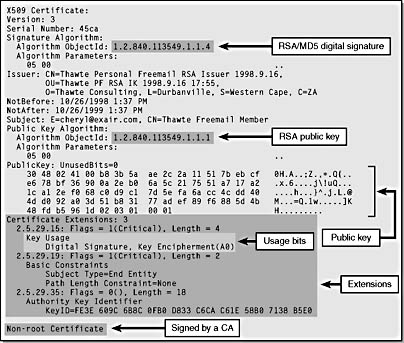
Figure 15-21. A client certificate from Thawte in X.509 format.
Other resources for Certificate Services
The Web pages listed in Table 15-5 have useful documentation on setting up and maintaining a PKI solution based on Certificate Services in Windows 2000. All the locations start with http://www.microsoft.com/windows2000/library/planning/security/.
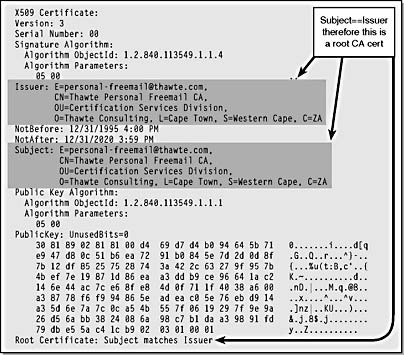
Figure 15-22. A Thawte root CA certificate in X.509 format.
Table 15-5. Useful certificate-related documentation at http://www.microsoft.com.
| Web Page Title | File |
|---|---|
| Step-by-Step Guide to Setting up a Certificate Authority | /casetupsteps.asp |
| Step-by-Step Guide to Certificate Services Web Pages | /cawebsteps.asp |
| Step-by-Step Guide to Administering Certificate Services | /adminca.asp |
| Step-by-Step Guide to Advanced Certificate Management | /advcertsteps.asp |
| Step-by-Step Guide to End User Certificate Management | /eucertsteps.asp |
| Step-by-Step Guide to Mapping Certificates to User Accounts | /mappingcerts.asp |
| Step-by-Step Guide to Public Key-Based Client Authentication in Internet Explorer | /pubkeyie.asp |
| Step-by-Step Guide to Public Key Features of Outlook 2000 | /pubkeyol2000.asp |
| Step-by-Step Guide to Public Key Features in Outlook Express 5 and above | /pubkeyox.asp |
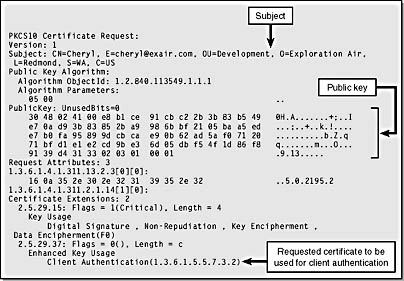
Figure 15-23. A client authentication certificate request in PKCS #10 format.
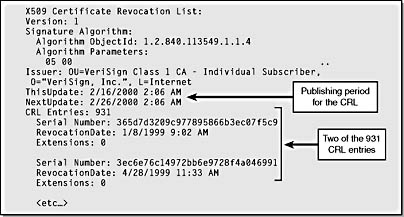
Figure 15-24. A CRL issued by VeriSign.
Certificates in Microsoft Office 2000
Office 2000 does not require Windows 2000, but let's look at how Office 2000 uses certificates. Office 2000 uses certificates for securing e-mail in Outlook 2000 and for Visual Basic for Applications (VBA) code signing.
Securing e-mail in Outlook 2000
Outlook 2000 supports sending signed and encrypted e-mail using the secure e-mail standard S/MIME. You can access the S/MIME functionality as follows:
- Choose Options from the Tools menu.
- Click on the Security tab.
- Click the Setup Secure E-Mail button. If the button is named Change Settings, you've already set up S/MIME.
You can now determine which certificate to use for signing and encrypting.
To send signed e-mail, you can choose to have all e-mail be signed (by selecting the Add Digital Signature To Outgoing Messages option on the Security tab) or you can choose to sign specific e-mail as you create the message (by clicking on the Options button on the message toolbar and then selecting the Add Digital Signature To Outgoing Message check box). The same applies to encrypted e-mail. However, to send encrypted e-mail, you must have the recipient's certificate added to your Contacts list.
For details about S/MIME support in Outlook 2000, see Knowledge Base article Q195477 at http://support.microsoft.com/support/kb/articles/Q195/4/77.ASP. For more information about S/MIME, go to http://www.ietf.org/html.charters/smime-charter.html.
VBA code signing
Office 2000 introduces digital signatures to help users distinguish legitimate script code from potentially harmful code. When you open an Office 2000 document and see a macro security warning with digital signature information, you can feel confident that the principal signing the macros also created them. You can choose to trust all macros signed by this person by selecting the Trust All Macros From This Source check box.
Office 2000 also includes a tool named SelfCert.exe that enables you to create a temporary certificate and key for signing VBA projects. The certificate is self-signed and has no inherent trust, and its key usage is for code signing only—you cannot use it for other purposes, such as secure e-mail or SSL/TLS.
NOTE
The certificate and private key produced by SelfCert.exe isn't stored as a file; it's stored in the current user's MY store.
See Knowledge Base article Q206637 at http://support.microsoft.com/support/kb/articles/Q206/6/37.ASP for more information about signing macros and using digital certificates in Office 2000.
EAN: N/A
Pages: 138