Section 9.2. The Spec Sheet
The first thing you should do is get a hold of the specification sheet from whoever will be printing the final job. This specification sheet will list the print parameters for the particular file you be working on.
Figure 9-2. Spec sheet from a carton printer

A spec sheet typically looks like Figure 9-2.
Figure 9-2 is a typical spec sheet from a printer that prints on various kinds packaging material. Here's the information we should be concerned with:
-
The printer has indicated a curve; we will investigate this later on.
-
They can print a variety of colors; this would mean that a number of special colors could be used. It is very typical to use special colors in packaging work because companies that sell goods on store shelves want to attract your attention to their boxes and bags!
-
The print process is flexo, or flexographic , which is a type of press that can print on various packaging material, folding cartons, plastics, and bags.
-
Substrates indicate the material to print on, such as a bread bag. You probably won't care what material the image is going on, but you will want to know what the specifications are for the image so that it prints properly.
If we skip through the rest of the specifications in this example, you will want to be aware of the following things:
-
What the press does to the image; this is very important.
-
The dot gain curve. We'll cover the dot gain curve in a minute.
-
The minimum dot required for an image. If you have anything less than the minimum dot anywhere in the image, the press will drop any dots less than the minimum and they will not print. If you have a soft gradation in a shadow or vignette, you may be disappointed to find out that it breaks off where the minimum dot drops off.
-
You may or may not be concerned with the trap values. If you are doing the trapping in Photoshop then yes, you would be concerned with trapping. Trapping is typically done with specialized software designed for trapping or packaging. Trapping is covered in Chapter 5.
-
The line screen required for the image. No point working on a very large file at a high resolution if you're only going to be using the image for the one job. You'll save processing time and move around a little faster in Photoshop if your file is smaller as well.
-
Bleeds will be a concern for you. Bleed is the amount of extra image you will need to have around the perimeter of the image that extends out beyond the "live" area of an image, or what will be seen when the final job is done. Extra image or bleed allows for any shift when the printed job is cut or die-cut out of a printed sheet. For example, when you see an ad in a magazine, it probably had 1/8 inch or so of bleed around it, and the final magazine you see was trimmed back or cut to the final magazine page size . If no bleed is added, the page is trimmed to the correct size by a cutter, and the cutter happens to trim the sheet or paper just outside your image area, you'll have a line where the printed material or paper pokes out along the edge where the cut was off or where the image was offset when it was printed.
The rest of the specifications have more to do with the film output or running the file directly to the printing plate and are directed to the people who will be outputting the final files.
9.2.1. Understanding the Dot Gain Curve
One very important specification to look at and obtain is the dot gain curve that will occur during the printing process; this is crucial to producing a good-looking final image. The look of the image can change drastically when printed because of the way the press prints; this is reflected in the dot gain curve, like the one in Figure 9-3, which is a typical example of dot gain curve guide that you might receive from a carton printer.
Figure 9-3. Dot gain curve from a carton printer
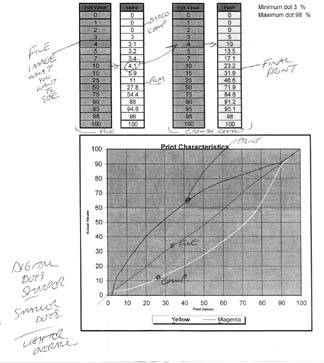
Some explanation of the dot gain curve is necessary. You'll see that there are four columns with numbers in them. Let's start with the column that is second from the right. This column represents the dot percentage values that exist in the image file that is ready to be printed.
The column on the far right represents the dot percentage values after your image has been printed on the press. As you can see, if your original image had a 1 or 2% dot in it, these dot values would drop off and not print on the press.
Notice how a 10% dot gains to over a 23% dot! Unlike newsprint or newspaper images, which of course gain too, the gains that are typical on carton and packaging printing are not all that consistent, and the gains are quite heavy. Some are even worse than the example in Figure 9-3! This is one of the better ones!
So you can see that you have a quite a challenge in front of you to produce a good-looking image that will print well on press.
There are a few ways to help you see what you'll get on press prior to going to press so that you can adjust your images accordingly .
One method is to use a proofing system to simulate press conditions. The first column on the far left represents the original image file values. The second column from the left is the same file after having been scooped . What I mean by scooped is that the image is basically taken back with a curve in the opposite direction in which it gains. The image is taken back in this manner so that when the press gains, (the far-right column) the image is basically brought back to the way it was originally, which is desirable.
This is typical of a workflow for a flexo press and a packaging proofing workflow. Images are prepared in such a manner that they are flexo press ready, as will be discussed shortly. The images are then placed in a Quark or Illustrator file, and then the entire file is scooped by special packaging software in the hope that the file will gain back that information and produce a proof or printed piece that basically looks like your original file. This is the hope.
Note: Unfortunately, many of the presses that typically print packaging work are not state-of-the-art machines. Much carton work is now printed overseas, and many of the presses are old and not all that consistent. It isn't always the case, but something to keep in mind.
At the bottom of Figure 9-3 is a visual curve representation of the gain curve. The straight line in the middle of the curve running from the bottom left to the top right of the curve represents your original image, or the image you have corrected in Photoshop. The curve to the bottom of the straight line is the scooping of the image that would occur after the file has been assembled as a final file, and the line above the image line is the gain incurred during the printing process.
A little later in this chapter, I'll explain how to make a curve in Photoshop with the Curve adjustment tool that will mimic the press gain you can expect from the printing press. You won't ever apply the curve to an image, but you can use it as you go along to see how your corrections are reflected in the final image.
Figure 9-4. A CMYK image ready for corrections for packaging
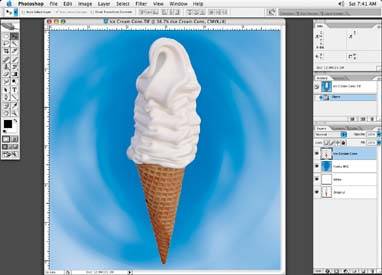
Back to the image at hand, shown in Figure 9-4, which shows the image to be used on a package in Photoshopwe have a print specification sheet from our printer and the dot gain curve.
EAN: N/A
Pages: 83