Using Quick Mask to Adjust a Selection
Quick Mask mode enables you to use a selection on the current layer as a temporary mask. Once you've masked the area, you can make the needed changes to the unmasked area and then turn off Quick Mask mode to remove the mask.
-
Make a selection on the current layer using the selection method of your choice. The selection marquee will appear.
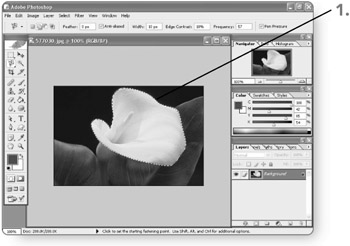
Tip See Chapter 5, "Selecting Image Content," to refresh your memory about the various selection methods . One trick is to select the area you don't want to mask, click on Select, and then click on Inverse to select the image areas that previously were not selected. (The figure here shows an inverted selection.)
-
Click on the Quick Mask Mode button on the toolbox. The Quick Mask mode will become active, and the mask color will appear over the masked area.
-
Make the desired change to the masked area, using a toolbox tool or filter. The mask boundaries will change accordingly . This example shows a mask being adjusted using a brush.
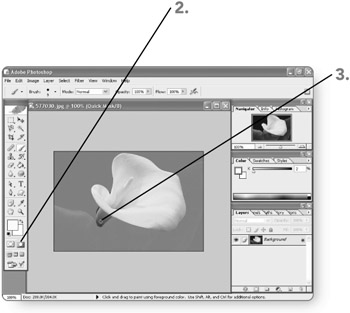
Note Paint or draw on the nonmasked area with a color other than white to create a semitransparent masked area. Use white to exclude an area from the mask and black to add area to the mask (the hidden area).
-
Click on the Standard Mode button on the toolbox. Photoshop will leave Quick Mask mode and return to the altered selection. You can then apply the needed changes to the selected areas, as described later in the section "Putting a Mask to Work."

EAN: 2147483647
Pages: 179