Saving a File
If you've just created an image file or have just imported it into Photoshop from a scanner or digital camera, you need to save the image file to name it and store it to the location of your choice on your system's hard disk. The following steps lead you through the process for saving the current file:
-
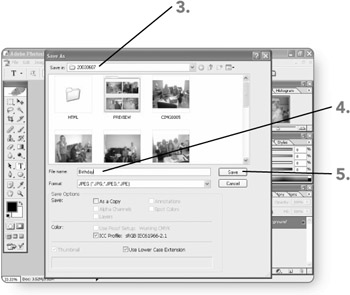
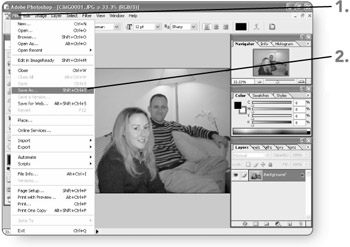
Click on File . The File menu will appear.
-
Click on Save As . The Save As dialog box will open .

-
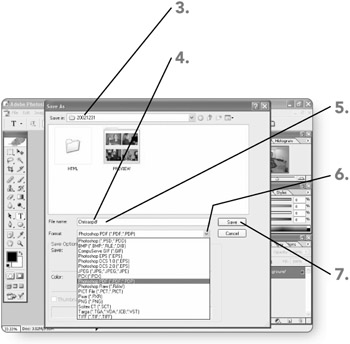
Navigate to the file location where you want to save the file. The files in that folder will be displayed in the file list. (See "Opening an Existing File" earlier in this chapter for help with navigating folders.)
-
Double - click on the File name text box entry and then type a new name for the file.
-
Click on Save . The Save As dialog box will close. Photoshop saves the file and leaves it open onscreen for further work.
| Note | If you make changes to the file, be sure to click on File and then click on Save to save your changes. The Save As dialog box will not appear for subsequent saves unless you click Save As rather than Save on the File menu. |
Saving to Another Format
By default, Photoshop saves new images in its Photoshop (.PSD or .PDD) format. However, you may need to save an image in another format. For example, you might want to save the file in the Windows Bitmap (.BMP) or Paint (.PCX) format to use the file in a word processor document. Photoshop enables you to save images in more than a dozen formats.
Using Save As
Use the following process to save the current file to one of the available graphics formats. (The Adobe .PDF format will be covered in the next section.)
-
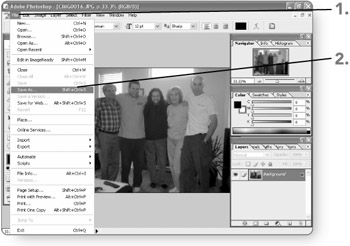
Click on File . The File menu will appear.
-
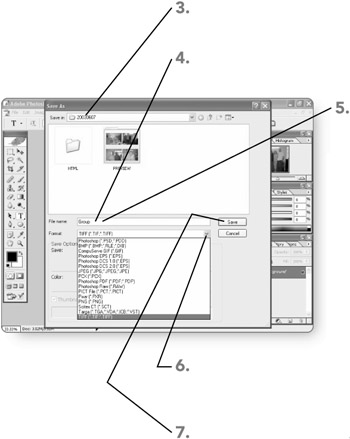
Click on Save As . The Save As dialog box will open.
-
Navigate to the location where you want to save the file. The files in that folder will be displayed in the file list.
-
Double-click on the File name text box entry . The name will be selected.
-
Type an alternate name , if needed, for the converted file. The new name will be displayed.
Tip To save a copy of the current file (in the same file format) rather than the original, click on the As a Copy check box to place a check in it. Then skip to step 7.
-
Click on the down arrow for the Format list, then click on the format to use for the converted file in the list. The list will close, and the format will be selected.
-
Click on Save . The Save As dialog box will close.
-
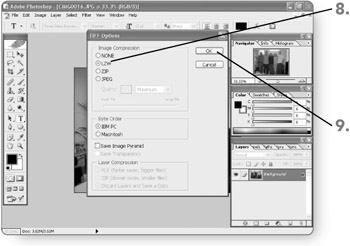
Set needed options if an Options dialog box appears. An Options dialog box appears only for certain types of conversions, and the options vary depending on the conversion format.
-
Click on OK . Photoshop converts and saves the file, closing the original file. The converted file remains open in Photoshop for further work.
Saving a Password-Protected .PDF File
PDF ( Portable Document Format ) is one of the most convenient ways to send files to other people electronically . You can password protect your PDF file to prevent others from making changes to the file or from doing certain other things with the file.
-
Click on File . The File menu will appear.
-
Click on Save As . The Save As dialog box will open.
-
Navigate to the location where you want to save the file. The files in that folder will be displayed in the file list.
-
Double - click on the File name text box entry . The name will be selected.
-
Type an alternate name , if needed, for the converted file. The new name will be displayed.
-
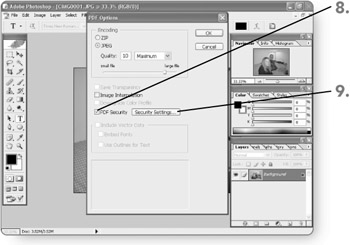
Click on the down arrow for the Format list and then click on Photoshop PDF. The list will close, and that format will be specified for the converted file.
-
Click on Save . The Save As dialog box will close, and the PDF Options dialog box will open.
-
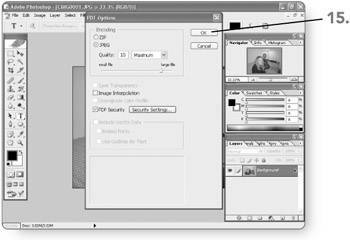
Click on the PDF Security check box. It will be checked, and the Security Settings button will become active.
-
Click on Security Settings . The PDF Security dialog box will open.
-
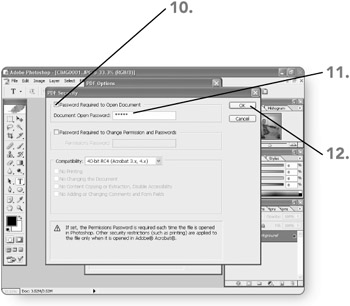
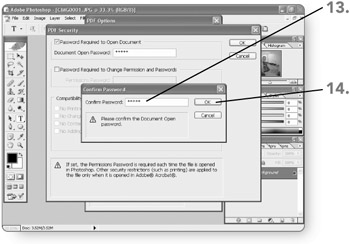
Click on the Password Required to Open Document check box. It will be checked, and the Document Open Password text box will become active.
-
Type a password in the Document Open Password text box. An asterisk will appear for each character you type.
-
Click on OK . The Confirm Password dialog box will open.
-
Type the password again in the Confirm Password text box. An asterisk will appear for each character you type.
-
Click on OK . The Confirm Password and PDF Security dialog boxes will close.
Tip At this point, you could click on the Security Settings button in the PDF Options dialog box to reopen the PDF Security dialog box and specify additional security settings.
-
Click on OK . Photoshop converts and saves the file, closing the original file. The converted file remains open in Photoshop for further work. In the future, users will be prompted to enter the password you specified to open the converted .PDF file in Photoshop CS.
EAN: 2147483647
Pages: 179
- ERP Systems Impact on Organizations
- ERP System Acquisition: A Process Model and Results From an Austrian Survey
- The Second Wave ERP Market: An Australian Viewpoint
- Intrinsic and Contextual Data Quality: The Effect of Media and Personal Involvement
- A Hybrid Clustering Technique to Improve Patient Data Quality