Navigation through Server-Side Redirection
| Another way to display a different page from the one the user requested is through server-side redirection. In fact, this is not truly navigation, because the user does not see a different URL in the browser and it appears to them that the page they requested is loaded. Server-side, ASP.NET loads a different page and sends the output back to the client as though it were coming from the page they requested. You can perform two types of server-side redirection: transfer to another page (where execution ends at the end of that page), or execution of another page (where control returns to the original page when the second page completes its execution). ASP.NET provides two methods to support this feature. The transfer method of the HttpServerUtility class performs transfer to another page, and the Execute method causes execution of the second page. The HttpServerUtility.Transfer MethodThe transfer method has three overloads. The first simply takes the URL of the page to execute. Server.Transfer("url")By default, the contents of the Form and QueryString collections are available in the target page of the transfer. However, you can clear these collections first by using the second overload of the transfer method. It takes an additional Boolean parameter that determines if the Request collections are preserved (set it to False to clear the collections). Server.Transfer("url", [true | false])Finally, you can also execute a class that implements the IHttpHandler interface, which is useful if you write your own HTTP handler. This overload also takes a second parameter that determines if the Request collections are preserved. Server.Transfer(handler-class, [true | false])
Details of the HttpServerUtility.Transfer method are at http://msdn2.microsoft.com/en-us/library/y0w8173d. The HttpServerUtility.Execute MethodThe Execute method has five overloads. The simplest of these takes just the URL of the page to execute. Server.Execute("url")Like the transfer method, an overload allows you to specify whether the Request collections are preserved. Server.Execute("url", [true | false])The Execute method has another useful feature. Unlike the TRansfer method, which streams the output of the target page or handler into the response and sends it to the client, you can capture the output of the target when using the Execute method as a TextWriter instance. Server.Execute("url", TextWriter)In addition, an overload allows you to preserve or clear the Request collections. Server.Execute("url", TextWriter, [true | false])Finally, you can specify the target as a class that implements the IHttpHandler interface and preserve or clear the Request collections. Server.Execute(handler-class, TextWriter, [true | false])
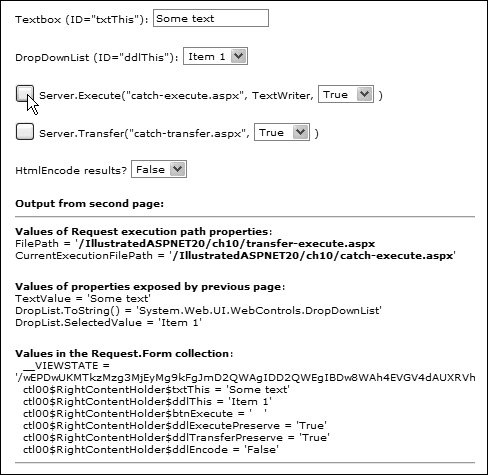
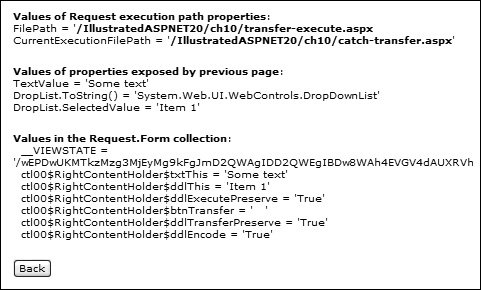
Details of the HttpServerUtility.Execute method are at http://msdn2.microsoft.com/en-us/library/yw97w238. Using the Transfer and Execute MethodsThis example shows how you can use the TRansfer and Execute methods. The initial page contains a TextBox and a DropDownList with values to pass to the target page, plus two buttons that initiate either the transfer or the Execute method. For both of these, you can specify whether the contents of the Request collections are preserved using the drop-down lists. Below the buttons is another drop-down list that takes effect only for the Execute method and allows you to specify if the results should be HTML-encoded (so that you can see the target page content as HTML) or just rendered in the usual way. Executing the Target PageThe Execute method calls a target page named catch-execute.aspx, which first displays the values of two useful properties of the Requestthe FilePath and the CurrentExecutionFilePath. These allow you to determine in code if the page was loaded directly by the browser (in which case they are the same), or whether it is running in response to an Execute or transfer call (whereupon they are different). Next are the values of the properties exposed by the initial (original) page. These properties are the Text value of the TextBox and a reference to the DropDownList control. The page displays the DropDownList control type and then accesses its SelectedValue through the control reference. Finally, the page displays the contents of the Request.Form collection. Figure 10.4 shows the results of the Execute method for this example. The output generated by the target page displays between the two horizontal rules and is rendered by the browser because it is not HTML-encoded. Figure 10.4. Using the HttpServerUtility.Execute method to execute another page If you turn on the HTML-encode option, the results show the HTML generated by the target page. This is because the Execute method sends the output to a TextWriter instead of directly to the browser, and code can therefore extract the content and apply the Server.HtmlEncode method to it for display. Figure 10.5 shows the result of selecting the HTML-encode option. Figure 10.5. Displaying the HTML content of the target page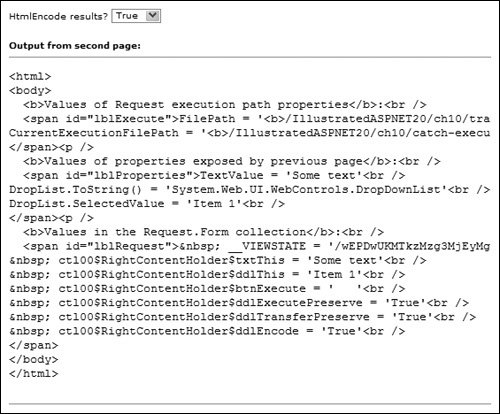 Transferring to the Target PageThe second button in the example initiates the transfer method, causing the server to switch execution to the page named catch-transfer.aspx. This page opens in the browser and displays the same contents as the page you saw for the Execute method. The main difference is that it contains a button that allows you to return to the initial page (see Figure 10.6). Figure 10.6. Displaying the HTML-encoded content of the target page Exploring the Example CodeThe code used in this example is relatively simple, yet it demonstrates one of the main topics that arises when transferring or executing another page. In fact, you will meet the same issue in the next section on cross-page posting as well. When you transfer execution to another page, the target page cannot directly reference the controls on the original page. However, it can reference the ASP.NET Context for the page, and so has access to the values in the Context collections (such as Request.Form,Request.QueryString, Request.Cookies,Request.ServerVariables, and Response.Cookies). However, if the initial form defines a class name, using the ClassName attribute of the Page directive, the target page can create an instance of that page from the Context. The page transfer-execute.aspx you saw in the previous example declares a ClassName of ExecutePage. Notice also that, to use a TextWriter with the Execute method within your code, you must import the System.IO namespace: <%@Page Language="C#" ClassName="ExecutePage" %> <%@Import Namespace="System.IO" %> The target page can now create an instance of the initial page (the one that caused the transfer or Execute method to run), but it still cannot directly access the controls on the page. The usual solution is to expose whatever you need to access in the target page as public properties of the initial page. The example you have just seen exposes the Text property of the TextBox on the initial page as a read-only String property, and a reference to the drop-down list control as a read-only DropDownList instance (see Listing 10.14). You can expose read/write properties if you want to be able to update the values in the target page. Listing 10.14. Exposing Controls and Values as Public Properties
The remaining code in the initial page consists of two routines that handle the Click events of the two buttons in the page. The DoExecute handler creates a new StringWriter and passes it to the Execute method, along with true or False as the third parameterdepending on the setting of the drop-down list box for this operation. The code then checks to see if HTML-encoding is required and places the results in a Label control on the initial page. The DoTransfer handler is much simpler. It just executes the transfer method, passing in true or False as the third parameterdepending on the setting of the drop-down list box for this operation (see Listing 10.15). Listing 10.15. Handling the Button Clicks in the Initial Page
The Code in the Target PageIn a page that is executed in response to the transfer or Execute method, or through cross-page posting (as you will see in the next section), you can only access the controls in the initial page by exposing them as public properties or by using the FindControl method in the target page. The better solution is the use of public properties. The two example target pages, catch-execute.aspx and catchexecute.aspx, include a @Reference directive that links them to the initial page: <%@Reference Page=" transfer-execute.aspx" %> The remaining code consists of a Page_Load event handler, shown in Listing 10.16 This code creates an instance of the initial page as the class type specified in that page's @Page directive, and then accesses the public properties of that class. The reference to the DropDownList control in the initial page allows the SelectedIndex value to be obtained. Then the code iterates through the Request.Form collection to display the contents and queries the Request.FilePath and Request.CurrentExecutionFilePath properties to get the execution path values. Listing 10.16. Displaying the Property Values in the Target Page
The TRansfer and Execute methods therefore allow you to separate features in your Web site to allow common functionality to be available on demand to any pages that require it. Remember that, as well as an ASPX page, you can transfer to or execute any class that implements the IHttpHandler interface. |
EAN: 2147483647
Pages: 147