Creating Graphics and Images with the System.Drawing Classes
| The ability to create graphics and images in code has long been an area for more experienced developers because it involves working with the Windows GDI methods and using handles to manage resources. However, the .NET Framework contains a large selection of classes that allow you to create and process images using managed code. The example for this chapter contains the same basic code that you saw in the previous chapter for creating a pie chart dynamically as a GIF image. If you select the Graphics image option in the example and write the output to a disk file, you can click the resulting link and see the newly a created chart (see Figure 15.9). Figure 15.9. Creating a chart dynamically using the .NET Framework classes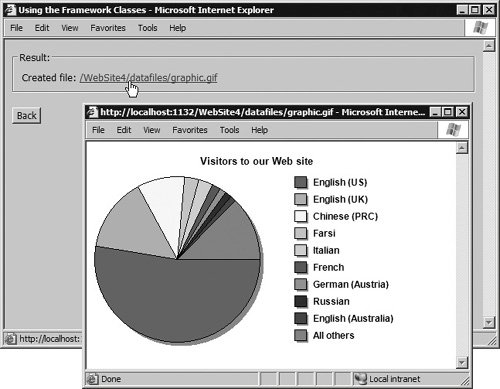 The file PieChart.cs in the App_Code folder of the example creates this chart and returns the generated chart as a Bitmap object instance. As you can see in Listing 15.21, code in the GetImage method of the Ch15DataProcess.cs file then creates a new MemoryStream, saves the Bitmap to this in GIF image format, and reads the contents of the MemoryStream into an array of bytes. Listing 15.21. Retrieving the Bitmap as a GIF Image into an Array of Bytes
Creating Images with the System.Drawing ClassesWith a few exceptions, all of the commonly used classes concerned with image generation, manipulation, and processing are in the System.Drawing and System.Imaging namespaces. Other namespaces are System.Drawing.Design, which contains the classes to build custom toolbox items and editors; System.Drawing.Drawing2D, which contains the gradient brushes and specialist transformation classes; System.Drawing.Printing, which contains classes concerned with printing; and System.Drawing.Text, which contains classes for advanced rendering and access to lists of installed fonts. We do not have room to list the entire code for the PieChart class used in the example application, but the following shows the general techniques you can use to create simple graphics such as that shown in Figure 15.9. You can open the file PieChart.cs to see the way that it builds the chart; all of the code is commented to help you follow it more easily. It creates a DataSet containing the values to chart, an array of colors for the pie segments, and then iterates through the rows in the DataSet table drawing the appropriate output for each one onto the Bitmap. The basic technique for using the System.Drawing classes, as shown in the code extract in Listing 15.22, is to generate a new Bitmap or start with an existing Bitmap, create a Graphics object instance from it to act as the drawing agent, and then create brushes and pens to draw onto the Bitmap. Brushes come in different typesbut for solid lines and area fills, the SolidBrush class is the obvious choice. To draw a shape such as a rectangle or ellipse, you can specify the bounding rectangle first and then draw the shape within this rectangle. Listing 15.23 shows a section of the code that draws the individual pie slices onto the Bitmap for each value in the source data. It calculates the size of the slice in degrees from the value in this row, sets the color of the brush, and draws a pie segment; then it outlines it using a black pen to create a crisper appearance at the edges. The code then updates the current end point within the pie (in degrees) and is ready to draw the next segment. Listing 15.22. An Extract of Code from the Example Page Creating a Bitmap and Drawing on It
Listing 15.23. Drawing Pie Chart Segments into a Bitmap
To write the text heading and caption, the code uses a SolidBrush and calls the DrawString method of the Graphics instance. A RectangleF structure (a rectangle that can have floating point values for its vertices) defines the area where the text will appear, and the code generates Font and StringFormat instances that specify the appearance and alignment of the text within the bounding rectangle. Listing 15.24. Drawing Text onto a Bitmapa
The example only shows a few of the basic techniques for using the System.Drawing classes. However, once you start to use them you will find that they are reasonably intuitive and easy to work with. In fact, it is surprising how you can quickly build quite complex images or draw on existing images. You may find these classes useful if, for example, you display pictures of products for sale on your site. You can dynamically draw "Sold Out" or "Special Offer" slogans directly onto the image at runtime. |
EAN: 2147483647
Pages: 147